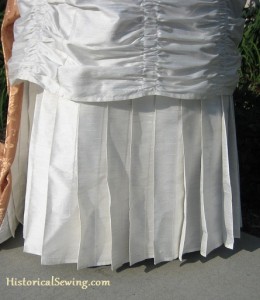
Have you noticed all the pleating in historical clothing?
You can find various pleats on bodices, sleeves, jackets, dresses, skirts, waistbands, undergarments, petticoats, coats, cloaks, trims and so many other articles. Taking the time to put a pleated element into your 19th Century costume can take it from good to jazzy!
Pleats are used:
1) to pull the fabric into a smaller area to fit another piece, such as the top of a skirt to a waistband or a sleeve into an armhole.
2) Pleats are sometimes used instead of gathers for a flatter, smoother look (and are much more period appropriate on dresses. Keep the gathering for your petticoats.)
3) pressed pleats add an element of depth to your garment.
When researching historical clothing you may have come across the word “plait.” This refers to what we call a pleat. (A plait can also be used for a hair braid, but let’s just stick to clothing for now.)
Pleats can be left loose or stitched down. They can be trim or a design element in the pattern. They can be flat or 3-D. Opportunities abound for this fabric manipulation!
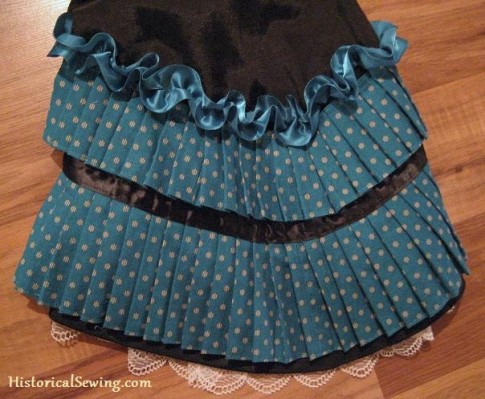
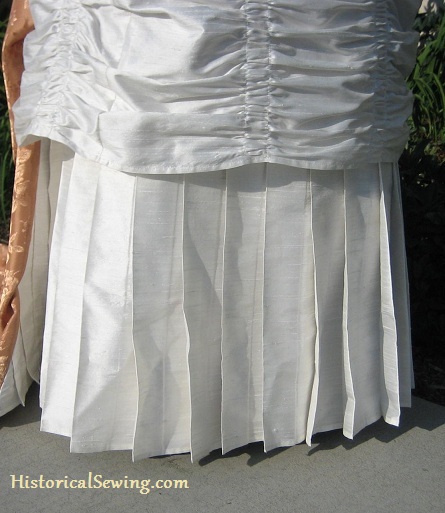
Period costumes use a variety of pleating techniques. Four of the most frequently used are: cartridge pleats, knife pleats, box pleats and inverted box pleats. Other types include accordion pleats, sunburst (radiating), and fork pleats.
Keep the below tips in mind the next time you want to incorporate pleating into your costume. I’ve used them in a variety of projects.
- When making pleats (except for cartridge pleats), pressing is key. And a modern steam iron makes the work easier. If you don’t press, the pleated area will hang soft like a gathered ruffle. Even when making knife pleats in a skirt waistband – press a couple inches down from the waist seam to set those lovely folds.
- Here’s how to calculate the amount of length needed for pleats. (This is good for knife, box and inverted box pleats.) You’ll need to know the length of what you are attaching the pleats to, like a hem.
- For single pleats, multiply your finished length by 3.
- For double stacked pleats, multiply by 5.
- For triple stacked pleats, multiply by 7.
- Hem your trim first. When making yards of pleated trim, hem or edge finish the fabric first before creating the pleated section. You can make a tiny double hem – a ¼” wide one is seen all over the Victorian era – or simply pink the edge (again, used often in Victorian trims). You can also bind the hem with self-fabric bias or a contrast fabric.
- Finish the top edge of the trim piece before pleating. Run it through a serger (I usually do this) or pink the edge. You can also narrow hem this edge too depending on how you are mounting it.
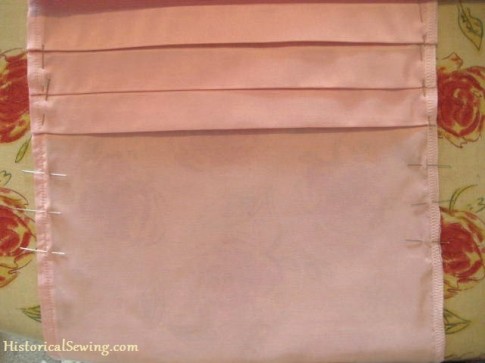
- The Pin Pleating method is super easy. Use a small ruler to measure and place pins equal to your desired pleat width. Fold up your trim and press!
- Try the Divide & Conquer method – or rather divide the length of skirt AND the waistband area you are mounting it to then then match up your marks to create even areas to pleat up. The trick here is to always halve what’s left. This will get you nearly even pleats on either side of a center or side point. Pin the pleats as you pleat the skirt to a waistband. This method works great on sleeves too.
- To start the divide technique, pin at the centers and side seams first giving you 4 quarters. Find the mid-point between each pin on BOTH skirt and waistband. Pin marks together for 8 sections. Now divide each section again same as above, matching half-way marks. Continue doing this until is necessary to start folding the fabric down into knife or box pleats.
- This “free form” pleating gives you flexibility to create the pleats exactly how you want them. Experiment with wide and narrow sections and your overlapping of folds. But pleating by consistent halving will give you evenly divided pleats.
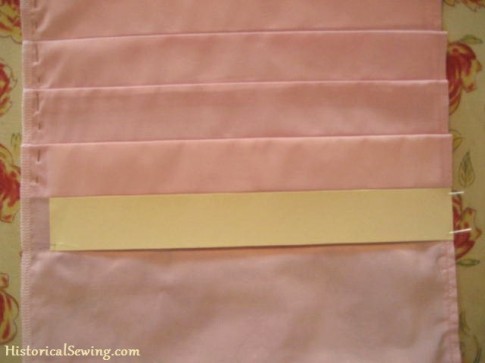
- Use strips cut from manila paper or a file folder the width of your desired pleat to easily make uniform pleats without specifically measuring. Use 2 strips the same width.
- Let your pleats cool completely after pressing them in place. This is key! You want to set those folds in place and moving the warm fabric will soften that pressed edge. Patience is a HUGE virtue in this step.
- And my favorite practice for perfect pleats in my Victorian costumes – using white vinegar to set them. It is AMAZING how a simple household product can create magnificent folds worthy of a trip to Newport in the summer. Read more about using vinegar to set pleats.
Do you have a favorite way to make pleats?

Thank you. I am making 8″ knife pleats to be tucked under the back skirt hem to make it longer. Your ideas are helpful.
That sounds lovely! You are welcome.
Thank you so much for your very thorough explanations and photographs. You make complicated topics easy to understand. I appreciate all the effort that goes into doing that.
So happy to hear this helps with your projects. 🙂 And thank you.
Please what is the meaning of double stacked pleats and triple stacked pleats you mentioned… Thanks for this tutorial,i don’t know what i would have done without it.
Stacked pleats come from making a knife (or box) pleat, then making another knife pleat and laying it right under the first one rather than pleating the fabric and setting it next to the first one. Two knife pleats made and stacked on top of each other are called a double stacked pleat. When you have three it’s triple. Generally, in stacked pleats the folds of the pleats are all the same width.
My Heroine!
Oooh, good article! Inspiring, too, I shall try some of these techniques the next time. Until now, I’ve used a simple fork.
Yup, fork.
It’s easy, really. Takes a bit of patience, and again, needles, but it gives very nice and even pleats, at least the three kinds I’ve tried (and I’ve nooo idea what they translate to in English, so, I’ll have to go with having at least tried knife pleats). Simply take a clean fork, put the fabric between the two outermost teeth, and twist. Depending on how you want the pleat to look, choose a direction. It’s easy once you get the hang of it.
Then again, I have a pretty good eye for measurements so I seldom measure for these things, letting the fork do the job. But it might be best to measure and mark to get the perfect pleat, and then, the above techniques are probably better!
I haven’t used a fabric that was tricky, though, so for, say, very thin and slippery fabrics I’m not at all sure it’s the best technique. The pleats’d probably be more work than they’re worth…
Cheers for a good article!
My mother always set creases and pleats with white vinegar and a brown paper sack. She said the sack was preventing any damage to the fabric. I used her technique to crease my fatigues. Never got dinged for a bad crease.
Would a box pleat for the neck of a Renaissance shirt about 15, 15 1/2 be calculated by ,x’s 3 or x’5 ?
Box pleats are simply knife pleats but every other one going in the opposite direction. If you’ll be single pleating (meaning each box pleat will be one layer and each next to each other, then go with the x3. If you are making a box pleat with an additional single knife pleat sitting under each side of the box pleat – that’s when you’ll need to figure at x5.
I like fork pleating skirt trim.
Thank you – I love pleats but always have issues with them.
I always end up using this little mid-19th century secret as well – pleat your skirt onto your waistband, center front to within 2-3 inches of center back, on both sides. Then, instead of trying to get that last bit pleated perfectly (which often involves un-lady-like language) just cartridge pleat the rest. Apparently very common back then.
Thank you for sharing everything you do.
Jenny
My favourite are finger pleats. They make really nice loose pleats and you can do it on the sofa watching your favourite period film.
great tips. i use quilters tiger tape, or the
pleating tape found in the drapery section of your local fab. store. the tapes are removable, and repositionable, loved it for those little tiny 1/2in knife pleats in a waistband. keep up your great work!!!
chris.
I am making a Renaissance costume for a friend, and read that skirts were pleated onto the waist instead of gathered. So, this comes in very handy. I prefer to pleat, anyway!
Thank so very much for this information. I have always shied away from pleats but now I will give it a try.
Thanks so much for this info on pleats. Just about to start a garment with pleats right around the hem. NOW they’ll look great! 🙂