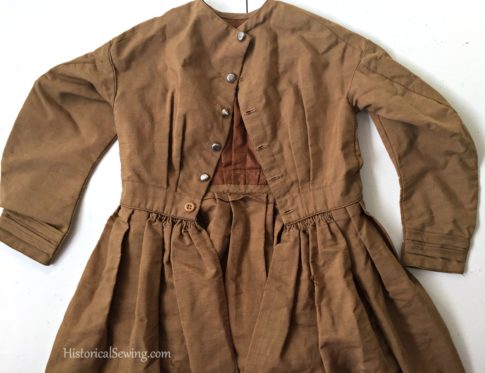
Late in summer 2017 I had a follower (Ruthann Gray) send me a girl’s dress that is in wonderful condition aside from the few random holes in the skirt and spots on the bodice front. I shared it recently in a Facebook Live video (posted below) going over each detail in the construction. For a closer look, here are photos of various parts of the dress.
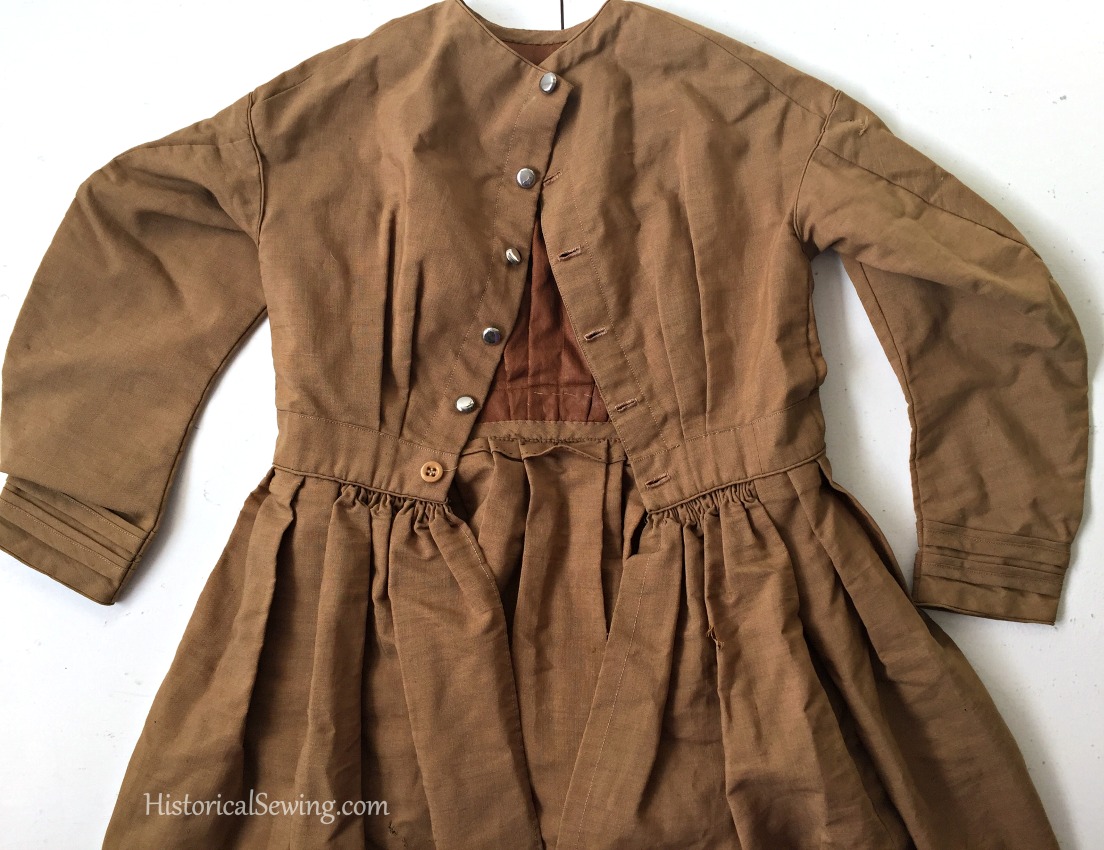
The dress is 35.5″ long from piped neckline to finished hem and was made for a girl about 8 to 12 years old.
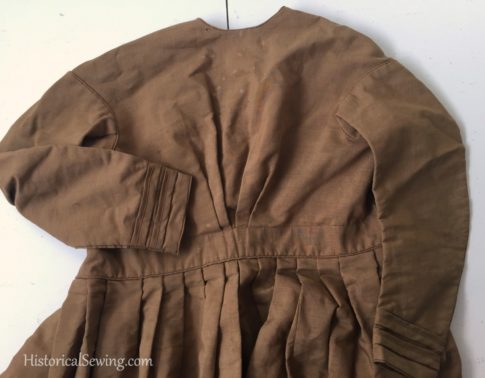
This dress is most likely, in my opinion, 1860s to 1870s due to the dual machine and hand sewing construction as well as the simple style. It is made from a wool or linen functional fabric lined in brown polished cotton on the bodice with another tan polished cotton lining the sleeves.
The bodice has four tucks in front to accommodate a girl’s developing figure as well as the fashion silhouette reflecting the front darts of a woman’s bodice.
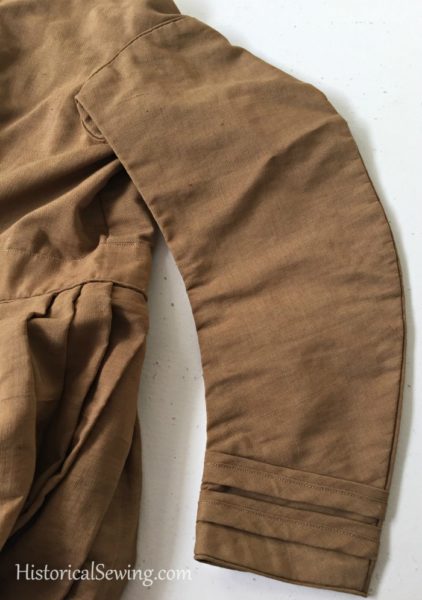
The sleeves are 2-piece in a curved cut so popular in the mid-Victorian decades. The armhole is piped.
Two bias strips of the dress fabric have been pressed to enclose the cut raw edges and machine stitched to the sleeve. This was done first then the inner sleeve seam sewn.
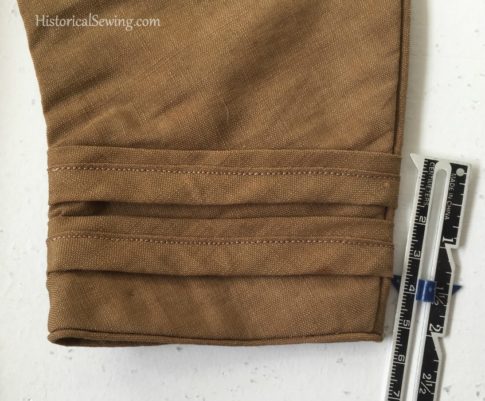
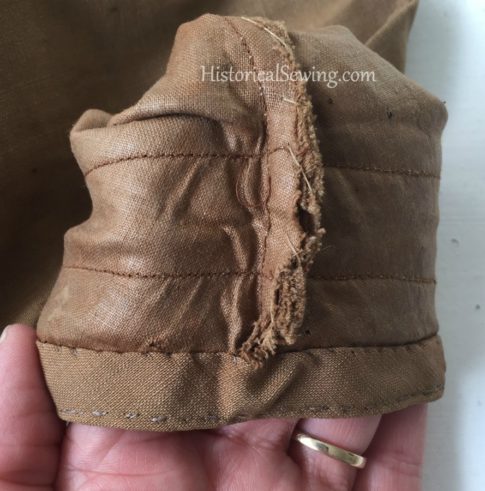
You can see above the inside of the sleeve showing the two rows of machine stitching where the bias strips are mounted on along with the piped bias finishing the wrist edge.
All seam allowances are hand whipped to finish the raw edges.
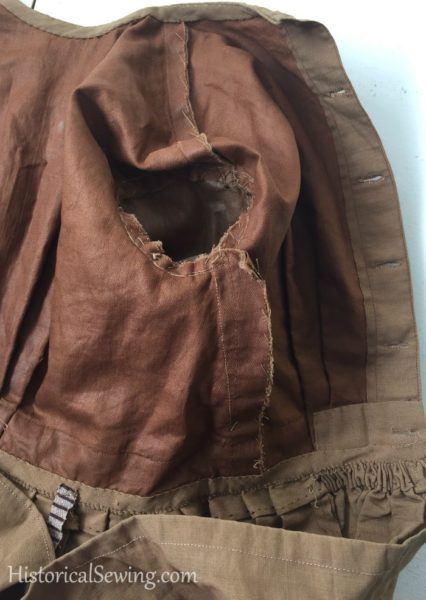
The side seams have a wider allowance that have been machine sewn and then hand whipped over the raw edges.
The sleeves were set in with a hand backstitch seam then allowances whipped together.
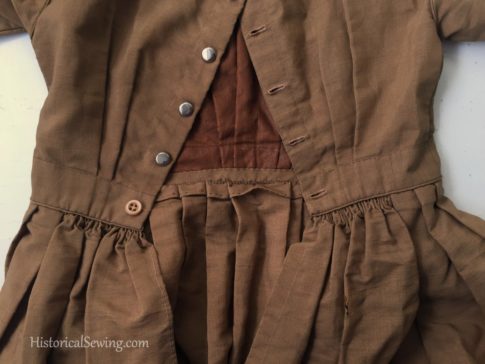
The dress closes by buttons in the center back. The buttons are replacements. Buttonholes are hand sewn.
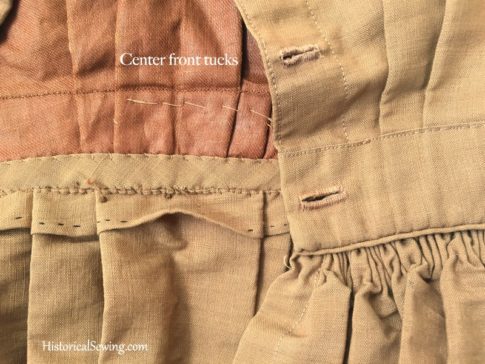
Above shows the inside detail of the front tucks which were hand basted before the bodice was set onto the waistband. The machine stitching you see on the inside above the hand basting is where the waistband was mounted to the bodice.
The skirt top edge was folded under and the raw edge folded under twice and hemmed by hand with a small running stitch. The skirt is knife pleated as was so popularly done in the 1860s with an inverted center front pleat, box pleats at the sides so the knife pleats all face towards the centers.
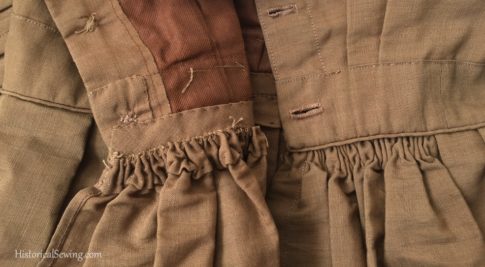
A few inches on each side of the back opening are cartridge pleated or stroked gathers – although most likely cartridge with the sewing stitches broken over time and/or removed.
The skirt was pleated then stitched to the piped waistband and bodice.
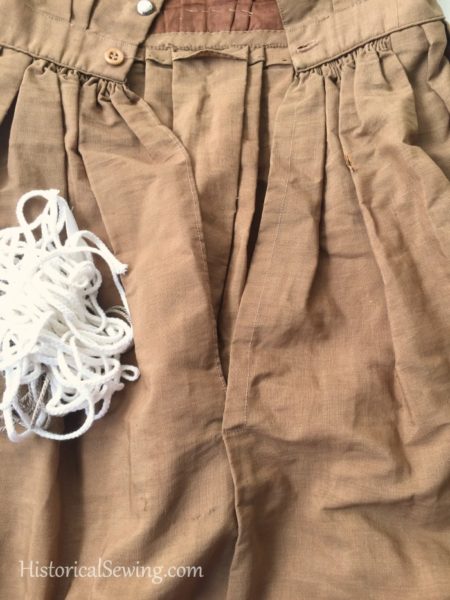
The back skirt opening is a simple placket. The skirt is made in two panel fabric widths; the center back sliced open about 12″. The cut edges were turned to the inside twice and machine hemmed. The bottom edges of this hemmed opening were overlapped and stitched down for reinforcement. This is a period technique you will see often on men’s shirts of the era. (The white cord in the photo is for capturing the right color of the skirt and details.)
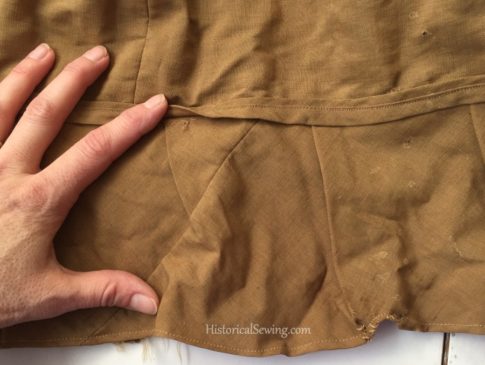
Along the skirt hem is a bias ruffle that’s been pieced a few times to get the length. It is mounted to the skirt with a long hand basting stitch so the bottom of the ruffle about matches to the skirt hem.
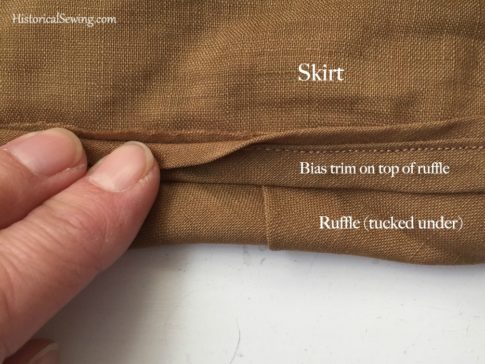
The bias trim is the same as those strips on the sleeve: the edges folded in then machine stitched in place to the skirt over the top ruffle edge.
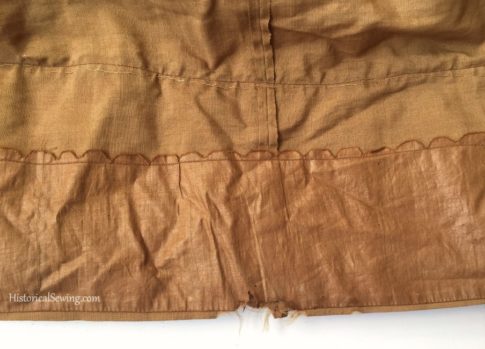
Above you can see the skirt hem facing cut from polished cotton and simply pinked at the top edge. The facing was machined to the skirt edge then turned up and machined down at the top. Above that you can see the hand basting stitches of the ruffle and the machine stitch of the bias trim holding everything to the skirt.
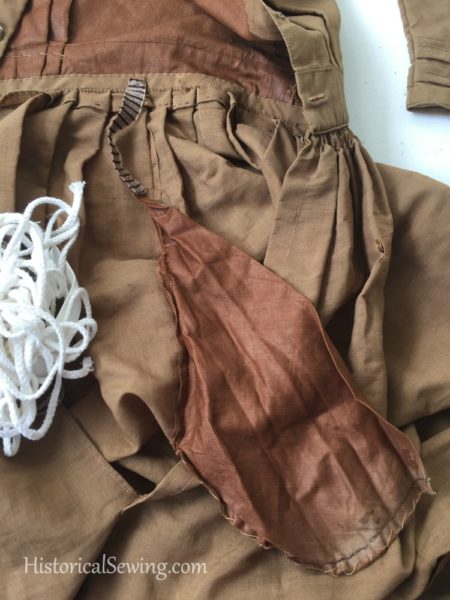
One of the coolest features of the dress is a pocket made from the same bodice brown polished cotton. The pocket pieces are hand backstitched with the edges sewn together in a hand whipstitch. (Find both of these stitches in my online class of Hand Stitches.)
The pocket was inserted into the skirt side seam during construction. The top of the pocket has a narrow cotton stay attached to the waist area of the skirt to help hold the weight of the pocket when filled with items.
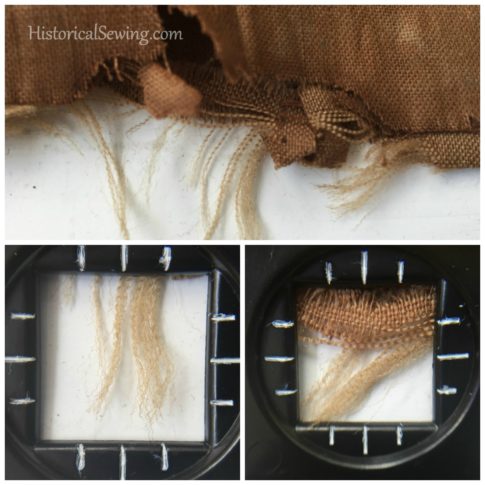
My initial thought was the dress was a rough linen or linen/cotton blend. One of my followers thought it might be wool (alpaca) due to the stiffness and rough feel. It certainly is an everyday dress made for durability.
I took some closeup shots of one of the fraying edges of the ruffle through my pick glass for a better look. It most certainly could be wool. If you have any ideas on this please share your thoughts.
For a video discussion of this dress here’s the FB Live video I shared. Dress discussion begins around the 5’40” mark.

Construction details like this are invaluable. Thanks!
I’m 14. I am planning and researching in preparation to sewing a 1890s dress. What altercations do I need to make to an overall look to make it accurate to someone of my age? Is it simply a slightly higher hemline, less dramatic look, and hair that is not completely up in a bun?
How exciting! Yes, definitely shorter length – mid-calf is good. But include wide tucks in your skirt so you can let it out as you grow taller (if you do). In my research, hair would be half up – the top in a bun at the crown with the rest long and loose. Or you can braid the hair and leave it down. Below are some links for your reference.
This one is a 1898 catalog. I’d recommend flipping through the whole of it as it’s a wonderful resource.
Mid-1890s plate for girls. (Ignore the incorrect 1889 date.)
Although earlier 1880s, here’s a photograph of teen girls. Notice the hair and skirt lengths.
I caught your facebook video on this dress, and I wanted to say thank you for showing us in so much detail. It was really helpful in constructing my own 1870’s children’s dress.
You are quite welcome, Ilse! So glad you found it helpful. It’s neat looking at original construction details.
Hi Jennifer, Will you be posting photos of the dress you were sent that matched this child’s dress? I’d love to see it in more detail. Thanks for all you do!
I hadn’t planned on it. I did post a couple in the comments of the Facebook Live video I did on that one. But I’ll make a note to add it here and on the blog schedule.
We can probably rule out alpaca, for two reasons: the style of the dress is classic American Pioneer, very few of whom ever went to South America (and alpaca was not a common import in the 19th century); and, alpaca is actually a very soft, even silky fiber, often spun and woven very fine because it is exceptionally warm.
Linsey-woolsey is the most likely–remember, Anne Shirley was dressed in it as late as the 1890’s.
Thanks for the input!
I agree with the Linsey-woolsey comment. It’s too rough and basic for alpaca or maybe even for marino, although linen is a possibility. I have a linen suit that looks very similar. One thing you could try is to clip just a few threads from the frayed section and burn them. We do this a lot with vintage yarn and such. Plant fibers and animal fibers burn differently and smell different while burning, although the dye used can affect the smell even in something that old. Another thing to try is to “pull” a thread from both ends and see how it stretches before breaking. Wool has a lot more stretch than cotton or linen.
Ask around and find someone with a microscope. Fibers look very different from each other.
Microlab Gallery
I agree. It might very well be a blend of wool/linen-or-cotton or a linen/cotton.
Thank you so much Jennifer ! This is fascinating stuff ! Love all the detail you take the time with. I find all this a thrill.
can i see you on Facebook’s
If you want to watch the video on Facebook, use this link.
INTERESTING! THANK YOU FOR GOING THROUGH THAT FOR US, THIS IS AROUND THE TIME PERIOD (1865) I AM CURRENTLY SEWING IN FOR THE SITE WHERE I VOLUNTEER. AND, IRONICALLY, I WATCHED THIS VIDEO DURING NAPTIME😂
Can it be a combination of linen and wool? My first guess., was linen, also, but when I saw the threads frayed, it looked more like wool. The frayed threads are they the warf or weft?
They are in the weft (horizontal) cross threads.
I had this dress for over 20 years and never knew all the wonderful information you have provided. I always thought it was ‘linsey-woolsey’ with a linen warp but your fibers make me think the wool is the warp. Will follow with interest.
It could be linsey-woolsey. I thought that would have been faded out by the 1860s as it was super common in the 18th century, but without a burn test we can still speculate.