Flatlining. No it’s not dying in pursuit of that ultimate dream costume. Neither is it the process of killing your bodice to make it work. Ha! (Although, it feels like it kills us sometimes!)
I use the term “flatlining” often when describing this historical sewing technique. It is also called “mounting” and “adding an underlining.” Various sites and dressmakers call it whatever is easiest for them but it all describes the same procedure.
So today, let’s delve into what exactly IS flatlining and how do we do it with a bodice.
Flatlining, simply, is the process of cutting your pattern from an underlining (support) fabric and mounting (attaching) it to your fashion fabric. The double layer is then treated as one piece going forward in the construction. It’s a vital part of sewing a Victorian bodice.
This one step will elevate your dressmaking skills and take your costume to a higher visual level.

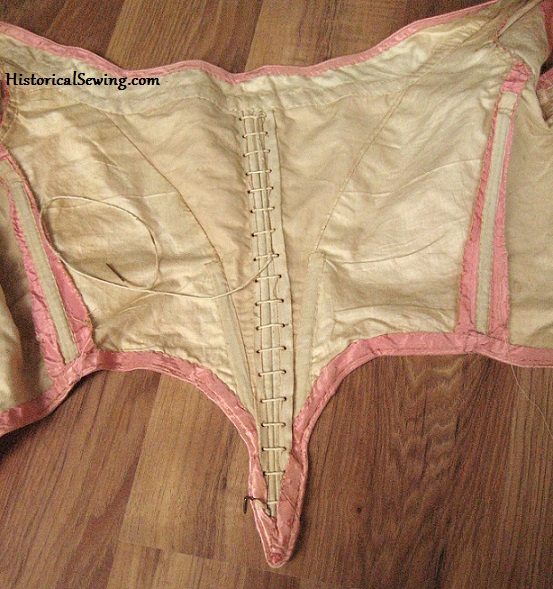
Most original bodices were flatlined with a tan or brown polished cotton. You’ll also find lots of sturdy linens used as underlining fabric.
Our polished cottons today are a bit heavier than theirs but still work fine. A cotton sateen, quilting cotton, silk organza, or linen are all very fine underlining fabrics available to us.

The Process of Flatlining
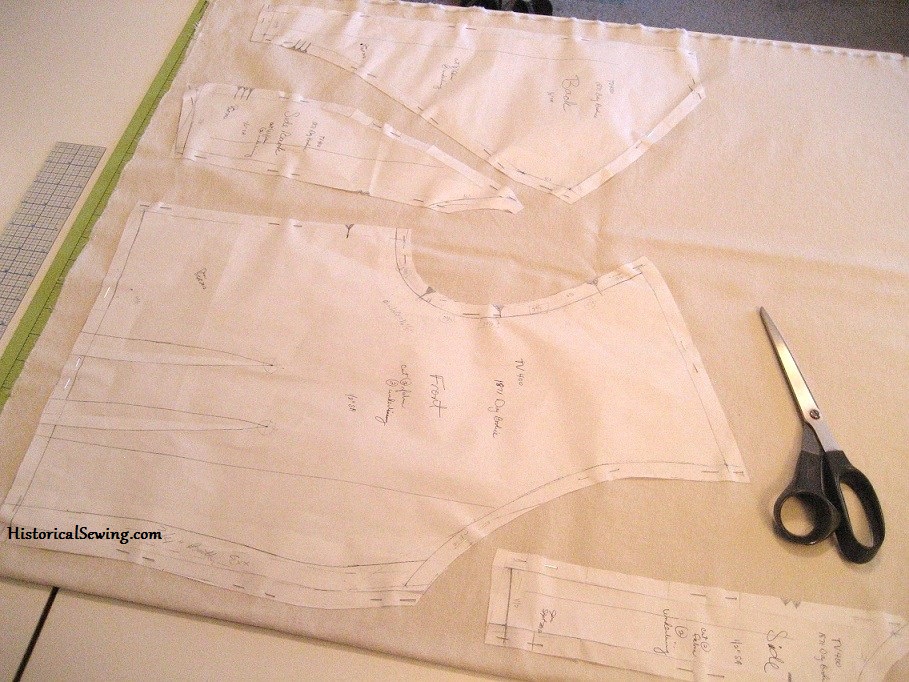
1. Cut all pattern pieces from your underlining and fashion fabric. This includes the all bodice torso pieces and the sleeves. (Sleeves can have a lighter underlining fabric depending on your fashion fabric.) Basically, you’re cutting out two bodices.
2. Mark the darts on the correct side of the underlining fabric ONLY. You do not need to mark them on the fashion fabric. Originals vary with making the darts separate in each layer or together, but in my research more often than not the darts are made in the two layers together.
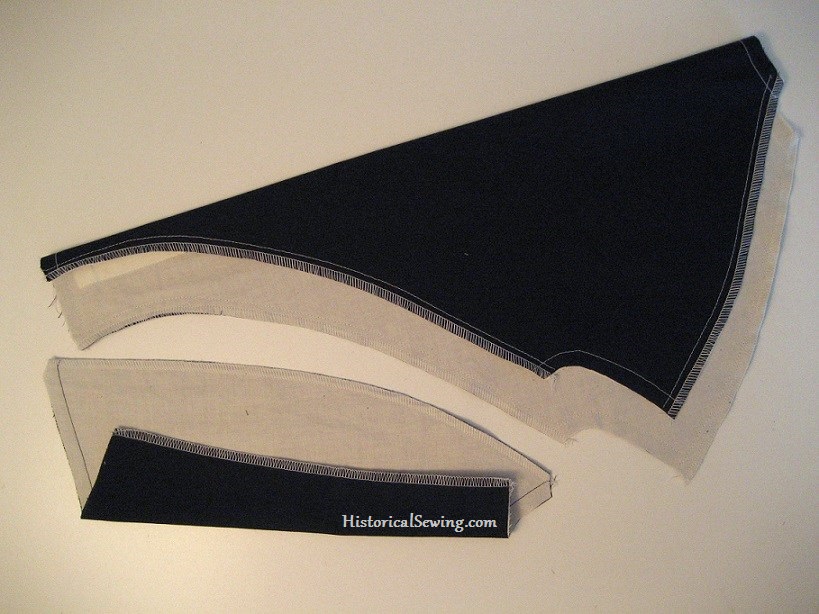
3. Lay each fashion fabric piece wrong side to wrong side of its matching underlining piece. Machine or hand baste the layers together around the outside edges.
Tip: Do not sew to a corner, lift the presser foot to turn the piece and then continue to sew along the next edge. Sew each side separately and in full.
Baste side seams, shoulders, and neckline edges.
I generally use my serger to attach the layers together. This gives me a finished edge and flatlines all in one step. Although, I DO NOT serge any edges that will be enclosed such as the neckline or the bodice hem that will both be finished with bias tape.
You can baste the armhole and hem edges now or leave them open until later during construction. However, you’ll definitely want to baste the armhole edges together before setting in the sleeve.

Best Flatlining Tip Ever
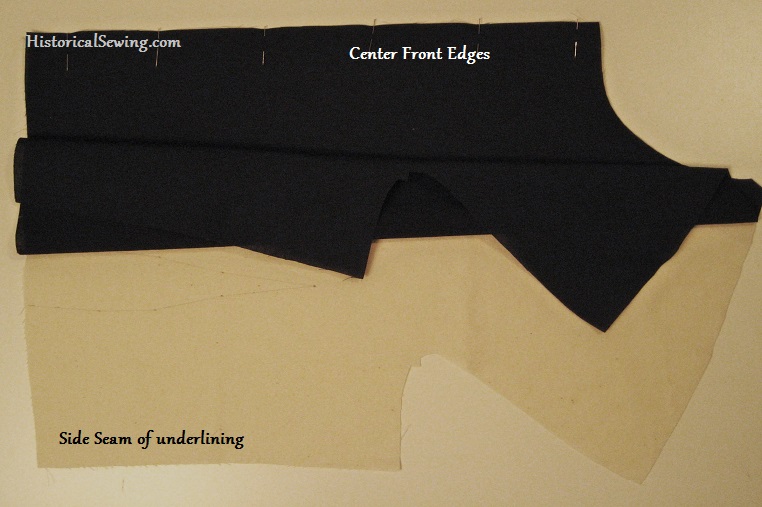
My favorite modern shortcut technique is finishing the center front (or back) edge during the flatlining stage. It is, however, based on period construction. The center front edge is finished (sewn) *before* the underlining is attached to the fabric.
Right sides together, sew the fashion fabric center front to the underlining. Do this for both left and right sides. Press flat, grade the seam, clip at the curves, turn and press the seam flat.
Next pin and baste or serge the shoulder and side seams. Baste (only) the neckline, armhole and hem edges.
4. For the sleeve, instead of basting the cap edge I simply run my ease/gathering stitches at this time to both flatline and ease in one step. Read more detailed steps for sleeve flatlining in my post here.
And now the bodice is ready for the major seams! Not too hard is it? Flatlining is imperative for a well-constructed historical garment.
Do you flatline your bodices? Have you not done so then realized how poorly the bodice looked without that extra layer of support?
Now, that your bodice is properly flatlined, get to working on your skirts. Read how in this post.

When you use your serger to flatline, how do you ensure that you’re maintaining the right seam-allowance? Presumably you cut the fabric bigger because of the cutting the serger does?
I serge right on the fabric edges without cutting anything off so as to maintain the full seam allowance. 🙂
Wait, you can do that?
Learn something new every day. 🙂
I’m about to embark on my first historical piece. I’m using Butterick 3012 and it has all modern techniques, but in following your blog and working for some theater costume shops, I’ve picked up some ideas to tweak the process.
Flatlining has alluded me. I’m sorry if these are stupid questions: does flatlining with a cotton fabric remove the need of modern interfacing?
Should I avoid materials labeled as “lining” materials?
I have been waiting to make this dress for 15 years and I really want it to be my best work.
Interfacing is to reinforce areas that tend to get well worn – collars and cuffs as well as openings to support buttonholes and modern facings to support the finished edges. Using an underlining (flatlining to a fashion fabric) is to support the entire fashion fabric piece. Sometimes you only need a little support (like muslin) and other times stiff (silk organza or cotton organdy) or even heavy (using coutil on the whole bodice). I very rarely use a modern interfacing on my historical pieces. The underlining generally gives me the support I need for the project.
I recommend you read my article on underlinings and linings. That may give you more tips.
And finally, as I say in all my classes, it won’t be perfect. Don’t hold yourself back from pursuing techniques. It can certainly be your best work for right now. Years from now and dozens more projects you’ll look back at this dress and be astounded how far you’ve come. Keep moving forward with learning. And best of luck on the dress!! 🙂
Dear Jennifer
I am so happy to have found your website.
Until now I wasn’t sure how to finish the neckline of an underlined dress I am making the patterns for. But now I know I can just use bias tape!
I was only wondering if I can use your tip about the center front/back if you’re making a dress with a back button placket under a band.
Best regards
Emily
Sewing the CB/CF seam first before flatlining merely finishes that edge without having to finish with bias (or a lining) later. You could reinforce for buttons with a strip inside. Otherwise bias finish is just fine and period correct too.
I have one question. Does the colour of underlining fabric be similar to fashion fabric? For example when I am sewing dark brown dress, can I use light blue underlining fabric? It will not be visible, right? Sorry for bad english.
It can be the same or different. Generally, you want to use underlining colors that produce the effect under your fashion fabric as you want them to be. A blue under white or cream will change the overall look of the finished garment. Blue under dark brown shouldn’t be a problem as the dark brown will not show the blue. So sometimes you want the underlining fabric to produce a different look and be visible, and other times you want the underlining to not be seen at all.
Enjoying (and gleaning from!) this discussion. I, too am a bit confused, as my Truly Victorian TV442 (1860’s Ball Gown Bodice) indicates that I cut interlining AND make an entire garment out of lining material. Can you clarify once again, please? The pattern suggests twill or light weight denim as underlining; it also suggests lining. Help!!
Heather at T.V. first drafted all her bodice patterns with instructions to finish with a full lining. It’s a bag lining that is a modern finish technique. Most antique bodices I’ve come across are merely flatlined with all seams & boning exposed on the inside. (This made it easier for alterations.) However, you’ll find some high-end bodices with full linings hand whipped into the bodice to cover the inner construction. It is entirely up to you whether you want to go through the effort of applying a full lining (hand whipped or by “bag” method). It’s perfectly ok to leave seams exposed and still be period accurate (if that’s your thing).
Twill & lightweight denim are fine for underlining but can be heavy & thick. Over the years even I have altered my recommendations on strictly using twill & denim for underlinings. Our fabrics are much heavier than the 19th C. ones. So be careful in selecting fabric to flatline to your fashion fabric. Underlining fabric supports the fashion fabric and should be chosen accordingly. Full linings are best in very light cotton or silks like China silk or other traditional lining fabrics. (Avoid polyester & nylon if at all possible!)
Just asked you a question about this very matter on the blog post about underlinings vs. linings! Have now seen this and feel reassured. 🙂
Thanks.
A
I am flatlining a bodice for an 1870 outfit and will be adding boning. how do you add boning with out it showing on the from of the bodice?
It’s attached to the underlining and seam allowances only. See this article for more info on boning.
I’m new to historical sewing. The first pattern I’m working with (Isabella’s Workdress) gives the instruction to do this to the bodice. Glad to read your article here about it in more detail and especially the finishing the center front (or back) first. Makes total sense. Love your blog!
So, are you not lining it afterwards? I’m just trying to think through of having it finished on the inside, and I’m trying to look at the seams on the garment pictured up there, and I can’t quite tell for sure if it’s finished with twill tape or if it was lined in addition to flatlined, because I’m not seeing raw edges there.
Many (but not all) bodices in the 19th century were left with seams exposed on the inside. Sure makes them easier to alter that way! In the later decades you’ll start seeing full linings put in to cover the seams, but that’s mostly on luxury or high-end, designer garments. The lining is made up then hand whipped into the bodice around the edges.
In the pink bodice above the seams are exposed and the edges hand whipped to keep from fraying. The beige you see near the center back lacing and the the pink seams is twill bone casing enclosed over whalebone.
Do I understand “Best Flat-lining Tip Ever” correctly?
Rather than flat-line the center front, you use the interlining fabric as a facing to the center front edge, flipping & finishing the center front, then proceed to treat the full bodiced “facing” to proceed as a flat-lined bodice front?
I’m in process of a “design as you go” “inspired by” bodice where I’d cut the lining fabric first, and cut it short at the bodice center front because I didn’t think I would have enough fashion fabric–and wouldn’t need it anyway since the inspiration piece would fill the gap. Then a day later, realized fashion fabric was wide enough AND I could/should do a basque/vest sort of treatment. So, now the debate is whether to add to the flatline fabric with interfacing and then cut a facing to fill the gap.
OR, if self-facing, flat-lining is sufficient, just sew on more flat-lining fabric and call it good.
I have a “don’t cut after midnight” rule, but figured pinning after midnight and then letting it simmer a day would be ok. Evidently the idea needed two days to marinate, lol!
🙂 Marinating is good! As I wrote here, you cut the underlining and fabric exactly the same, and as you described, sew the center front to finish it then complete the rest of the basting. This is a period correct technique as you’ll find loads of originals with the center front (or back!) finished in a seam with the underlining. This method eliminates the use of a separate or cut-on facing or finishing the raw edge with bias (all of which are period correct too).
You could also add a self-facing to your fashion fabric and fold under at center front (with a seam or cut solidly with the rest of the bodice front). If you go with a separate facing I’d cut it from the fashion fabric.
Good luck with whatever method you do!
Thanks!
I’m going to let the idea marinate a bit longer. No more of that fashion fabric left. I was squeezing it out of an end of bolt yardage of pintuck taffeta and had to skimp/scale down on the “petals” for TV246 Petal Ball Gown Skirt. I can probably something else suitable to fill in for facing. (At moment, leaning towards that extra layer of support.) Mostly this is a “how can I use this eye-catching thing I found at a resale shop” upcycle that gave me an opportunity to practice the bodice techniques I’ll need for the intended original project. So, I’m allowing myself to be ok with a bit of “inspired by” wild creativity on this one. 🙂
Thanks for your help and feedback. Your posts seem to anticipate what I need to hear as I’ve jumped into my first historical costuming projects with both feet and hands.
wow! I’ve been flatlining all this time. Didn’t realise. lol! I just can’t stand doing normal lining coz for some reason even though they are cut out the same the lining and fashion fabric never line up. So I do it the flatlining way. Well at least I do when something needs lining…I try to avoid lining at all costs.