
It’s finished!! After over four years I finally have completed my first objective of the day bodice to this incredibly fun ensemble!
As in true Victorian spirit, the initial plan was to make the day bodice first then add an evening bodice later. It is the accurate way to get more mileage out of those elaborate skirts. (Plus it saves money in not having to get a whole new dress for the ball.)
But plans change as they nearly always do when you’re creative with historical costumes. I ran out of time in disseminating the challenge that is the original collar/lapel. So I switched to an evening bodice for the first wearing.
Let’s go back…
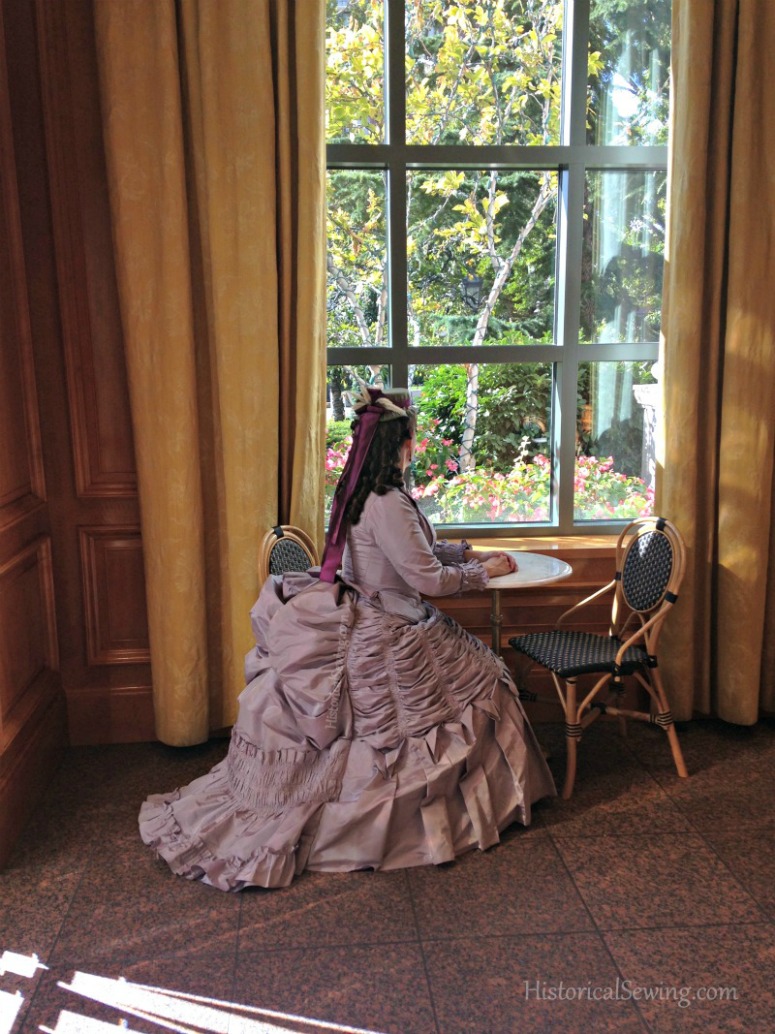
The first showing of this completed dress was at Costume College 2011 for the gala. Besides the time crunch that ensued, I decided I couldn’t wear a day bodice to an evening ball. Nope. Even to show off at CoCo.
So the evening bodice was made first.
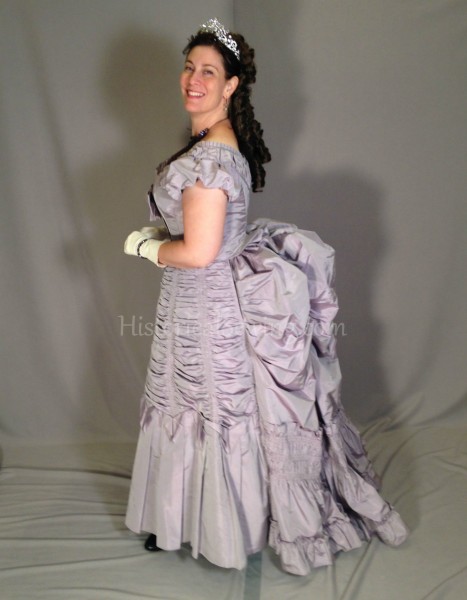
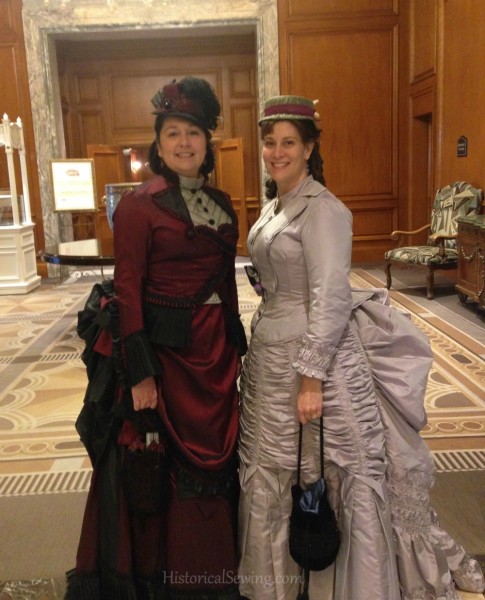
I had the great pleasure of pulling this gown out again at the 2015 Costume College to appear at the Friday Night Social – with tiara this time. 🙂
Unfortunately I’m slightly bigger now and the top of one covered button on the bodice popped off as I was dressing. Ugh. But it was the top one and the bow covered it quite nicely. Bows are wonderful Victorian inventions to cover all things wrong, wonky, or, as my friend Bridget says, “The solution for everything in Victorian costuming.”
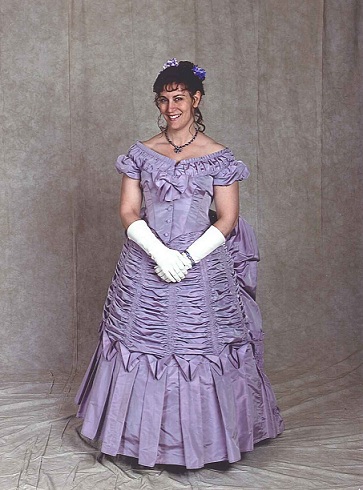
I was so surprised at how “quickly” the skirt came together. It’s so poufy and ruche-y and purple. The basic fabric allows for all the design details to shine through.
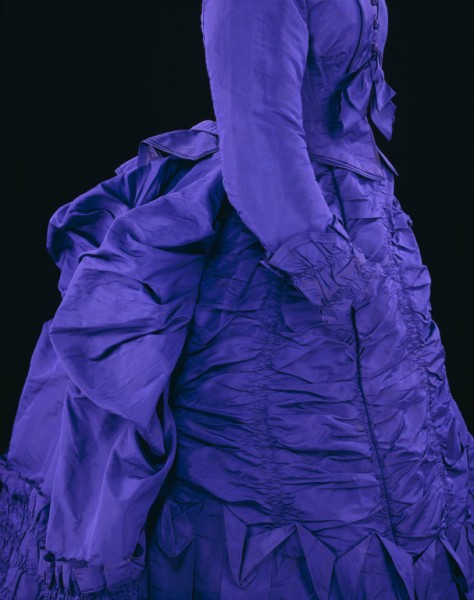
To go back as to how this gown came about, let’s ogle over the original inspiration as seen from the Victoria & Albert Museum. I’ve drooled over this gown for many a year. I’m sure you have too. The photo and sketch in the Nineteenth Century Fashion in Detail book was immense help.
In early 2011 when I was ready to tackle the reproduction of it I could not find this deep purple colored silk anywhere. I was so bummed! (And now, in 2015, you can find it everywhere…. Time to snatch it up for another project!)
The fabric ended up being from a roll of dirty, snagged lavender silk taffeta from the clearance bin. Thirteen yards purchased and after the skirt, evening bodice, and now day bodice I have only a scrap left. Whew!
Ok, so when you start studying the original (and you can’t see the inside for construction) you become baffled by the back collar, lapel AND a mandarin collar. How in the world was it done?!?
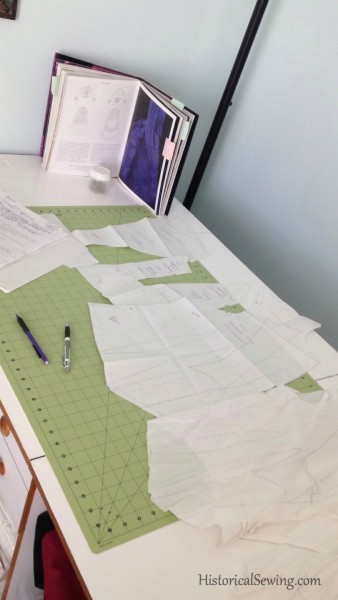
Last week when the opportunity arose for me to finally tackle the day bodice I pulled out my old worksheets from 2011.
Let me tell you. If you don’t keep a journal for your historical projects you are missing VITAL INFORMATION!! I can’t tell you how often I refer back to the pages of notes and sewing schedules and patterning information and measurements from projects I’m done in the past and are currently contemplating. They help SO very much. Do it. Start keeping a sewing journal.
So here I was on Friday afternoon with a tea to attend on Monday at noon still stuck at the “How in the world did they do that collar? And I need to make it fast.”
As if my magic (or really just good preparation) I found in my worksheets my original breakdown of how to make and sew the collar/lapel detail. Then I found my mockup from 2013 that already had the markings drawn in. And then I discovered I had already copied out the main bodice pieces.
Whoot! I was hours ahead already! I pondered some more, wrote more detailed sewing instructions, created the collar and lapel patterns and drafted the mandarin collar pattern. I was set and cutting the fabrics by Saturday night.
I had a unique way of assembling this day bodice. It’s what worked for me.
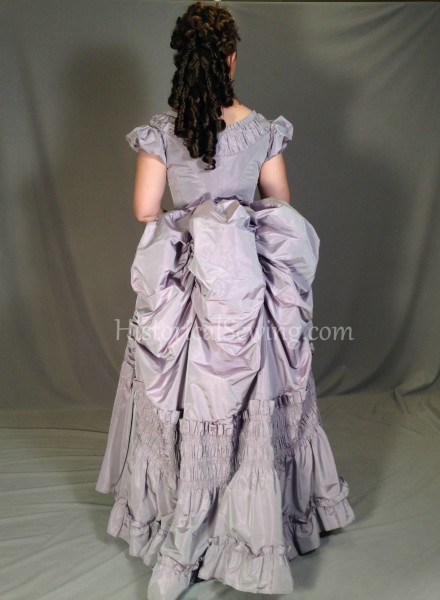
I flatlined the back bodice panels and sewed the pleats. I sort-of followed my own tutorial on how to do tail pleats on bustle bodices, but instead of finishing the hem with the facing I flatlined the facing to the inside of the bodice back panels. The hem to be finished with double flat piping.
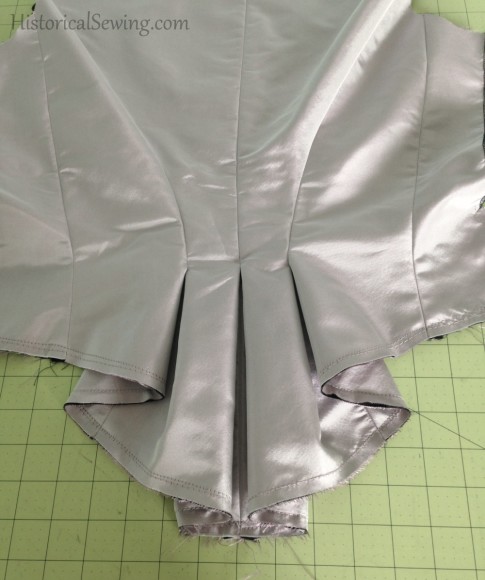
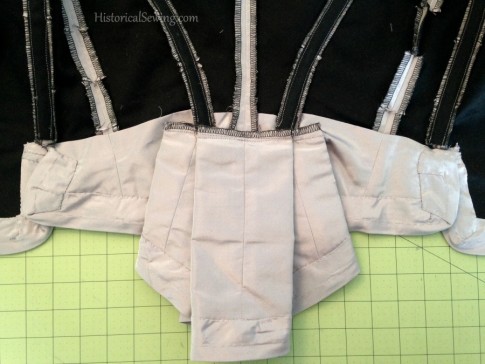
I then finished sewing the back seams and pressing the pleats.
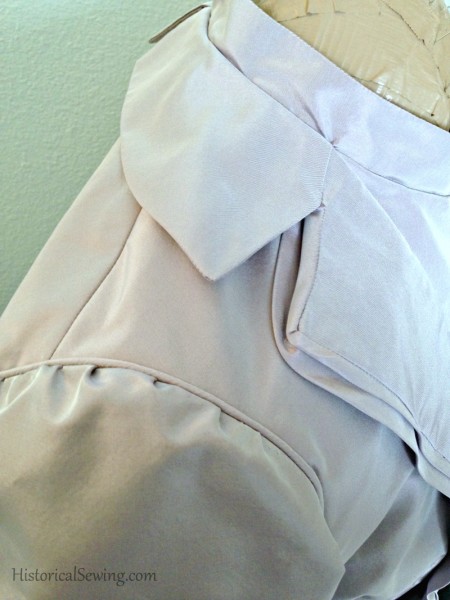
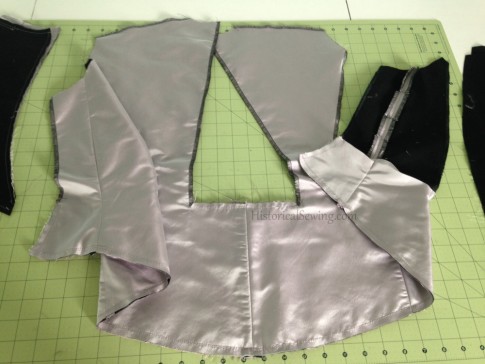
The front silk was flatlined to black twill first. The shoulder seams came next. Then it waited for me to finish prepping the collar & lapel.
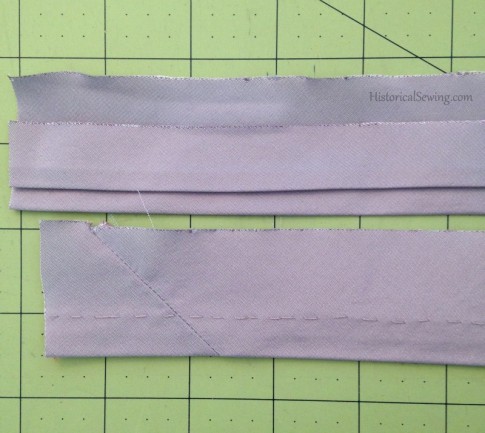
Here I was in a conundrum as to how to create the double flat piping. I guess it might have been easier if there was actual cording in the piping to create it double then stitch it on the bodice. But it was flat. And I was copying the original as best I could.
So I played with a scrap, folding and bending and playing until I had a nice measurement to work with (3 1/8” wide bias strip). I drew in the 1/2″ seam line, then pressed – by eyeball measurement – the two folds to create the flat piped rows. Inside one of the folds I did a hand running stitch to hold in place.
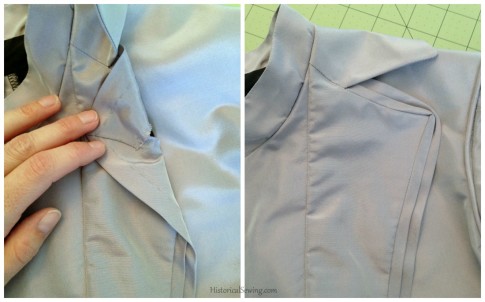
The folded & pressed bias was sewn to the collar then turned to the back and the wide allowance slipstitched down but allowing the piping folds to lay flat on the front.
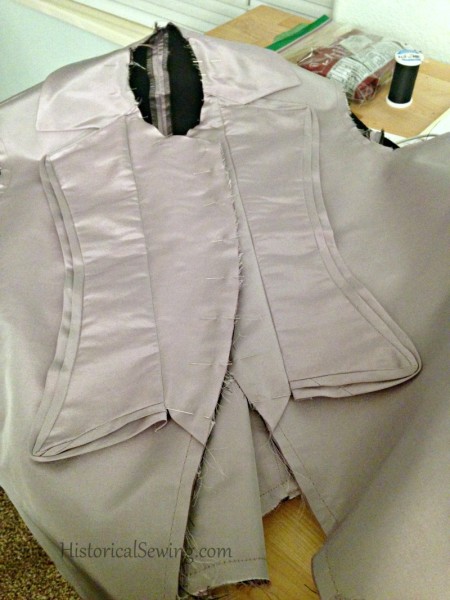
After the piping was on the lapel, I sewed the little bit of back collar to the lapel at the top. Next the front inset (what looks like a separate vest part) was sewn to the raw lapel edge. The whole piece was then mounted to the bodice front.
The mandarin collar was basted around the neckline and the raw edges finished with wide single fold purchased bias. The bodice center front edges were also finished with bias but cut from the silk.
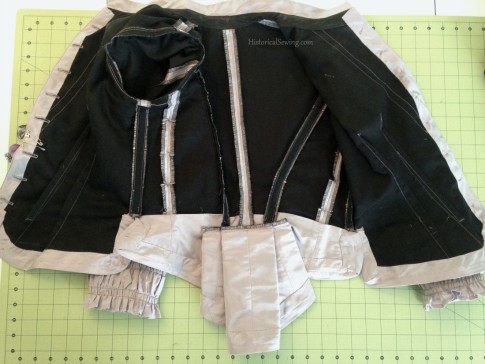
Next the side seam was stitched, darts hand basted then stitched, and boning set into the side back and side seams and into darts.
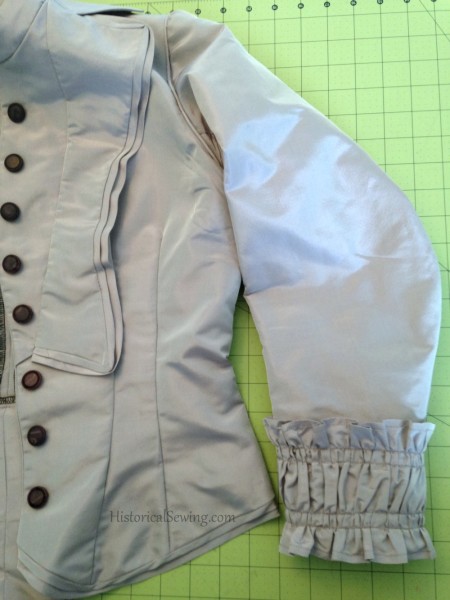
The sleeves were basic in construction: flatline, sew seams, finish hem with wide single fold purchased bias tape.
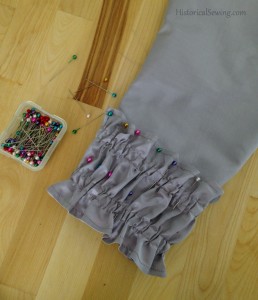
The cuff was merely a strip of the silk cut on the straight and narrow hemmed (1/4”) on both long edges. I ran two sets of two rows of machine gathering to match the ruched rows and ruffles on the skirt. This creates a uniform/tied-together design look of bodice with the skirt.
I had a bear of a time machine stitching the gathered rows to the sleeve as the wrist circumference is smaller than the free arm of my machine. It wasn’t easy.
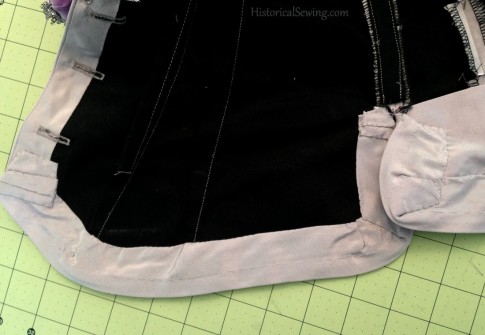
The finishing step was sewing the double flat piping bias strip to the hem edges – the back and front were finished separately as the V&A original with slit seam at the sides. The wide allowance was pressed & pinned to the inside and hand tacked in place.
The final construction was eight buttonholes (by machine) and stitching on the buttons. (Buttons are Belle Buttons by Dritz and found at my local JoAnn Fabrics.)
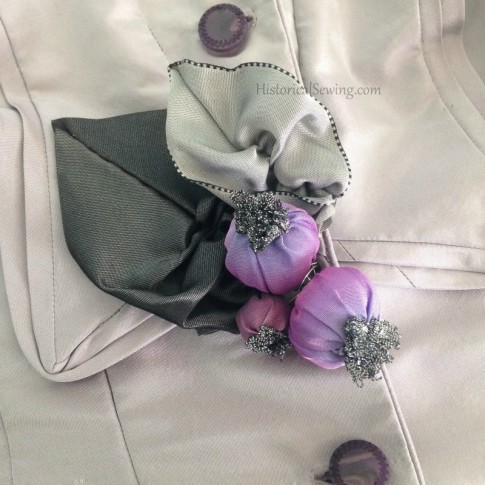
I didn’t have time before the Monday tea to make the self-fabric bow on the front, so I grabbed some old berry buds and ribbon leaves from the stash I made in 2003 for another bustle evening dress that never got the trim tacked on. Doh… I think they work splendidly on this new bodice!
(Read my tutorial for when I went back and made this little trim corsage permanent.)
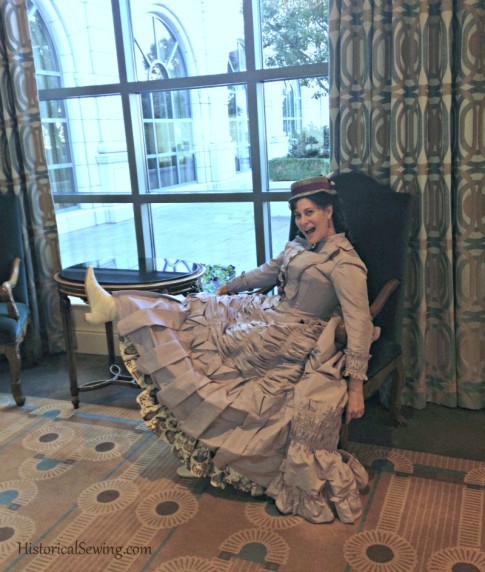
Proof you can sit in a bustle AND have fun showing your coffee print petticoat and Renoir boots. Ha!
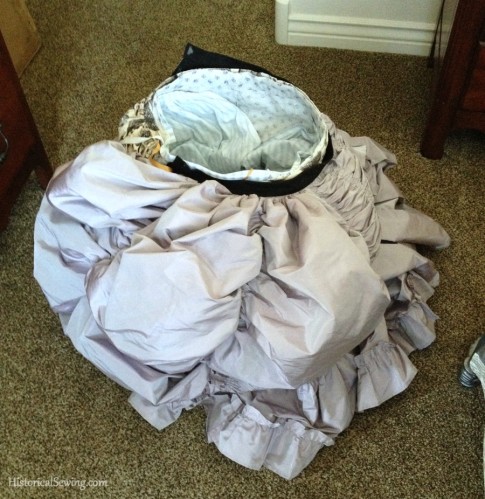
And this is how you get out of your costume at the end of the event. Un-hook & un-tie all closures of bustle, petticoats and skirt then step out of it. It makes for a giant puffy ball on the floor that scares your kitties. 😉
P.S. My hat for the tea was my Three-Hour Hat. You can read about that project in my non-tutorial.
Beautiful! I’m determined to only make day-to-evening sets from now on! Love the details in this (although not sure I’ll ever try them myself).
One tip for the small-diameter cuffs on a machine: when I worked in a tailor-shop with industrial flat-bed machine, we hemmed small things by sewing “inside” the cuff: instead of having the garment looping down around the free-arm, we had it on looped up against the presser-foot arm. With a plain hem, sewing on the inside of the cuff, the sleeve is actually right-side-out (for sewing trim on the outside of the garment, your sleeve would be inside-out). I never had to sew anything like a ruched cuff onto a sleeve this way, though: that kind of bulk would probably need to be pinned like nobody’s business, or basted first. If it were me, I’d probably have basted the cuffs on, run out of time before getting the machine sewing done, and worn the bodice with my fingers crossed that the basting stitches wouldn’t break loose. XD
Great tip! I’ve had to sew that way before and it works with fiddling.
And yes, I would totally recommend basting trim on before machine sewing to a small cuff. But at that point I would probably just hand tack the trim with smaller stitches (not long basting ones) as was appropriate back then and works lovely today to save the frustration later at the machine. 😉 In fact, I recommend hand tacking trim heartily in my Ribbon Trim class on attaching finished trim to garments.
Beautiful!! the swallow tail back is one of my favorite
I chuckled at your comment about having difficulty sewing the wrist ruffles on a free arm. Dressmakers of the 1870s would have had to use a flatbed sewing machine. I use mainly antique and vintage machines so I have gotten used to flatbeds. I think I might have done that wrist ruffle thing by hand though.
I was on such a tight time crunch so was determined to do it by machine. Normally I would have relegated to hand tacking and would have been fine with doing so. 🙂
I am in awe! Brava!
I find your articles very informative and interesting! Thank you very much.