
In many historical costuming instances you’ll need to pleat up a length of fabric to fit another. Most commonly it’s a skirt to a waistband. However, this can be anything really. A sleeve cap to a bodice. Length of trim to an overskirt. A curtain to a bonnet neck edge.
A lot of times a pattern will state (or you’ll decide) to pleat the section to the corresponding garment. Ok…
But how wide do you make the pleats so it’ll all fit?? Re-pleating just plain sucks. (Right??) So I have a cool technique that’ll get that fabric pleated evenly the first time.
It’s called the Divide & Conquer method.

Now, first of all, I didn’t come up with the name. I learned this technique back in about 2001 while working in a well-known costume supply shop. Someone used the term “divide and conquer” for pleating. I thought it was a neat name and even super cool trick to getting my pleating project done quickly and making it look even too.
The basis of this method is simply to divide and quarter mark (repeatedly) enough times down to where you have a small, workable length to then create your desired pleat take up.
For ease of example, I’ll show you pleating a ruffle to the bottom of a bustle support undergarment. Although, remember this will work with most any length of fabric that needs to be pleated up to fit another part of a garment or fabric length.

You start by folding the ruffle in half, matching ends to find the center point. Place a pin here.
Then fold each half of the ruffle into half matching the end with the center pin you just placed. Pin mark at this halfway fold. You have now “quarter marked” your ruffle – the “Divide” part of this technique. Cool!
Repeat this quarter mark process on the garment.
Depending on the length of your ruffle or skirt to be pleated you’ll need to keep dividing further. Remember, halve and pin mark as many times as needed to get a workable – few inches – of ruffle to pleat up.
It’s a lot easier to continue halving and pin marking BOTH pieces into eighths and sixteenths before you start to put them together.
Be sure both initial halves of your ruffle/skirt and garment are pin marked the same. E.g. you have eight sections on the right half and eight sections on the left half of the center mark.
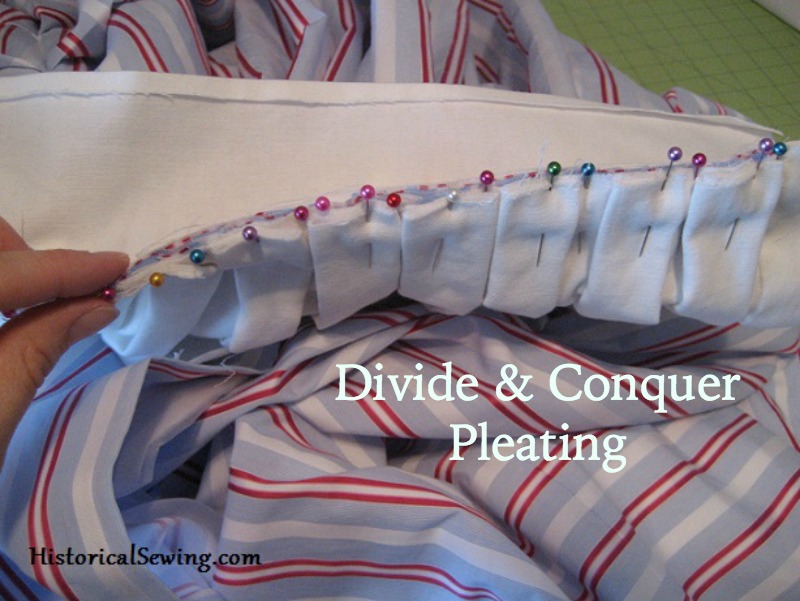
Fun Tip: I love to use long, multi-colored pearl head pins when pleating. I use the colors to help me keep track of which mark is what quarter mark as if they were numbered. For instance, red is for center marks, green for half marks. Then I pick other colors as I further divide. I’ll use the same colors for corresponding marks on both ruffle and garment.
After both ruffle and garment are quartered it’s time to start matching the two pieces.
Start with the centers and ends.
Continue to match pin marks until ruffle is pinned to garment with a couple inches between each set of pins.

Now for the “Conquer” part:
Pleat up each section between pins. Start smoothing over the ruffle fabric to one pin and fold the excess down creating a knife pleat.
Sometimes you’ll need to create two, or even three, pleats within each little section. If you still have too much between pins to make pleats, continue to halve & pin for smaller sections.
Be attentive to which direction you want the pleats to face when viewed from the correct side of the garment.
At the center of the garment you can choose to have a box pleat or inverted box pleat. Pay attention to this. Or you can simply make knife pleats in all the same direction along the entire ruffle.

Keep folding up the excess between each pin mark and fold it over to create pleats. Pin to hold each one.
It’s entirely OK if the pleat take-ups lay on top of each other. Pin as much as you need to secure.
The great thing about this method is how flexible it is. If you don’t like how large or narrow the pleats are turning out, simply remove the pins and divide more or less to personal preference. (See how colored pins would help out here??)

Once the entire ruffle is pleated and pinned to the garment sew in place. Baste, if necessary, first if you have a tricky or thickly-pleated area.
Now it’s time to go Pleat.All.The.Things!! 🙂 Good luck!

Have you used this “quartering” method when pleating?
I have always called it divide and conquer as well. I wonder if I read your post several years ago and have forgotten? I swear I’ve been calling it that longer. We’ll never know for sure. Great post!
It’s not my original title, though. I picked it up from an older costumer at Costume College around 2000 or 2001. 🙂
How well does this work for box pleats? I need some large (around 3″) box pleats for a skirt, and I keep coming out uneven. I’ve pleated it five times so far, and my latest try might be the last since I’m running out of patience. I ended up just doubling up at the back zipper so it’d come out somewhat even, but I don’t really want a “bustle”! Any ideas? Waist 35″…yeah, I know it’s not an easily-divided measurement.
Fabric is a poly brocade, 58″ wide but the back panels are slightly narrower because I had to cut up the middle for the zipper, so it ends up being about 56″. Thanks for any suggestions!
You might only divide in quarters or eights. Generally box pleats take 3x the fabric versus what you mount them too. Keep that in mind and you can use it to recalculate the box pleat width. Remember, box pleats are like knife pleats but with one turned the other direction. This article might give you another idea or help.
Thank you! Your expert answers helped tremendously. I’ve finished my lehenga, and it looks great!
This is literally the only method for pleating that I have ever used, like several others. It’s really quite easy and there’s a distinct flow to it. I’ve even used it to pleat down 40″ to a 7″ sleeve cuff. (Elizabethan sleeves can be huuuuuuuge!) I actually wound up stacking pleats on top of pleats for a really interesting effect, with those! I’ve also gathered my fabric as tightly as I could, stay-stitched it, then pleated the gathered material down further with this method. It’s extremely versatile.
Thank you so much for re-posting on your Facebook page. Your color coded pin suggestion tip makes this somewhat daunting task go so much easier & faster. No more getting to the end only to find you are 1 pin off kilter.
I’ve been doing this with gathers for years, but for some reason never thought to do it with pleats *feeling silly* The tip for colour coded pins was really useful.
I use it all the time. I like that I can snuggle up in a chair with my parrot as I do it.
YES! I’ve been using this for gathers, pleats, ruffles and especially ELASTIC on kids clothes, like dirndl & play skirts, for over 30 years. I don’t know who first taught it to me, I doubt I thought it up, but it’s marvelous how easy it makes life. I use the color coding too!
Color coding can make all the difference. 😉
Like others, I learned this earlier in a much more generic way for both pleating and gathering; however, your directions/photographs are excellent and will help me so much in being more precise in the completion of this method for future pleating. Thank you so very much.
You’re welcome Ruth! And yes, I always quarter mark even those things I’m gathering up too. Works a charm! 🙂
I whole hardheartedly agree with Ruth!! I have done this for years!! But am so glad I read through.. your pictures and directions really will help me going forward and being more precise! Now if you could do the same for gauging….. I would be ever so grateful!! can never quite get those carriage pleats quite right!
Thank you so much.
Catherine K
Have you read my tutorial on cartridge pleats? It’s even more thorough than this post. 😉
I learned this method around 2005. It almost goes faster than explaining it does. Wowed my son by reducing 30 or so inches of fabric into 8 inches of neat knife pleats in about 10 minutes. Thanks for writing about it.
Thank you! This makes SO MUCH SENSE! Now I won’t dread my next pleating project.
Great tutorial! I will put it to good use on an 1860’s gored skirt I plan to make for a summer outfit. Thanks for sharing it.
I learned this trick from my mother, many decades ago. She taught me how to sew when I was very young. It sure makes things go a lot faster! I’m really enjoying your blog, thanks for taking the time to write it!
Thanks for reading Heather! 🙂
I agree with the other commenter, it’s the only way I’ve worked with pleats as well. I thought I was going to learn something new when I clicked on the link, it turns out I’ve been doing it without a name for it anyway.
This is the only way I know how to do pleats! I had no idea it was a “thing”. 🙂 Seems to me it is the only way to get it all to come out. Glad to realize that I have some official skills! Ha ha!