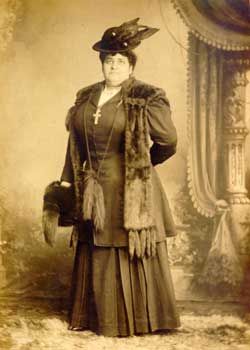
My, but the response on covering plus-sizes was intense when I asked for article ideas on the Facebook page! Thank you for the input!
Appears many of you who are “busty lasses,” larger than size 18, and plus-size need to know more about historical patterns suitable for your “stout” figure and how to trim garments with appropriate proportions.
You were also curious to find out if our full-figured 19th century ancestors wore the same styles as the mainstream fashion or simply wore wrappers all the time. (Hint: they wore the latest modes with aplomb.)
To help, I’ve put together a list of items and tips you can incorporate into your period sewing and think about when dressing your lovely larger figure.
A note: “curvy” doesn’t always mean “plus-size.” Even though this article is directed to larger sizes (due to the requests), if you have curves, these tips will be handy for you too.
[Small disclaimer: I personally am not plus-size in a modern wardrobe, being a good size US 14. However, I have large hips, small waist and DDD bra cup. So I understand a bit about full figures. I would love to see other sizes give their insight in the comment section here.]
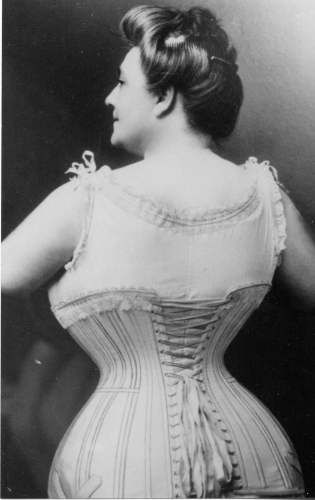
First thing: Wear a good fitting corset – everything else is built on this so it’s SUPER important. Honestly. Doesn’t matter if it’s slim Regency, full hoop skirt fashion, or 1890s leg o’ mutton sleeves to hide the arms. The CORSET IS KEY to a proper historical silhouette.
In regards to corsets, straight seamed panels seem to be better suited for larger curvy figures, especially if you want some minimization. You’re probably thinking, “but gussets help smooth corset panels over curves.” Yes, gussets DO allow for a svelte look. They do help to cut the corset further into the waist area while providing bust & hip support. I won’t argue that.
It’s simply that the straight seamed panels have the gusset shape built in. Gussets are perfect for smaller busts and hips and for those larger women who want to emphasize their assets. 🙂
As for patterns, the Truly Victorian #110 pattern is fantastic, but you must pay close attention to selecting your size to cut. Laughing Moon #100 is good but doesn’t give quite the tighter waist shaping that curvy girls need (not enough of the gusset shaping added to the straight seams). However, if you carry weight in the belly/abdomen area it’s a good pattern to start with. For more on fitting larger busts in corsets I highly recommend this fabulous article on Foundations Revealed.
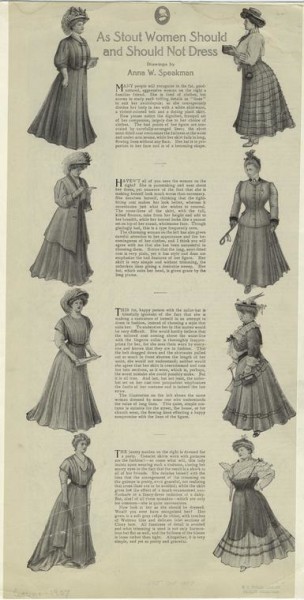
Stay modest in the cut of your costume– no very low necklines. It’s okay to be revealing, but not a wench. Curvy girls look best when the gown is fitted well to the figure, emphasizing the curves, but not over-exposing them. This goes for dinner bodices with V or low rounded necklines as well as for ball gowns.
Although, in staying modest, give space to the neckline. Cut down a rounded jewel neckline just a tad to give the neck flesh more room and not make the head look cut off. Shallow Vs and rounds allow for the full bust to “breathe” and not look so confined.
This isn’t to say you can’t or shouldn’t make a high, round neckline bodice. Oh no. This style was seen in many decades – the 1840s, 1850s, 1860s & 1880s primarily, even into the 1890s but with extra collars & trim. Merely give a little bit of ease around the neck seam. And goodness, utilize those waist darts to smooth the fabric over the bust to waist.
Speaking of darts – don’t sew them up in your mockup before fitting. Pin up the excess fabric at the fitting to make two or three darts that allow the fabric to be smoothed around the torso. Follow more fitting tips in this video tutorial.
If your bodice or corset is too small/tight, think about adding an extra panel between the side and side back pieces. Besides the extra width, you get more seam allowance to play with for fitting and tightening the fabric to the torso.
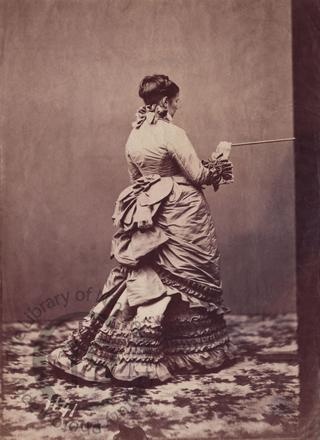
Reduce the size of your sleeves. Your arms may already be large; why add to their girth with super wide sleeves?? It may sound contradictory – needing smaller sleeves for larger arms – but it’s a trick to slenderize the look.
For form fitting sleeves from the 1840s, and 1860s to 1880s, keep the ease minimal on the upper arm, like only an inch or so in circumference. Of course, movement will depend on a well-fitting armhole as it relates to the bodice it’s sewn into. If your sleeve has too much fabric and your arm swims in it, try these tips to taking it in.
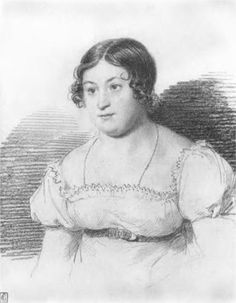
For wide sleeves such as puffs from the Regency Era, 1830s, 1890s, and evening gowns of the mid-to-late decades, cut down your puff sleeve pattern to where you get the effect of a puff but not the width of fabric. Too much fabric around a full arm will add visual weight or make it appear larger than it is.
Reduce the width of the puff by making vertical cuts and folding the pattern up evenly. Make sure not to reduce the cap seam line too much. You need at least 1.5″ larger in the sleeve to show any gathers for a puff.
Also, lengthen the puff sleeve. A number of available patterns offer a puffed sleeve that’s very short. I know modern cap sleeves are *the thing* but not so in historical styles. Add length to the hem straight around or simply bow out the hemline to where the pattern is lengthened in the center but stays the same underarm seam length.
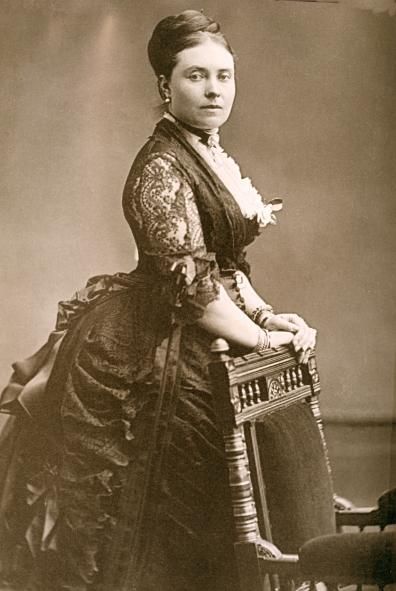
Don’t weigh down trim if you’re not comfortable with it. If you’re concerned, be conservative with trim – one large hem ruffle; basic sleeve cuffs; ribbons tacked on flat and not pleated or gathered.
But I want you not to hesitate to add trim either. The key here is to make the trim larger in proportion to you. Don’t add a 1/4″ or even 3/8″ ribbon around the neckline if you are a size 22. It will look like an afterthought and not flow with the entire design. No, use a 1″ or wider size.
If your skirt has to cover 52″ hips, that hem will be wide too. Don’t go slapping on tiny rose buds for decoration.
Think *bigger* and don’t worry about too much. You’ll most likely know when it’s too large as it’ll start looking like a masquerade, fancy dress, or Halloween costume to you. Trust your instinct here!
Remember, though, to increase the overall size of your trims about 10-20%. Pleats should be wider – even an extra 1/4″ can make a difference. Visible pockets should be cut larger. Sleeve cuffs and collars need to be enlarged from the pattern.
Accessories too: hats should frame the face, so that bonnet brim may have to be cut longer and deeper for a rounded face. Reticules should also be cut bigger to compliment wider hips.
And yes – larger women wore the same styles and same trim designs as other smaller women. Skirt panels were still cut the same, just wider and perhaps longer. Sleeve shapes remained the same. I encourage you to constantly study and view original photographs, paintings and antique garments to notice the details.
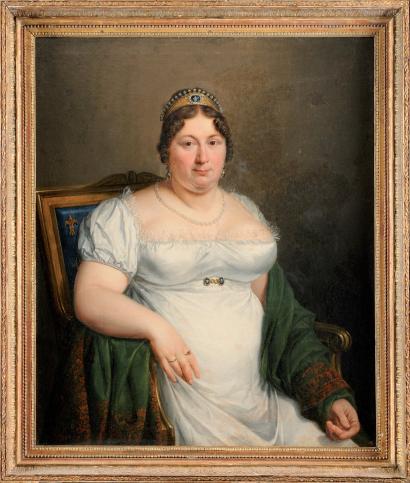
Re-think horizontal. Nowadays, horizontal stripes are a no-no for plus-sizes. True, they do make the dress appear wider than desired. But in the 19th century you WANT to have a wider hemline or wider sleeves/shoulders so as to emphasize a narrow waist. Use this to your advantage!
Just because you have hips or are a busty gal, don’t knock extra padding for the historical silhouette you’re going after.
For example, I have wide hips at 46″ BUT… my back side is rather flat. The Truly Victorian Imperial Bustle (lobster tail) gives me the full back protrusion I need for the Bustle Era. To get the late 1880s shelf I need to ADD a pad on top of the Imperial bustle. Ack! That’s a big back side. Well… at least it seems to me.
(Listen to podcast episode #7 on working with your specific body type to achieve that historical silhouette.)
Indeed, it’s how the final look is viewed by others (not yourself in the mirror as that’s plain subjective). The confidence you exude while wearing your ensemble goes a long way too with the look you’re going for despite additional padding. 😉
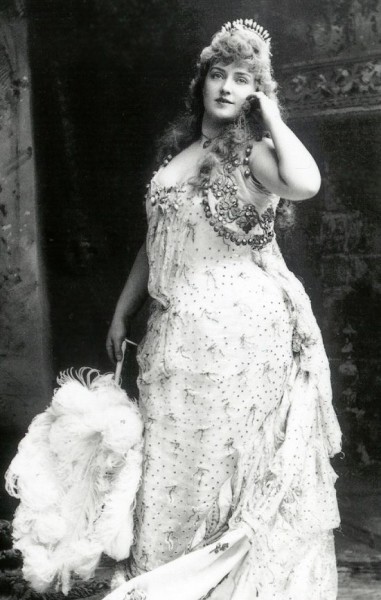
Pay attention to the clothes in your modern wardrobe. Transfer the same guidelines to the historical costumes as you did when picking out the t-shirts and dresses: v-necks, dark colors on bottom, 3/4 length sleeves, particular colors people say look good on you, armhole shirt seams that sit on the shoulder and not hang off so everything looks baggy, etc.
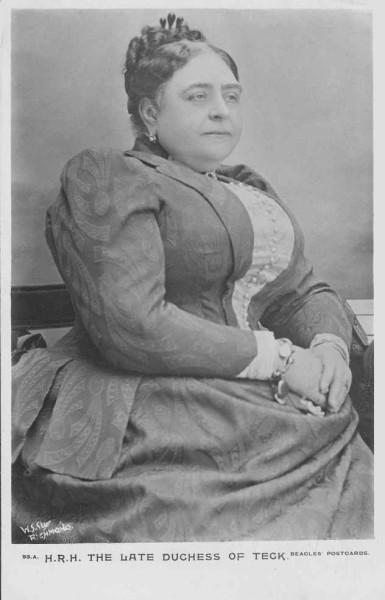
Be willing to accept your measurements as is. No cheating on them! Our 19th century ancestors made the clothes to fit the body they covered. No off-the-rack items were really available (except perhaps undergarments).
It’s only contemporary sources that have told us we all have to fit into a size 8 or size 16. To heck with that when making period garments! Fit YOUR body, not the girl on the cover of Style…. or even in the period fashion plate that’s, again, an “ideal” of the age.
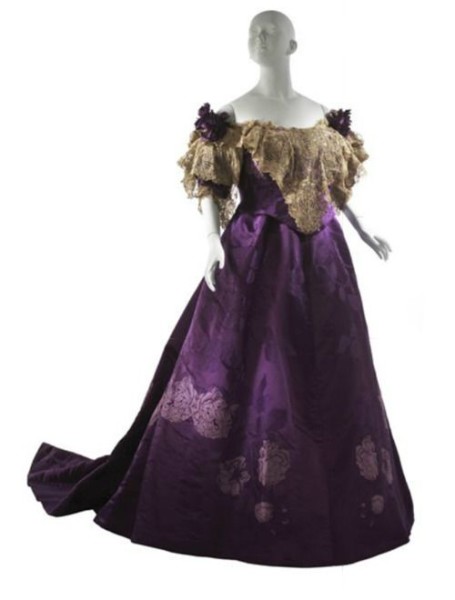
Work on your fittings:
- Open out those shoulder seams to allow the fabric to cover the fleshy shoulder instead of pinching tightly
- Keep the armholes high under the arm, then cut them larger around the top half only to help prevent cutting into the flesh
- Use up to 3 waist darts in front to bring in excess fabric at the waist
- Add extra width in skirts evenly to each panel instead of only centers and sides
- Cut waistbands to your corseted waist measurement over undergarments and with a little ease; fit skirts to the band length with darts and seam allowances
Recommended pattern lines:
- Truly Victorian
- Laughing Moon
- Past Patterns
- Simplicity (watch for fitting issues)
- Period Impressions
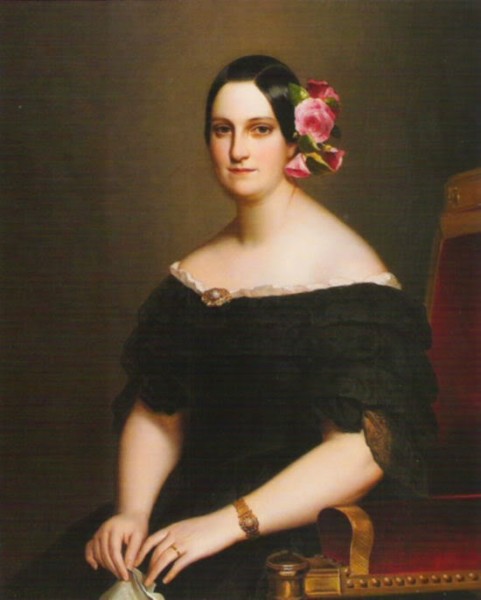
My final thought for the stout ladies is a question: Are you bringing your 21st Century mindset to your historical costuming?
Truly. That view of what you *think* you look like in costume is based a whole lot on your 21st C. mind. Heavy-set people have existed throughout all generations of people. Don’t let the prevailing world view of plus-size get you into a tizzy over how you should wear a Victorian dress.
Wear bright colors if you want. Dress as a puffy cupcake if it makes you happy. But most of all, keep at it!
If you fall into the “stout” sizing for Victorian ladies, what’s been the best technique you’ve used for flattering costumes? Share below so we can all learn.

I’m looking for someone whom either makes or sells plus size vintage dressing gowns. The super long, flowing, elegant dressing gowns (preferably with a bit of a train) made of beautiful fabrics, like chiffon, silk, etc…any guidance would be very welcome! All the best! 😊
I would love your suggestions and imput on costuming for the conical corset/stay shapes of the 17th and 18th century on fuller figured women. I have a large bust and generally an hourglass shape, but feel that the “shelf” created by that silhouette would be overwhelming- I don’t want to choke in my clevage! How would you combat that to match the styles of the era? Thanks so much!
I focus on 19th and early 20th centuries so don’t have much experience with early time periods. But you’ll want to cut the top front of the stays wider so you sit down into them rather than them be so tight you are pushed up high. Although, remember that every body shape existed back then. And every time we study, make and wear past fashions we are bringing our own 21st century attitudes and familiarities with us. What our ancestors found as normal is sometimes jarring or uncomfortable to our own sensibilities. Keep that in mind. But work with mockups until you feel comfortable wearing those stay shapes.
Thanks so much for the input, I hadn’t thought to do that. I’ve found your articles to be so helpful in my own research and look forward to more! 🙂
Ummm, the fashion industry considers a size 14 a plus size. Ridiculous, but true. That’s the size model they use to show plus-size clothes.
I really enjoyed your article. I see the gorgeous dresses on Facebook and wonder two things: 1) what did regular people wear when they weren’t the bride or going to the Duchess’ ball? And 2, weren’t there ANY larger people? And what did they wear? You’ve delightfully answered the second. Thank you!
A very good article but I must add that it is dangerous to try and pull a corset too tight, If you are not able to breathe deeply, it’s too tight. I work with a Renaissance Faire having been on cast and I’ve seen more than a few women of many sizes that pulled them too tight trying to get a smaller waist and ended up in the ER ’cause they passed out ’cause they couldn’t breathe.
Also, have a question. I have a large figure but since I’ve had a double mastectomy I am the same size bust and waist. 45 – 45 – 57. I’ve not been able to build a corset that fits properly on me. I’ve tried having them custom made by professional corset makers and also making my own, as I’ve made them successfully for other women, but none of them fit me correctly. They all tend to ride up and feel like they are around my neck by the time the day is over.
Any ideas on what I can do? I could always lace tighter but I like breathing so that doesn’t work. I’ve even tried an underbust that also just rode up.
Yes to the tight cinching!
For you, it sounds like there’s not enough room in the hips. Open up the seams at the hip/hem level so when you sit and the flesh is spread out it doesn’t push the corset up. Fabric (in any garment) will shift to smaller areas if it’s pulling somewhere. Not enough width in that high hip area is causing the corset to move up to the smaller waist area where it fits. So it is not at the bust where the issue is.
Looking at corsets, I dress a number of ladies in 1860s clothing for my job at a site. I have three gals who break boning and busks on a regular basis. Any suggestions for those who are curvy and wear their corsets everyday!? Thanks!
Ouch! One, they need to bend at the knees and hips rather than at the waist. They are moving wrong. The waist in a boned corset is not supposed to bend. It’s supposed to keep you upright. Have them work on moving and bending by using their thigh muscles and practice when not in a corset. If busks and bones are breaking they need more practice in wearing the corsets and moving differently. This will become very expensive (as I’m sure you’ve realized) and may cause injury too.
That said, second, it may be the cut of the corset is too tight for the curves. Use spiral boning on the sides and perhaps even a heavy-duty or wide busk in front to help support.
This is a great and really helpful article. I never heard you mention THREE waist darts before, but I’m all for giving it a go. My biggest problem though is the deep fold that forms on the bodice under my arm. Is there ANY historical evidence of bust darts? A simple bust dart would solve EVERYTHING. Maybe I could hide it in a pricess seam? Maybe?
That is a very common fold for us larger busted gals! You can pinch up that dart making the point go towards the bust apex. Then using the basic dart pivot method, pivot the dart take up from that area and move it into the waist darts (one or both). Your waist darts will be quite a bit larger than the amount you pinch up horizontally across the bust. Try that. It may not get rid of that fold altogether, but will reduce it greatly.
And just as I was to despair over ever finding a blog/article listing how women of any size can make historical clothing work here it is. I have been a big fan and follower of your blog and costuming since I stumbled on it in the beginning of my costuming journey. As a curvy girl I have worn fashions from so many different era’s and been complimented regardless of not having the exact figure of the era. However I have been shying away from regency and 1920’s because its been a daunting period to pull off as a busty hour glass and, perhaps I’m looking in the wrong places but everyone I’ve viewed so far is small chested. This article was a needed confidence boost, it reminded me that though fashions may have change; for years women have been adapting to current fashions even if they didn’t have the exact body type. In the end its as you say its not about changing your body so much as knowing how to work with what you have to get the best results and in the end be confident of who you are and no one will notice if your a tad bit busty for regency (fingers crossed.) Though I must say I always smack myself when I research a costuming subject for hours only to find the answer back here on your blog. Thank you for making the costuming journey easier.
This makes my heart happy. You are very welcome Asha! I’m so glad you’re finding the encouragement you need. 🙂
Cheers! ~Jennifer
Ooh could you please do one on how to make the skinny small-boobed chick look suitably curvy and Victorian? Please?? (Yes that’s moi)
🙂 Well… it’s all in the adding of pads IN the corset and at the hips and adding petticoats too.
Ah, I know I guess. I was just hoping for a bit of article love for the littler gals as well as the bigger gals! No matter, this was a great read 🙂
I enjoyed the info on full figured women. It seems to be for the women with very full busts and small waists and large hips. I don’t seem to fall into that bunch. I’m definitely full figured but in a different way. I’m straight up and down. My ribcage is wide, hips straight, cup size small (but large around back. What do you suggest for my boyish, not sqwishy figure.
Definitely use the Laughing Moon corset pattern as listed. The historical effect you want is to make the waist look smaller. I’d suggest thinking about how to increase the hem width (petticoats and hip padding help out here) as well as increase shoulder width (again, with fuller sleeve widths as the idea). I’d avoid horizontal trim across a wide back, but chevrons in either striped fabric or trim placements will help to give a minimized look to your waist. Think this way too for the front – trim or stripes or patterns going from wide at the shoulders down to a pointed waist. Be careful in how you use belts (which are quite period popular but can cut a body in half or bring emphasis to a wide waist.
Great article! Thank you for taking the time to address this issue and inspire. 🙂
Jennifer, even though I am not a plus size this article is a big help to me. I am only 5′ 2″ and wear a small size in commercial clothing but I have a large bust, short waist length and narrow ribcage it is just the girls are a problem! Hope this makes a little since to those reading this. I find that there is NO space between my waist and bust. I am hoping that by using some of these ideas to make another corset I can get a better silhouette. Do you. or any of the ladies reading this, think this might help? I am tired of looking like an odd shaped box with bumps on the front! Styles with lower waist help but since I do Civil War re-enactment this doesn’t work for that. Thanks in advance for any suggestions or ideas any of you may have.
I’m shaped just like you! Small-ish everywhere except out front and my shoulders. Jennifer’s list of tips and tricks are all pretty spot on! (Though, personally, I love my gusseted corset more than my shaped-seam corsets, but the shaped seam corset helps smooth everything out so my breasts aren’t so prominent and my waist looks a bit longer and leaner. It depends on your own tastes.) Her tips about necklines and larger trims are especially important! I always look so much heavier in a high, round neckline thanks to my wide shoulders and low, large bust. I used a piece of trim over the bustline to counteract the rounded neckline. I found playing with trim placement over my bust in the mirror for a while helped. Choosing a V-necked design with a cute chemisette would be a great option, too. I also go one pattern size smaller for my narrow back and do a Full Bust Adjustment on the bodice front. Checking the fit of the shoulders is really key, too. If the shoulders are too small, it will make weird wrinkles around your bust that look like you need to let the bust out more, but you don’t. It’s the shoulders pulling everything up and in. Ugh! It takes some fiddling, but I am so much happier with the results after taking the time to slash and spread the pattern pieces. Also, like Jen says, DARTS DARTS AND MORE DARTS!
Bless you for this article!
I have struggled with fashion mindset all my life. Before my breast reduction surgery (for the health of my back) I was 44F and my top weight was 240. Twiggy blighted my self-image even when I was a healthy teenage 130. My experience of 1960’s empire style still makes me shy of Regency garb.
Learning to alter patterns as well as draft is crucial. Good research which reveals portraits such as the above is empowering. A well-executed vintage outfit gives the full-figured dignity. Add the element of a vintage persona and Rule Britannia!
Fantastic article Jennifer, and very encouraging to us “above average” ladies! (Myself included.)
I do have one question:
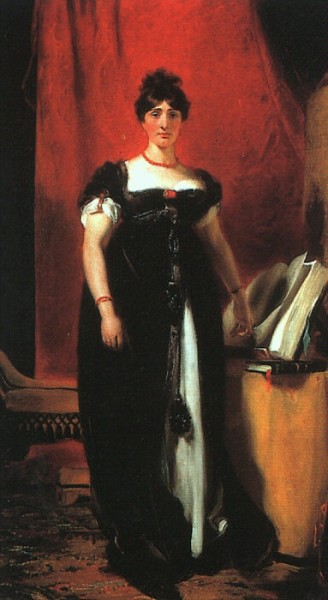
How is the Comtesse de Provence holding up her bosom? It seems like she is wearing stays made of pure magic, as they are perfectly invisible yet render her bosom flawlessly balanced.
Indeed! But let’s not put it aside that the painter would paint out any visible corset lines either. 😉
Thanks for the article – I’m sending it straight to a sewing buddy of mine who would love to get into historical dressing, but thinks she’s too big to look good in a hoop skirt or bustle gown. I’m quite petite, so she doesn’t fully trust me when I tell her how smashing her figure can be when well corseted. (It’s amazing. Holy mega-hourglass, Batman!) Maybe these words of wisdom and wonderful pics will help convince her that she really *can* rock a 19th c. look as well as (or better than!) smaller ladies.
This link has on it Thorton's International System of Cutting Ladies' Garments from 192, and pages 126-127 are for drafting a pattern for a "corpulent ladies' walking skirt." It talks about some of the adjustments to be made when drafting a pattern for an Edwardian skirt that would probably apply, at least generally, to most periods.
How would you build a corset for a woman who is 44DD one side and 44D on the other. OR how would you build a corset for a woman who has had a radical mastectomy on one side. I am the one with the different size breasts. I am modest and don’t want my girls to stick out so one could put what/knots on them. I have worn minimizers since I was 14 and like every thing up close, corralled in, no hint of cleavage showing, and not able to bounce. Even in this day and age, at age 63, men tend to talk to the girls.
PS. the lady with the radical mastectomy is my friend…
Victorians used all sorts of padding and “improvers” to round out the bust. You could make a soft pad to fill the bottom of the smaller cupped breast to make it match your other side (much the way modern “chicken cutlet” bust enhancers work). If your friend prefers to wear a breast form, just make her corset to fit over it like a normal pair of breasts. Otherwise, corsets are constructed in two halves, so you might be able to take the measurements for each half separately to match your body shape (I cannot vouch for this, though, having never seen a corset made with mis-matched halves).
If your friend has painful scars, a corded corset or one with no boning over the chest might be more comfortable for her. I can’t say I’m an expert on corset construction, but it’s a place to start!
What God has forgotten we pad with cotton!
Hahahaha! That’s GREAT!
Great article, thank you!!
Really great article, Jennifer! The photos and portraits you included were fantastic source material. One of the reasons I love historical clothing is because it was custom made to fit the individual, and therefore will be most flattering no matter what body type we possess. I also like to think that the “stout” figure (my men’s clothing sources use the word “corpulent”, which has a nice ring to it) was not something to find troublesome. Rather, it could reflect the sought after ideals of personal wealth and a life of ease – so trim the heck out of plus size garments and flaunt the opulence.
This was awesome, insightful and inspiring. Thank you so much for this.
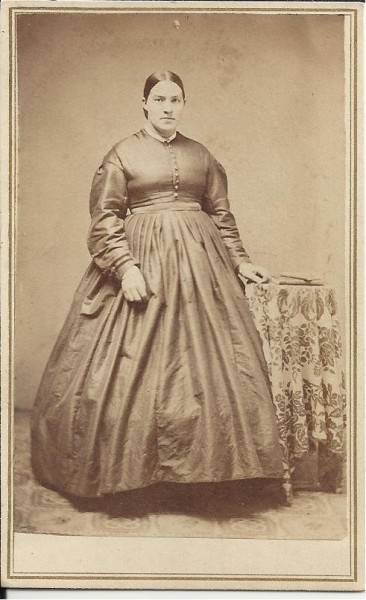
Thank you for a thorough and well-thought out article. I am wondering about that 1860s portrait, though… Given the rise of the skirt in the back and the set of the waist so high on the ribs, she seems to possibly be hiding a belly that’s not due to stoutness. Could she possibly be wearing her skirt higher for pregnancy? Or is the skirt just bumped higher because she is resting on a stool from the photographer? Do you have any thoughts?
hmmm… curious. Very well could be for pregnancy as the hem is up in front and would be down if the waistband sat more horizontal. Good point!
Then again, if one was to have a belly that’s truly extra flesh then this is a good visual to adjust the length of the center front panel to allow for it.
I would suggest that the close proximity to the table is causing her hoop to distort, and thus is the cause of the raised hemline.
She may also just be really short-waisted. I only have 3.5 inches between my underbust and waist and another 5 inches from my waist to lap. In hoops, its makes my waistband sit comparatively high. It’s hard to tell, though. The dress looks like it’s pulling rather than fitted to be that tight. She may very well be pregnant, especially since she appears to be very lightly corseted, if at all. Either way, I like that she is stout and sturdy and not “curvy” at all. (My family has the same shape. We are all hearty folk). Even in corsets, not everyone in the Victorian era was an extreme hourglass shape, especially in the earlier decades.
I made the Mantua Maker Late Regency Dress. I am 5′ tall and a XXXXL. I made it in size 28. The sleeve was HUGE. In the end I had to cut the sleeve using the size 12 lower sleeve and the size 2 top of sleeve. That plus after setting in the sleeve needed to cut down the underarm part of armhole to make it big enough for movement. I KNEW the sleeve as drafted was too big for my height.
This is the other style gown that I made, that follows many of the things you were talking about. I cut the sleeves slimmer on the upper arm and used wider pleats on the skirt. Normally I wouldn’t have added anything like ruffles around the neckline, like in your Worth gown example, as I don’t want to make my bust larger. I was thrilled with adding the ruffles. I felt so comfortable wearing this gown, as it flattered my figure. Like on the Worth gown example, the length and placement/shape of the ruffles or lace was an important part. So I’d recommend cutting it longer and adjusting it to what looks the best to you. But don’t shy away from adding ruffles to a full size figure. I was very pleased with the outcome and got lots of compliments.
That’s beautiful Jeannette!
I loved reading your article, great ideas. I reenact 1860-1864. I recently made new dresses for an event. I was concerned about the style due to needing to be off the shoulder seams, so I didn’t add trim to the seams. I found I absolutely loved this style gown on my plus size. I normally would not have used heavier fabric for my gowns, concerned of adding extra weight. But I loved the outcome. The heavier weight fabric draped wonderfully over curves, much better than the cotton Civil War collection fabrics I had always used before. I cut velvet strips to make the trim for the gown and paid close attention to angles and vertical lines. Then outlined with narrow trim. I’m not a fan of up to the neck styles due to the plus size, so I found a sketch 1857 gown with a keyhole. So, I added it to my design to break up the fabric. I’m also very short waisted, so I loved the jacket as one doesn’t notice.
THREE waist darts??? I don’t remember ever hearing you mention that before! I don’t think I’ve ever seen it on any of the historical dresses I’ve looked at either. It’s a wonderful idea, especially when you have a huge bust-to-waist-to-hip ratio as I do.
I thinks some of my most frustrating fitting problems just got a big boost.
Thanks Jennifer!
Yay! True, you don’t see them much, but I have seen one or two bodices with 3 darts. Heck! Why not?? 🙂
This was very helpful. Thank you so much!