
It’s that moment when you are ready to jump into your first Victorian dress and hold out hope that it’s not as complicated as it “seams.”
Because I’d been sewing clothes for about a dozen years before I got into historical costuming I wasn’t afraid. The gorgeousness of the 1870s & 1880s called me strongly. But so many I talked to in that early part of my journey said the dresses of this later 19th Century era were complicated. Difficult. Time consuming.
Well… yes and no.
First, yes, making a dress from the Victorian Bustle Era takes time. Sometimes 80 hours and up for one ensemble. Depends on your overall design and speed of sewing. I agree that these dresses can be complicated. Complex. Intricate.

However, I have to oppose those thoughts that bustle gowns are too difficult to make.
Because when you peel off the outer layers – the lace, the tucks, pleats, the bertha, the ribbon trim, layers of skirts – there lies a working structure, a foundation we can call it, which is nearly uniform throughout these two Victorian decades.
Let’s look at the some construction tips of the three garments that form the basic foundation of a bustle dress.
Let’s shine a bright Edison light onto the basics of what makes one of these “complicated” dresses so we can be brave in our next project.
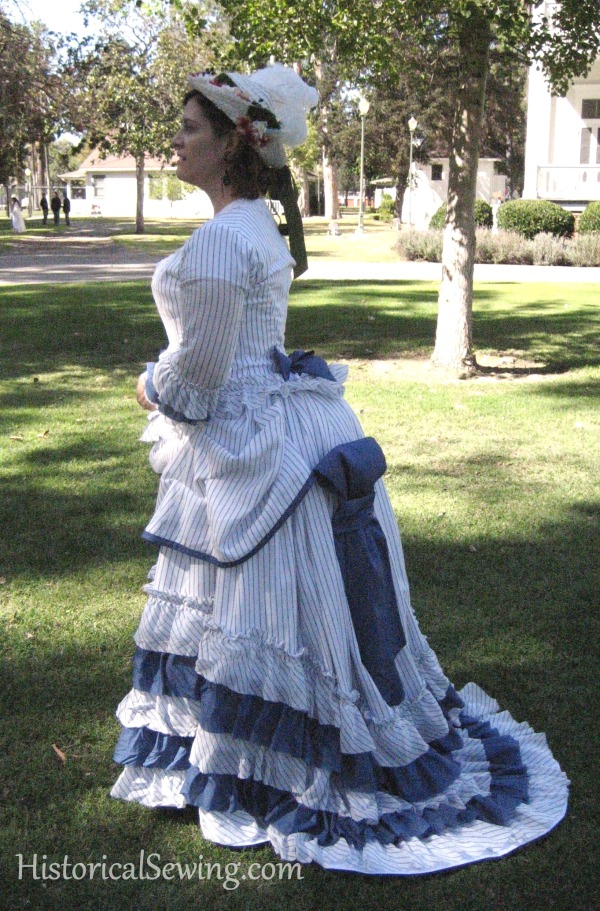
The three main pieces are: underskirt (also called a foundation skirt), overskirt (consisting of front apron and back pouf panel), and bodice. In building a bustle dress you start from the ground up, or hem up if you will. The bodice is the last piece constructed as it needs to fit over all the layers of undergarments and skirts.

Foundation or Underskirt
The base for all awesome bustle dresses is the foundation skirt, sometimes called an underskirt.
When you start with a cotton base, you’ll have a firm support to throw all those fancy trims and ruches and ruffles upon. The cotton underskirt also helps stabilize itself on the petticoats and wire support and works as a good underlining fabric base to mount fancier fashion fabrics to.
I heartily recommend 100% cotton for bustle dress underskirts. However there are some natural fiber blends available that work just as well, like cotton/linen (soft hand) and cotton/silk (can be stiff and difficult to sew as well as warm).
You’ll want a sturdy fabric whenever you mount something on top of it, whether that be a silk or simply rows of 4″ fringe. Many of my more intricate bustle skirts have a foundation skirt that then gets decorated on top.
Appropriate fabrics for underskirts include: twill, lightweight denim, firmly-woven polished cotton, poplin, and home dec linings, quilting fabrics, calico prints with a firm hand, corduroy (small wale), velveteen, sateen, cotton moire and taffeta.

Sometimes you’ll find a gorgeous cotton print that just demands it be seen. Add a little pleated ruffle to the bottom and voila! A quick and easy underskirt.
For bustle foundation skirt shaping, the panels (5 to 7 usually – center front, side fronts, side backs and a back panel in one or two pieces) produce a hem line in a gored shaped, shifted to the back.
The front silhouette is a wide A-line emphasizing a visually small waist, and in later years of the era, slimmer at the hem but still cut in shaped gores.
Most bustle skirts are made with a full panel at the back so it can pouf up and over the bustle. Great, but all that width pleated into the waistline can shift when half-way down the skirt.

Side tapes sewn at two or three spots on the side seams will help keep that full width under control and to the back – where you want it. The tapes are tied or sewed together, horizontally at center back, and lay over the bustle.
Also play with how tight to tie these side tapes. You may find that a bit tighter is better for the silhouette you’re going for (like for 1880s shelf bustles). Sometimes even just a gentle pull from the sides can help keep that back skirt panel in place.

Overskirt
Now that you have your dress base started it’s time to fancy it up with an overskirt.
Overskirts vary widely within the 20 years or so of the Bustle Era. Some have a front apron that can be short, nearly knee length, or almost touching the trim at the underskirt hem. In some bustle years a front apron is non-existent (early 1880s) but side poufs are – emphasizing the hips and visually creating a smaller waist. And other overskirts only have a back pouf panel to create the bustle look.
But generally, a front apron with poufy back panel distinguishes this fun Victorian era.

Overskirts are built with deep pleats at the sides/side back seams. This creates a look of a shorter overskirt pulled up to reveal more of the underskirt.
Deep knife pleats on the side seams help form the back pouf of the overskirt. They are crucial to the development of your bustle poufs and help support them too. Pleats can face up or down on the back panel (down is nice), but the apron pleats are nearly always up (think: crumb catchers).
There’s no definite number of side pleats but have at least two on the front and back skirt panels. Play with the depth too depending on how much overskirt length you have.
Eight smaller pleats will look different than three deep ones. Keep the pleats high on the sides and within the wire part of your bustle support to provide maximum pouf to the silhouette.
For the back poufs ON the back panel of the overskirt, use three long vertical tapes hanging from the waistband. Play with the back fabric by pinning to the tapes to create the bustle puffs. A general ratio of 8″ to 12″ seems to be a good length between tack points on the tapes.
If there’s too much vertical length of fabric between tack points, the poufs will sag and hang over each other. Not enough length and they’ll look pitiful and amateurish.

A final trick for overskirts: add horizontal tie tapes that pull the back of the skirt together so it lays right on top of the foundation skirt. So yes, you can have horizontal ties on both skirts.
Overskirts are beautiful when backed by organdy or silk organza. It gives them a little bit of body but keeps them light. Not all overskirts need the extra support. Although, some bustle dress designs are rather intricate and will need the structure underlinings give. Play with your fabrics keeping your design in mind.
Trim overskirts around the hem; add ribbons or flowers over the side pleats. Remember, in the Bustle Era that more trim is a good thing. Trim the trims and layer up!

Bodice
Coming off the skirts and realizing they are simply fabric layers trimmed out, the bodice seems difficult, most obviously, because fit is HUGE when it comes to sewing a bodice. So for the sake of simplicity let’s shelve the topic of fit for this article and concentrate on the actual sewing.
(For more on fitting read this article.)
Order of Sewing a Victorian Bodice – 10 Steps
1. Flatline main bodice pieces
Flatlining your fashion fabric helps give structure and support for the tightly fitted bodice. It strengthens seams. It provides a foundation for trims (even heavy ones).
Use an underlining fabric that supports your fashion fabric. It can be as light as silk organza or heavy as cotton twill. But do be careful in not choosing a too-heavy underlining fabric as that is an amateur costuming mistake. Let the fit and boning give the structure you need in the bodice.
2. Sew front darts
Nearly all Victorian bodices have two front waist darts to shape the fabric over curves between bust and waist and hips (for those longer garments). For large bust cups or really curvy figures use three small darts in front. Use the darts where you need them. Sew them beautifully.
3. Sew main design seams (i.e. side front seams, all side back seams)
The main seams are simple seams. Sew regular seams and finish raw edges at this point with serging (my modern shortcut), hand whipstitch or binding. You could also pink the edges. Press seams open. Although, some original bodices have seams pressed towards the center back, not all were pressed open.

4. Sew shoulders and side seams
Shoulder and side seams are just like the main seams. Sew, finish raw edges and press open.
5. Flatline sleeves as desired and sew seams
Not all sleeves need to be flatlined. Some light fabrics for summer could simply have a short sleeve lining and be sewn separately (not flatlined with the fashion fabric). Other sleeves, like ones with heavy trim, definitely need inner support. I recommend light cotton or silk organza for nice structure here. After flatlining (or not), sew the main length seams (1 or 2 depending on the pattern).
6. Hem & trim sleeves
I like to finish the hem of my sleeves while they are still separate from the bodice. Just makes it all easier, right? Hem with bias tape (a common Victorian hem treatment). Add cuffs and any other trim now.

7. Add bones in casings to seams and darts
Before setting in the sleeves you’ll want to add the bones to your bodice. Many costumers leave boning til last but it’s so much easier to apply to a bodice with no sleeves. Plus, bone casing can be sewn straight to the seam allowances of the bodice. You’ll want to apply bones to the darts and nearly all seams, but at a minimum the side seam and side back seam.
8. Set sleeves into the bodice
Set in the sleeves. You may dread this step. Don’t. I hear talk about “evil sleeves” so often it’s no wonder a smooth set-in eludes sewers! Don’t mentally set yourself up for failure.
My first step is to pick up one sleeve and try it on. Is it the left or the right? Once decided which arm it goes on, pick up your bodice and find that same side. Start pinning at the bottom most seam/notch at the underarm. Pin up to the easing or gathering stitches (if you have them), then pin the rest.
9. Sew bias around neckline and lower edge to finish
Raw edges along the neckline and lower bodice edge were frequently finished with bias tape on original Victorian bodices. (Sometimes you’ll see full linings but those were for expensive garments.) The bias tape finishing method was the most popular. Bias can be cut from the fashion fabric, the underlining fabric or another lining fabric.
10. Finish with closures of buttons & holes or hook & eye sets
Our last step is to add the closure. Evening bodices were sometimes closed at the back with individual hook & eye sets or hand eyelets & lacing. Front closing bodices had buttons with hand or bound buttonholes or with hook & eye sets.
To get buttonholes spaced evenly, mark the top and bottom holes first (look at originals for placements as they are not always near the finished bodice edges). Decide how many buttons you want on the opening. Measure the space between top & bottom marks and divide by the number of buttons you want minus 1. For example, if you want 10 buttons, divide the length by 9 which will give you the spacing between each button. Pin mark first before drawing in with pen/pencil.

That’s it! Doesn’t seem too hard, right? With all three pieces made your bustle dress is done!
Once you discover that bustle dresses are built primarily from three basic garments the creativity becomes endless! Trims and fabrics (and neckline cuts too) are what set styles apart for wearing at various day and evening events.
Enjoy the inspiration!
Een goede morgen Jennifer Rosburgh .
Mijn naam is mark uit nederlandt,vindt je vichtoriane vrouwen kleding er leuk om de zien.
Voor al de buste rokken/jurken zijn mijn favoriete vichtoriane dameskleding om de zien.
Ik heb geen vriendin,klinkt mischien raar als je als man zijnde ,tegen een vrouwelijke persoon zegt.
Dat je vichtorianse buste rokken je intresse wekken.
Het lijkt mij een prachtige belevenis,om als man zijnde als een vichtorianesse lady naar een vichtorian bal de gaan .
Gekleedt in zo’n vicktorianse bustedres of een bustle rok met bijpassende bloes met een leuk jasje met pofmouwen.
Nog een prettige dag verder,vriendelijke groeten van mark.
Geachte jennifer Rosbrugt
Als ik deze prachtige vichtoriane bustle aanschouw/zie.
Mijn ogen sluit zie mij zelf verschijnen op een vichtorian bal,gekleedt in een van uwe prachtige vichtorianse bustle jurken.
Met het bijpassende vichtoriane tasje erbij,die men om de arm heeft.
Bij elke stap die ik zet hoorde men het getik van het hakje van mijn vichtoriane damesschoentjes wanneer ik een stapje zet tik tik hoorde men dan op de vloer .
Men kon nog nog wat van zien wanneer neusje van mijn damesschoentjes tevoorschijn kwamen onder de onderzijde van de voorzijde van mijn vichtoriane bustle dres wanneer ik een stapje zet.
Thank you! I am not a sewing enthusiast, but I am a writer and have been frustratedly going through google search results trying to find a term for the part of the skirt that you call the ‘pouf back panel’. I don’t know if that’s the historical term, but I’m not working in a historical setting and your term is descriptive enough to make my point without having to spend a sentence’s worth of words describing the part I mean.
Glad to be of help! Good luck with your writing project.
Hi! I’m a longtime reader, but this only my first or second time commenting. I recently purchased 12.5 yards of fabulous pink, green, and gold tartan/plaid silk taffeta at a convention and I have the overwhelming need to make an amazing bustle ensemble with it. I am mixing eras in my pattern choices because I do more steampunk/historical aesthetic than actual reproduction or recreation or anything.
Anyway, I have a question! The taffeta has a fairly firm hand, but obviously flatlining the bodices is mandatory, and I’m somewhat at a loss as to what to use for this step of the project, because I really want this to be just right. The patterns I’ve chosen for the bodices are the 1875 ball gown basque and the 1887 Alexandra bodice from Truly Victorian. I’ve been leaning toward silk organza but am somewhat in denial over this since I’ve only worked with it once and it was fairly frustrating and fiddly. My deadline for this is a late spring event and the next thing I’m going to wear it to is a convention in the Midwest in July, so I’m partially leaning toward it since it would add the least amount of bulk and warmth.
Sounds like a lovely, colorful fabric!
If you want to avoid warmth I would recommend NOT lining in silk, as silk retains warmth. When I use silk taffeta I nearly always flatline in cotton. Remember, an underlining supports the fashion fabric and holds it in the fitted form. Take a look at light cottons such as high-quality muslin, batiste or sateen. Although cotton lawn has a nice drape, it is firmly woven and would be another option for a thin underlining. A cotton will provide comfort as well as help absorb sweat and oils which will keep your silk taffeta cleaner. Have fun sewing!
Taking your advice and also fabric website resources into account and I think I’ve found the one I’m after? It’s 55% linen and 45% cotton, which seem to be the best two fibers for body fluid absorbtion and wicking, to keep both me and my fabric happy and not sweaty. It’s medium weight, though – so for flatlining the sleeves, I might use some of the cotton lawn I plan to purchase for a new chemise and drawers?
Sorry for the incredibly lengthy comments, I just only have about 3 people in my current social circle who do anything that resembles historical sewing. (I know lots of cosplayers, but they all look at me blankly when I ask about flatlining garments. 😂)
Relatedly, I think I’m going to flatline my entire foundation skirt, which will be made out of the plaid with several rows of ruffles on the bottom, for which I think I should use cotton lawn, and flatline the entire overskirt with silk organza?
I’m mostly telling you this so you can tell me if I’ve screwed up somewhere along the line. I’m so afraid of ruining this beautiful fabric that I can never get again-
Your plans sound good! Flatlining does amazing things to your fashion fabrics in terms of support and providing a firm foundation for such fitted garments. So glad you are doing that.
And you’re using that fabric rather than letting it sit in a bin somewhere! Remember, your project won’t be perfect. Strive for excellence and know you are giving that fabric life in a creative bit of work. You won’t be “ruining” it. Simply letting it live on in a new form. Enjoy your creativity with it!
I have a PDF copy of a clothing pattern book from 1888. It’s great fun, because it has all the measurements but no instructions on how to assemble said items. I’m glad I found your article! Also one pattern says “skirt with reeds” and shows where to put them. Is this a built in bustle?
Yes, the reeds would be the “wires” of the built-in bustle. They were more common than we think as not many examples survive.
So I’m trying to figure out what I want to do as far as a bustle gown goes.
On the one hand, I like the ‘hoop like’ nature that the TV108 bustle has, but I keep looking at photos and it just doesn’t look very…poofy to the back? Whereas the Imperial Tournure looks wonderful but doesn’t have that hooped hem.
Do the petticoats and dress skirt make that much of a difference when looking at other photos?
Or maybe my issue is more that the TV108 seems to just come out slightly to the back and then go almost vertical, whereas the drawing and most gowns seem to have a more gentler slope downwards to the back.
Yes they can! Have you read my article on selecting your bustle shape? That might help you further in selecting which bustle to make. https://historicalsewing.com/selecting-the-correct-bustle
Where do you get the patterns you use of the bustle dress.
If I don’t drape/draft myself I start with Truly Victorian‘s patterns. They are awesome!
Your link goes to “trulyvictorian.net” but now I only find links to more searches there – ending up in ebay etc.
I suspect it should be trulyvictorian.info
Yes, she built a new website in the last couple of years with a new URL. I’ll change this page now. Yet I have loads of links to Truly Victorian that it will be a long time before I can get them all changed over specifically. Thanks for letting me know.
Absolutely amazing! Your work is perfect! I have a question, I am 16 and have been sewing for a while. I love historical costuming and really think I am ready to venture into my first ensemble. My only problem is that I’m not sure if I’m ready or old enough to wear a corset. Is there anything else I can do to achieve the right silhouette?
You are old enough to wear a corset. Back then you would have been in a lightly boned one, and you can do the same today. If you don’t want to make/wear a full, bust-supporting one, then a waist cincher would be a good start. (No need to cinch tight.) This will give you a smooth waistline and something for your skirts to hang off of evenly with no weight to your lower back. Wear a good supporting bra with it. When you’re ready you can “upgrade” to a full corset.
Congrats on getting the gumption to move forward with the sewing! 🙂