
The full length princess gowns of the late 1870s and early 1880s scare me. They do. I guess it comes from trying to achieve a good fit with such long seams over such figure curves as mine.
So when I got the need to reproduce the c.1885 dressing gown from the Met Museum I had to put on my Big Girl Drawers and take on the challenge.
My maternity dressing gown is 100% done, it’s beautiful and I’ve already worn it three times!
Following up my last post on creating those front panels with all their yards of laces, now it’s time to look at how I constructed this gown – with its marvelous long seams in the princess dress style.

The original gown has the two front lace panels sewn to fabric side front princess panels. The back is cut wide to accommodate the watteau-pleated design (a throw back to the mid-18th century) and a side back panel.
My first step was to pull out the Truly Victorian TV432 Tea Gown pattern as it provides a great base for those princess seamed Natural Form Era dresses like the original gown and also is drafted with the watteau pleat.

The back and side back panels I left as the Truly Victorian pattern is drafted. No changes there. I cut my gown with the train which ended up being a perfect demi-train length even though it wasn’t as long as the original Met gown.

The TV pattern front is only one piece, so right away I needed to create a side front panel separate from the the panels with the chevron lace design. Also, I was planning on wearing this gown for my baby showers – at seven & eight months pregnant – so changes for maternity wear were a priority.
I used my last fitted bodice pattern for the front and combined with the TV pattern so I didn’t need to fit this new-to-me pattern over the shoulders, neck, sides and center front placement.

Before I did the mockup I traced my previous bodice pattern front with help from the TV pattern lines, erased the darts, and added width to the center front line to allow for a baby bump.
The back and side back panels from the TV pattern were traced out as is. Although, I did end up tapering the size lines from my natural waist size (I wouldn’t be wearing a corset with this gown) to my natural full hip measure to allow plenty of room for my curves from waist to hips. (SO glad I did this!)
For the all-important mockup fitting, I cut the full front, side back and back (with full watteau pleat width) out of plain ol’ muslin, but cut the fabric short just below the full hips. I didn’t need the full length in the mockup as I was cutting the gown length to my measurement at the center front neck to hem.

I was happy with the mockup and don’t think I made any changes but perhaps more width to the center front line to accommodate a growing belly. (I still haven’t decided how I’ll fit this down to wear postpartum but probably put in a large dart in the side front panel.)

During the fitting I also drew in the princess seam line from armhole and over the side of the bust trying to copy the placement of the Met gown. The remaining part of drawing this seam was done at the patterning stage where I took the drawn seam line from the mockup down to about half of the full front panel.

So for the gown front I had both the full front panel from side seam/armhole to center front (which would be cut out of my underlining fabric) and front and side front pieces. The side front was cut from my fashion fabric and my underlining fabric. The front pieces became the template pattern for the lace panels.

I cut the front pattern template from tear-away stabilizer to create the lace front panels. I used 12″ wide stabilizer and had to piece the bottom portion of the front to cover the full panel width. I did this by hand basting a small piece of stabilizer to the main portion and cutting to match the template pattern.
For how I then created the lace fronts, read my post here.
After the lace panels were created I sewed them to the fabric side fronts. The whole thing was then flatlined to the full underlining front panel.

I used cotton lawn in ivory for the main gown fabric with a basic ivory cotton for the underlining. Hart’s Fabric carries nice lawn and the basic cotton was the Country Classics from JoAnn’s. The six different laces were primarily poly or nylon with the rose lace in rayon.

The back was simply flatlined – lawn to basic cotton – with seams finished with my serger (my modern cheat on every costume). The watteau pleat was basted into place, the back sewn to the side back, and the whole thing put on hold while I completed the lace fronts.

Both lawn and cotton fabrics were not wide enough for the full width of my skirt pattern. So I ended up piecing both layers before flatlining. A fun note: when I zoomed in on the hem of the original gown at the Met’s website I noticed it was pieced near the front hem too. How fabulous to be period correct in my reproduction without intending on it!

After the gown was put together on all seams and with front lace panels, I finished the neckline and hem with purchased bias tape. I used 1″ wide on the neckline and 2″ wide hem facing on the hem. When that was done I created the back hem ruffle and mounted it onto the gown.
The ruffle is sewn tight – about 2 times the hem. I narrow hemmed (1/4″) the top and bottom then sewed the edging lace to both sides.
For gather placement, I left about a 1″ header and ran two rows of basting stitches to the outside of where I wanted to attach the ruffle to the gown. I sewed the ruffle down in two rows 1/2″ apart reflecting the original gown technique.

To finish, I flatlined the sleeves and set them in without issue. There was a bit of pieced lace strip left over, so I simply machine stitched it around the wrist hem to make it look complete.
The collar was a standard 1″ wide mandarin shape with two rows of gold lace stitched on top.

The last bit of construction was the center front placket opening. I thought long and hard about how to do this and keep it hidden. Should it be hook & eyes? Buttons? Snaps for ease of dressing although not historically accurate?
I decided on a hidden button placket made from 1″ bias tape. I cut the tape length to match the gown front then marked 17 functional buttonholes from neck to a few inches above the hem. The front edges were then finished with the bias tape and buttons sewn to the left front to finish.

Let me tell you now… this was my Big Learning Moment in this project. DO NOT put buttonholes in bias tape and especially without any stabilizer.
Yeah…… Those buttonholes will stretch like the dickens on you and your buttons will pop out of the holes very easily. That is, if you can get them closed in the first place. Oy!
I ended up safety pinning the front closed for the first wearing of the gown. I then went back and closed up the stretched out holes by hand before the second wearing. I fear they will continue to stretch out so snaps might be in my future with this placket anyway.

I am very happy with how the gown turned out. It was essentially made in four very fast weeks in March/April 2016 with the two weeks prior being all the sourcing of lace and fabric. (It took HOURS and days of searching for the right laces that looked right and were inexpensive.)

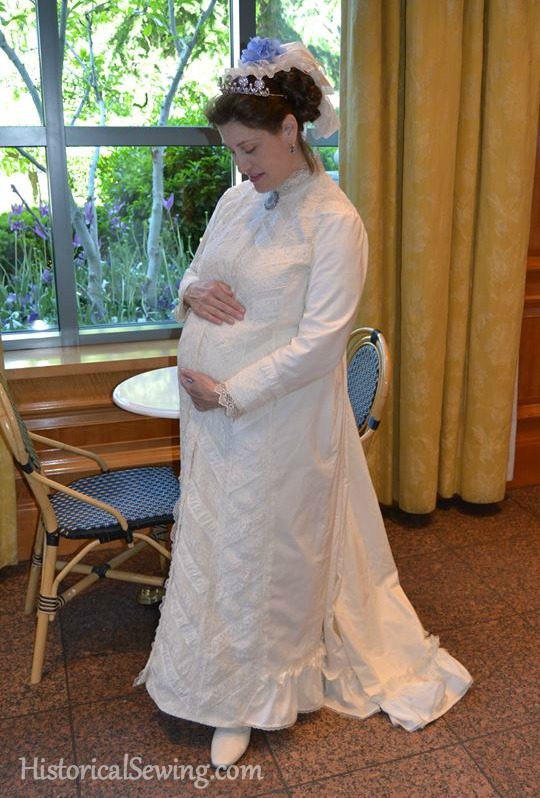
The gown was worn over a modern bra and tank top (I was pregnant, remember?) along with a bustle pad (I have a flat back side) and Bustle Era petticoat. I plan to put in darts in the side front panels to bring in the shape a bit and wear to future events. 🙂
The American Duchess Renoir boots in ivory were the perfect touch.


If you haven’t already, read about how I constructed the lace front panels in this post.
I am so thrilled for you and your sweetheart on the wonderful addition to your family! And that is the most beautiful maternity gown I have ever seen. What a lucky little girl to have such a talented seamstress for a mommy! 🙂
Thank you so much for the kind words Lovelystitches! 🙂
Congratulations on tackling and completing such a scary-ambitious project! It’s gorgeous. And yes, wonderful that you now needed such a gown 🙂
Thank you! And yes – after 15 years of trying our baby girl IS a miracle. 🙂
An absolutely stunning work of art! And congratulations on your first child, so happy for you!
Thanks Richard!
Congratulations on a beautiful gown…and even more on the beautiful reason you needed the gown!
Thank you, Jo. 🙂