How NOT To Set Your Sleeves In Backwards

Sleeves from Delineator, January 1898

Sleeves from Delineator, January 1898


Have you done it? We’ve all been there – it’s pushing 1am and you just want to get the dang sleeves sewn in then you can go to bed.

You pick up one sleeve, look at the seams and the gathered cap, and then start pinning it into the armhole. Good. Now run it through the machine. Smooth sailing.

You pull it out and the arm is totally bent towards the back……. Argh!!!!

Think it’s now time for bed. Just as soon as I run this thing through the garbage disposal…

Reproduction 1838 sleeve

Sometimes I believe sleeves were created simply to aggravate sewers. The arm bends forward; there are darts for the elbow. It shouldn’t be THAT hard to sew them into a bodice.

Besides the fact that sleeves can look really cool (and are mandatory on 19th Century garments), the only good thing about them is that there are only 2: one for cursing, hemming & hawing and the other for near perfection to show off our mad sewing skills.

I’ve not had too many issues with setting in sleeves. But after one too many ground-stomping fits, I knew I had to come up with some sort of method to keep me on track with what side of my body is the right and which one is the left. (You’d think that would’ve stuck in my brain since I was about two.)


Identifying the Correct (Left or Right) Side of the Sleeve

Set In Sleeve on Bustle Bodice

Patterns are usually drafted for the right-hand side of the body. Meaning, when you are looking at the printing on the pattern, if you lay it on your fabric with the correct fabric side up, this will be your right side piece. (Be aware though that just because this is industry standard doesn’t mean independent pattern companies follow it.)

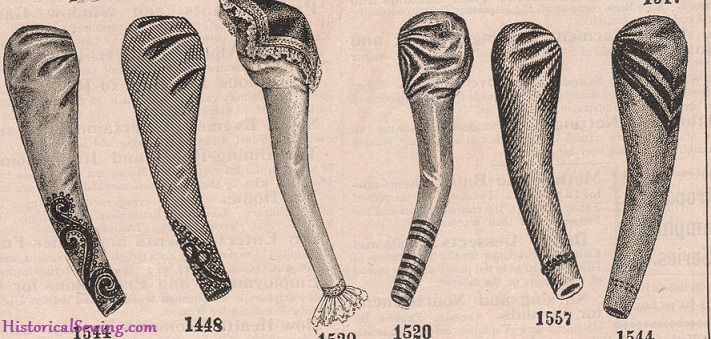
So how you cut your pattern from the fabric will indicate the left or right side. If there is a bend or darts in the arm, that’s a good indication it’s for the elbow or the back of the wrist. By looking at the correct side of the fabric and the bend, you’ll know if it’s for the right or left.

As soon as you’ve cut, mark the correct side of the fabric on EACH sleeve (see marking tips below).


Marks to Tell You Which End Is Up

Sleeve Cap with Notches


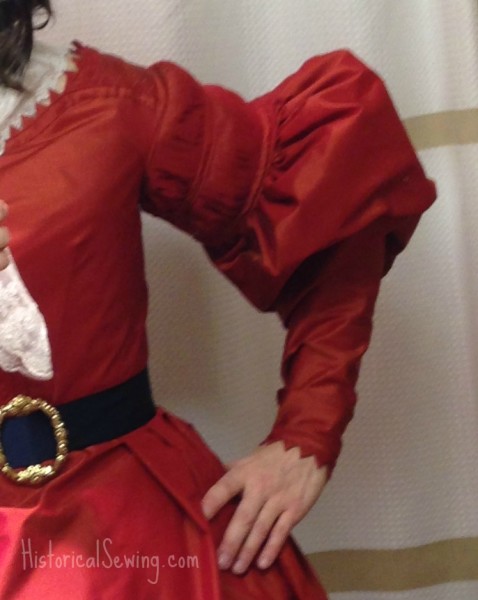
  • Notches – in general, one notch indicates the front and two notches the back. They’re usually placed a few inches up from the lowest underarm area and match to notches on the bodice. Depending on your pattern, the double notches may simply line up with the back princess seam on the bodice.


  • Seam Towards the Front – in my research & sewing experience of 19th C. bodices, sleeve seams are nearly always skewed toward the front of the armpit. This is true for both one-piece and two-piece sleeves.
Two Piece Sleeve Pattern


When working with under and upper sleeve sections, a good guideline is that the shorter seam is the one that will be in front. The longer seam is placed toward the back of the arm.

Some sleeves are cut with a mirror sleeve cap (as in the Notches photo above) where the sleeve seam is matched to the underarm seam of the bodice. If your sleeve is cut this way, use the other tips to show you which is left and right.


  • Armhole Shaping – The front has a tad more concave (inside) curve shaping to it. This is for matching to the curvy bodice armhole edge. The back armhole, from the lowest underarm point up, is a bit more flat as the bodice back armhole is not as curved. This is true even in dropped sleeve styles (e.g. 1860s).

It also helps to know the sleeve cap generally has more fabric towards the top and back.


  • Underarm Scoop – The very bottom center of the armhole is the first place to match to the bodice when sewing in a sleeve. Use the Armhole Shaping and Seam Towards the Front tips to help you determine which sleeve goes on which side.


Ways to Mark So You Don’t Get Turned Around (Literally)

First, hold up the cut sleeve to your arm with the fabric right side out so you can figure out which is the right and left.


A. Safety Pins Are Your Best Friend Here

Place pins on the correct sides of your sleeve. I like to place either one pin on the right hand sleeve (both pieces if it’s a 2-piece sleeve) or one on the right hand side and two on the left.

I ALWAYS put the safety pins on the correct side of the fabric. But put your pins on the same side or in the same manner that will make sense to you and that you’ll remember. (Sewing is personal, remember.)


B. Use a Marking Tool

I like a plain ol’ pencil. But don’t use a disappearing one as it’ll probably come out before you get around to setting in the sleeves. Ha!

Make a mark on the WRONG side of the fabric in the seam allowance at the top of the sleeve cap. I like to use an “R” for right and “L” for left to keep it simple.


Sleeves can be tricky. Even for the most experienced seamstress. Take your time. You get better with each pair you set in.

Above all, apply a little patience. It’ll go a long way to getting them in the right way – the first time. Most of us rush to sew them in, but slowing down will do wonders for those mad skills.

For a video tutorial on how I set in sleeves, visit this post.Β 

More on fitting your sleeves is found in my BFF post.


How are your sleeve-setting skills? What other ways have you found helpful so you don’t get your sleeves in backwards?

41 thoughts on “How NOT To Set Your Sleeves In Backwards

  1. Tess says:

    I have just finished sewing my first top…. I’m an absolute beginner, and was delighted when I’d cut out and placed my petal sleeve. I was puzzled by the instructions in the pattern where it said place the back over the front but when it looked ok I carried on. For some reason it wasn’t looking the same for the other sleeve but I blindly carried on and placed and surged the sleeve. I was so pleased they it was on right side out. That is until I tried it on and after some time trying to figure out why one sleeve was longer than the other and the overlap seemed to be at the back, realisation slowly dawned that I’d actually sewed two right sleeves! I was gutted! I unpicked and tried again making sure I flipped the pattern this time, but I did the same thing again. I still don’t know what I’ve done wrong. I’ve now run out of fabric and am sitting wearing my unique top. The lesson learned was to cut out the pattern on folded fabric. I’d misread the instructions and didn’t understand what cut out a mirror image meant and cut it out on single layer.

    • FloweringTree says:

      Oh, sympathies! Pattern flipping for left and right pieces is a nightmare – there are too many directions things can be rotated in. I was actually doing paid work on one occasion when I cut out two non-reflecting pieces instead of mirror images on a one sided fabric. (I didn’t use a fold because the two pieces needed to be different sizes). And I was well aware of the danger and I’d checked several times. I too will never know what I did wrong. I was able to cut the piece again, but it was an awful waste of fabric, and the finish (due to a subtle pattern in the fabric) was much poorer than if I had got it right first time. The customer was very gracious about it and I think it was genuinely all right for the purpose in question (says she hopefully!).

      I suppose that is why the conventional way of doing it is to cut mirror images on folded fabric: the left and right can’t go wrong, whatever else can.

      When people say that we haven’t got enough hands, I always think that I’m very glad I only have to sew two sleeves… imagine trying to make sleeves for an octopus πŸ˜› πŸ™‚ >< Best of luck with your future dressmaking adventures πŸ™‚

  2. Andrea says:

    My last blouse I pinned scraps of paper the said L and R on the correct sleeves and bodice fronts. Why, no, I have not managed to sew them both inside out before, why are you looking at me like that?

  3. Linda Keenan says:

    I am having trouble grasping this: I have cut out 2 sleeves printed side of pattern facing up when fabric folded. so right side of fabric is inside so even though printed side of pattern is on wrong side of fabric when folded than the left sleeve right side of fabric that was on inside is facing up so if right side is facing up is the 2nd sleeve that was a double cut one on top of the other is that correct right and left sleeve so confused!!

    • Jennifer Rosbrugh says:

      No, you are a-ok! When the fabric is folded you are cutting two mirrored pieces. Doesn’t matter that your pattern text is right side up or not. After you cut you can “open” and separate the two sleeves and you’ll see you have a left and right. Don’t overthink this part!

      Now… if you are cutting a single layer of fabric, then 1) you place pattern with text up on the correct side of the fabric and cut. Then 2) you *turn the pattern over so the text is down and touching the correct side of the fabric. (No need to flip the fabric.) When cutting one layer use the same layout of fabric and merely turn the pattern pieces over as necessary.

      Also, either way you cut – single or double layer with fabric folded – you’ll want to pay attention to the markings on the pattern. The notches (or other text, hopefully) will tell you which way to match to your bodice. You may find my video post on the actually sewing in a sleeve helpful.

      • anita stith says:

        I cut my sleeves out on single layer fabric that pictures fabric layout with wrong side up and flipping one pattern piece printed side down .Then noticed instructions : If cutting out single layer of fabric cut with right side up..could this be why my sleeves don’t look right ? I am new to sewing

        • Jennifer Rosbrugh says:

          Left and right sleeves will be mirror images of each other. When cutting single layer, lay fabric correct side up and pattern with text print up for one sleeve; then leaving fabric correct side up, flip the pattern with the text side down for the other sleeve. It can be confusing! Keep at it.

  4. Cecily says:

    I often put sleeves in backwards….so I’ve taken to pinning the sleeves on the mannequin to make sure they are on the correct side of the body and then hold up the dress/blouse/jacket and take off the sleeve I want to sew and immediately pin it to the correct sleeve hole….only way I can consistently make sure that I sew it on the correct side

    • Judy says:

      I once reversed the sleeves because the original 1920s Vogue pattern had the double notch in the front! More maddening because the fabric was silk charmeuse, and of course didn’t realize it until both sleeves were in with Hong Kong finish.

  5. MaidMirawyn says:

    So glad it’s not just me!

    Two friends and I just made Regency gowns for a group Pride and Prejudice and Zombies cosplay. (Don’t be so quick to judge! We had pretty gowns, all the accessories, and got to carry weapons!) Each of us ended up ranting about sleeves on Facebook. I was muttering about never sewing anything with sleeves ever again. (Of course, my husband was quick to remind me I said the same thing when I sewed a floor length princess seamed gown with long sleeves…) The funny part is that we were all sewing something different, and still experienced sleeve difficulties.

    I did find it helpful to stick a small piece of washi tape to each sleeve piece, marked “R” and “L”. If I had thought of it earlier, it would have been even more helpful. Like when I was cutting the bloomin’ thing out, perhaps…

    I spent a lot of time perusing this site while planning my costume, so thank you for all the informative posts. Next up is a spencer or pelisse for my winter convention! Dreading the sleeve already. πŸ™‚

  6. Varika says:

    I mark the front of the sleeve with an “F” up in the seam allowance on the wrong side, when I draft my own patterns. On all the pieces, if I’m doing a poufy thing. If I’m doing a commercial pattern–which so far I’ve only used the Big Three–I mark the markings on the bodice as well as the sleeve.

    ….and I STILL get it wrong sometimes…

  7. Sara says:

    I have never set a sleeve in backwards (yet! and you better believe I knocked on wood once I said that!), but I make up for it by having sewn more than my fair share in inside out. Apparently I cannot get my backbrain around the idea that right-sides-together equals the bodice inside out but the sleeve right-side out. I now pin and then turn everything right side out to make sure I did it the correct way. I also write “SLEEVE GOES RIGHT SIDE OUT” next to the pattern instruction if I’m using someone else’s pattern. It’s a little easier for modern construction, where the sleeve and side seams align and you can set in sleeves flat, then sew a single seam to close the sides and sleeve at the same time, in many cases.

  8. joyce says:

    I have just finished a silk blouse and discovered I have sewn one sleeve (the one that went in perfectly) in backwards. It was destined for the bin but after reading this article and the comments I have been given the courage to carry on. I will make a new sleeve and cuff and refit it. Thank you all for saving my sanity – I am not alone.

  9. Maureen Burns says:

    Jennifer, I just set in my sleeves and was wondering a historical way to finish the seams? Or just serge? πŸ™‚ Love your blog to pieces!

  10. Tracey Walker says:

    This is the number one reason I don’t use a Serger. I always sew sleeves in wrong the first time and serging wouldn’t leave any extra seam allowance to play with to do it over again.

  11. Diane Ullman says:

    I’m setting sleeve sometime this week. Maybe today. I’m going to review this article several times first.

  12. Margaret Rose says:

    I once sewed the right sleeve on a dress incorrectly 6 times in a row. I threw the thing across the room (yes, it was 2 am) and never finished it. Sleeves are my nemesis!

    • K. Winter says:

      Once I sewed my sleeves on backwards, then upside down, and then I had a small breakdown, but bravely sewed on, because I was supposed to be wearing that damn bridesmaid dress in my friend’s wedding in a couple of hours, at the other end of the city, looking presentable and not at all like a hysterical madwoman. Luckily for me it didn’t matter if I was a wee bit late, because the bride and her parents got stuck in traffic!
      Her burgundy hoopskirt gown was just gorgeous… πŸ™‚

      • K. Winter says:

        For some reason I can only ever get sleeves to really fit right if I try them on before I pin them. And then I try on whatever I’m making a couple more times too, before I sew the sleeves in, just to be sure. For some reason I just don’t like setting sleeves, so I triple check everything so I only have to do it once!

  13. melody says:

    If Ican avoid doing “Set-in” sleeves I will. I learned from my Aunt ,who worked on a line sewing lingerie ,to sew in the sleeves in on the flat bodice (Piece only sewn at the shoulder seams) then sew up the srm and down the bodice. I have done the old”magic sleeve routine” where you keep turning the sleeves inside- out/outside -in .trying to get the fabric to match before you realise you sewed it in ,inside out.

  14. Wanda says:

    On of my first set of sleeves nearly went to the trash with my blood on it…because I was ready to slit my wrists. It was an 1890s with the poofy outer sleeve and the fitted inner sleeve. I attached the right outer to the left inner. I attached the correct outer and inner together but I had the wrong side of the outer facing the right side of the inner then did the same thing to the other sleeve! It went on and on like this. I think I did the sleeves three or 4 times each! My problem was there was not a great difference between the right and wrong sides of the two fabrics. The pin idea would have saved me TONS of work!

    • Jennifer Rosbrugh says:

      Oh no! I feel for the struggles you went through! Hopefully it turned out looking good in the end. If not, I hope the next one was loads better.

  15. Judith says:

    Never fails…everytime that a sleeve goes in nice and slick, the ole heart stops as soon as you turn the sleeve right side out and find that it is in the wrong way! Always feel so stubid when it’s such a dumb mistake!…grrrr.. this also happens with cuffs for me, also. So now I take some soft chalk and make a nice big x on the top edge of the sleeve head and another big x in the center of the bottom edge. This way I can’t miss the big white x as I sew up the seam or gather. The x easily wipes or brushes right off when I’m done, before I turn it rightside out.

  16. Nicole says:

    I had this problem just this weekend! I though my dress was near completion then I tried it on and just looked awful! I’m happy to know I’m not the only one!

  17. Melanie Thomas says:

    I love that you use a regular pencil too! Unless it’s a really fine silk or sheer fabric I usually mark all my markings with a pencil on the wrong side of the fabric. They’re generally on hand and a lot cheaper then the disappearing ones.

    For setting sleeves I like to lay the garment out in front of me right side out and lay the sleeves on either side to see how it will look when sewed, then I’ll flip the garment over the sleeve putting them right sides together… and once you have one sleeve on it definitely makes it easier! Hope that makes sense.

    One little story of sleeve setting problems… my father is the first person that taught me anything about sewing. I remember sitting on his lap guiding the fabric through the machine as he pressed the petal. He didn’t know a lot of sewing, but we were part of a Colonial Minute Man group and having a bunch of siblings, sewing was necessary to afford the clothes. We didn’t have patterns… just sketches with measurements for the men’s shirts (all the pieces were square or rectangular making it easier). My father always had trouble gathering the sleeves into the armhole and usually had to put a sleeve in a few times as the fabric would catch underneath or bunch… etc. One day he was so excited as he showed us all how he just sewed a sleeve in perfectly… until he pulled it out and realized he had sewn the sleeve inside out! We all learned the very valuable lesson that you mentioned above: Take your time! We now also double check to make sure it’s all pinned right before sewing. It’s so much easier to be more thorough even if it means going a little slower then putting it in quick only to have to take it out again.

    Thanks for sharing the other tips… I love the safety pin idea!

  18. Artemisia Moltabocca says:

    Thank you for this post. My sleeve skills? Well, after five years of costuming I still manage to set my sleeves in backwards. I made a shirt recently and I didn’t understand why it didn’t feel quite right…and why where the cuff buttons on the inside of my wrist instead of the outside? *sigh* I fretted about the sleeve placement for hours before I sewed it in, and I still managed to put them in backwards. Well, at least it’s much better than my first experience with sleeves all those years ago. Back then I managed to make a sleeve for a four armed mythical creature…my first experience with sleeve lining. πŸ™‚

Leave a Reply

Your email address will not be published. Required fields are marked *

This site uses Akismet to reduce spam. Learn how your comment data is processed.