
When Heather of Truly Victorian published her new Edwardian patterns in 2011, I knew it was time for me to move into the 20th Century.
For some reason Edwardian clothes intimidate me. You’re probably thinking, “Yeah, but you sew all those detailed bustle dresses. How can a shirtwaist and skirt frighten you?” It does… despite my drooling love of early 1900s fashions.
I started with the Edwardian corset made during a successful Sew Along with 49 other sewers. Then taught a workshop class of 8 for the Costumer’s Guild West. Because this was a new era for me I now needed the undergarments. Victorian ones would not work for the proper silhouette. So onto frilly underwear I went…. 🙂
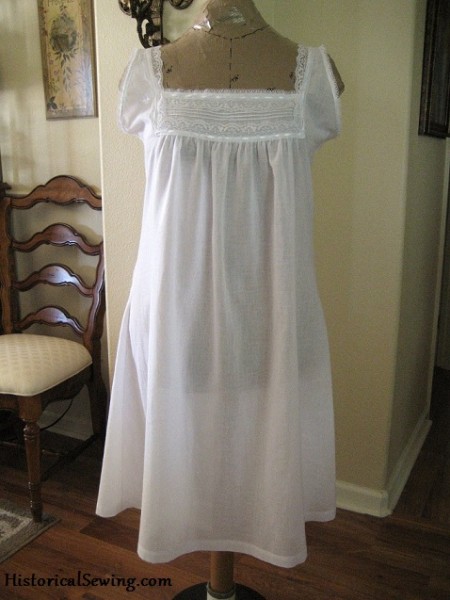
Chemise
In my silliness I thought I would just whip up the chemise in a couple of days. Get it out of the way so I could work on those fancy drawers with all the trim.
Yeah.
I think the daughters of Victorian women had enough of trimming dresses. “Let’s put it all on our underwear!” I can just hear them exclaim over tea one afternoon. And that’s how it started.
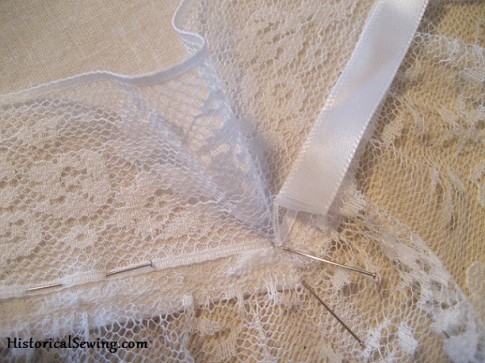
“Ooh! We can avoid hemming everything by turning the seam allowances to the RIGHT side and just sew some lace over the top to cover the raw edges.” Perfect! What they didn’t realize was that 100 years later people crazy enough to want to make clothes like they did would be short of time. Needless to say, I really could have completed my next bustle bodice in the same time it took to press all those seam allowances in and sew lace over them.

The yoke was first. Directions say you can decorate it with tucks or insertion. Oh, ok. So I quickly added 3 rows to the center of the front yoke. I did this 1) so I’d have some cool period trim and 2) I could tell which side was the front.
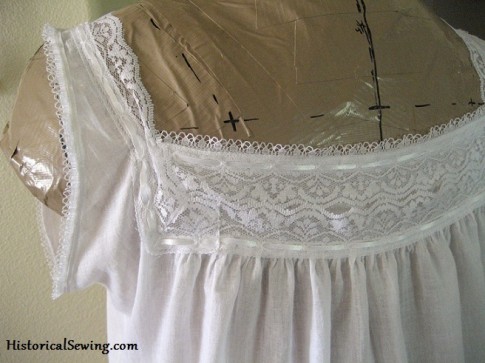
The back yoke is cut smaller but if you didn’t mark it and you trimmed the yokes the same you could very well wear your chemise backwards.
The sides and shoulders are sewn with French seams which I wouldn’t have done any other way. It’s period and perfect for a chemise.
The neckline is finished with lace edging with a beading for an 1/8″ ribbon. The lace finishes the bottom of the yokes as well as the entire neckline. I purchased 3 yards as the pattern listed but ended up short to use the same lace to finish the armholes. I cut an F bust size for the chemise top area and needed about 3.5 yards.

Not to let this set-back stall my sewing time, I quickly fished out a narrow 3/8″ lace from the stash to finish those armhole edges. And, as this is Edwardian, I added a row of the 1/8″ ribbon on top. Just because.
The directions for the chemise are easy to follow; however, if you’ve not sewn with heirloom techniques, you’ll want to walk through the yoke placement with trim finishing first. The pattern pieces are easy to cut and handle. (Although be mindful of soft fabrics stretching when making the hem.)
French Drawers
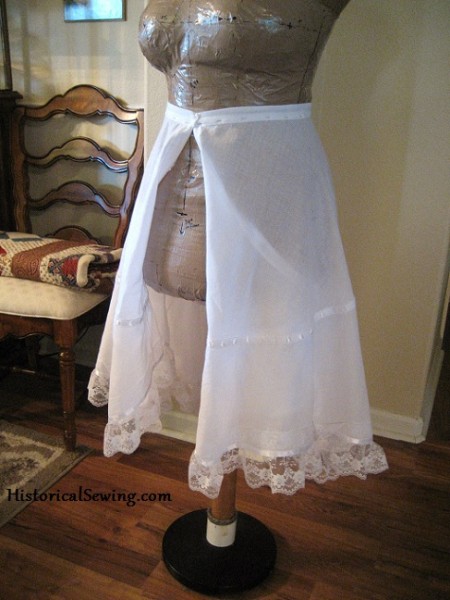
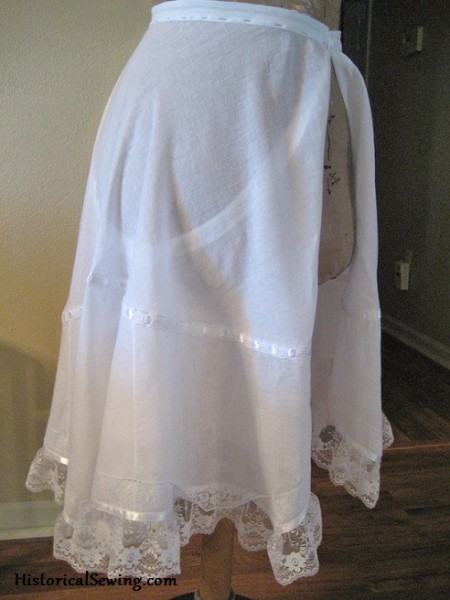
Aside from needing the chemise, I really bought the pattern for the drawers. They look so fabulous as undergarments for the Edwardian era. (I’ve had the Past Patterns drawers pattern for years but have never made them). I made the shaped hem ones.
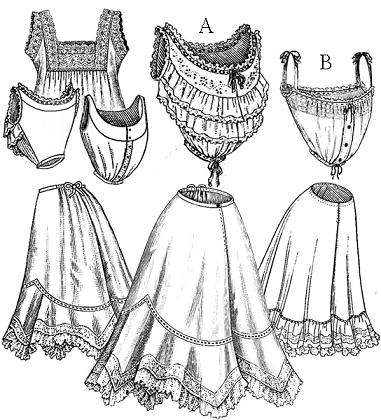
Take a look at the pattern sketch again (taken straight from a period source):
Those drawers don’t look too bad… hit just below the knee. Well, I must be REALLY short at 5’4″ as the back edge falls mid calf with the ~2.5″ lace ruffle hitting just a few inches above my ankle bone! As the pattern states, they are full at the knee and smooth around the hips. Great. I’m just betting on the fullness at the calf to operate as a mini petticoat under my skirt.
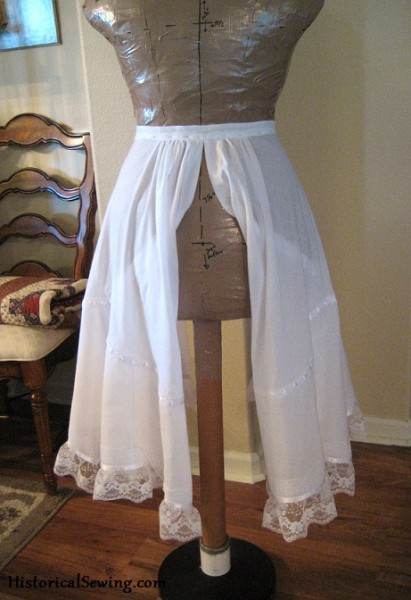
Here’s the front view showing the smooth waist:
The pattern piece for the leg is HUGE and is cut as one piece across the width of the fabric. Because of this there are bias edges everywhere. I’m using the same fabric as the chemise (a 100% cotton sheer that I call a lawn but could just be a thick voile. It is super soft!) But because of the gentle fabric I’ve really had to pay close attention not to stretch the curved edges of the flounce as well as the leg, waist and bottom edges.
The flounce seams are French. The facing is quite similar to the other Truly Victorian drawers pattern and sews on the same way. The waist is smooth with only the very back few inches gathered in to fit your measured waistband.
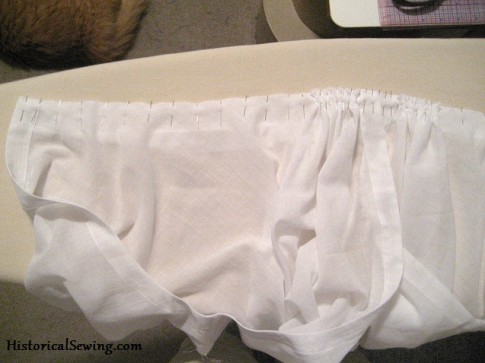
Speaking of the waistband, the pattern says to cut 2. However, the directions tell you to sew it to the drawers, press in 1/2″ on the opposite side and ends, fold over and tack down – meaning her instructions are copied from her skirt patterns and only use 1 cut piece. Besides, if you were to follow this you’d have about a 1/4″ wide waistband.
Again, because the sheerness of my fabric I decided to use both cut pieces, using one as a facing with a seam for support along the top edge.
I sewed the long edges and ends together, graded the seam and turned out. I pressed up a 1/2″ allowance on the facing side. Then I sewed the drawer legs to the waistband and hand tacked the facing down over the seam.
Drawers Flounce Trim
The instructions are very minimal on the flounce trimming: “Hem the flounce with a small hem, or sew a lace trim to the hem.” Ok.
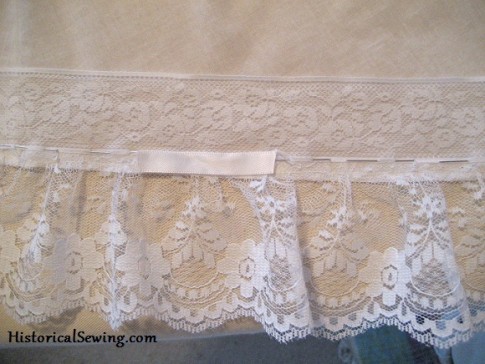
So I simply decided to use the sketch again for my inspiration. You can see a ruffle at the hem then a flat lace and another braid or trim on the flounce/leg seam.
Since the instructions were sketchy I had to guesstimate how much trim I needed. With my size H drawers, the hem on both legs takes about 5 yards of trim total.
My first purchase of ruffled lace was too heavy for my fabric so I decided to make my own. I ruffled it with my gathering foot (love that!), eyeballed the placement and stitched down (after pressing the raw edge to the OUTSIDE, of course, so the lace would cover it). I then trimmed the seam (bottom of photo).
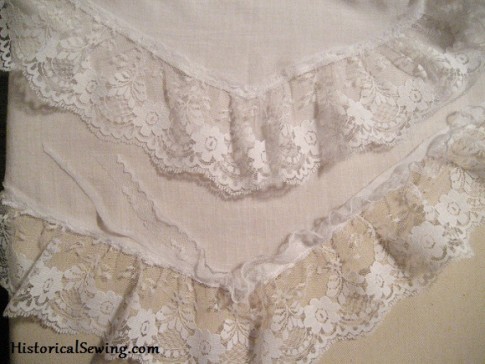
The flat lace I again eyeballed by using the 3/8″ wide ribbon for spacing that would cover it all up. When you are applying trim to the hem, be very careful not to stretch those bias edges!
The flounce has 3 defined corners at the hem so I had to miter the flat lace to go around.
I used a simple 5/8″ beading eyelet lace for the seam between the drawer legs and flounces. After all the other trims, this one was easy.
Overall the pattern is great! A very nice addition to sewing pattern collections everywhere. Although, I wish trim yardage was given on the instruction sheet. And the drawers are incredibly long! Next time I think I’ll use the straight leg and sew a simple 3″ lace at the hem.
I would definitely recommend it for beginning costumers (who know how to sew). Just be aware that if you want that Turn-of-the-Century frilly look, you’ll have to plan extra time for it.
Final note: I will be making the corset cover too. hmm… I might make the ruffles separately and sew on clear snaps so I can get use out of it from 1900 through the mid-Teens costumes.
Have you made this pattern? What do you think of it? Please share your experience below.
Thank you for your nice explanation: the result is gorgeous
I am currently working on the chemise, but I have this problem where the outside seam allowances stay very “horizontal” instead of going down (i pressed it- a lot, and I covered them with a ribbon and lace.) Did you had any “tips” for that?
And do you stitch a ribbon all around the seam allowances, like a biais, or you just sew lace on top and let the raw edges underneath?
Thank you for your answer!
As with heirloom sewing the seam allowances are topstitched or basted down first to hold, then covered with the lace. Sometimes the lace is sewn on with the same seam that holds the seam allowance in place. The raw edges stay there underneath the ribbon and/or lace. 🙂
Thank you for your ver quick answer. So if I understand well, they are just hidden, but if you would raise up the seam allowance you’ll see it right? I mean yeah, not like a biais that would wrap up the seam, but juste on the apparent side?
The lace/trim is stitched, most often, on both long edges so it encases the raw edge of the seam allowance. But it’s simply wrapped to the front and covered with trim.
Thanks, Jennifer, for pointing out the little details that might have some of us scratching our heads. I have the pattern but have not made anything from it yet. I’ve got the corset so I really need to get going on the undies. Your fabric choice looks nice. I’m a big fan of Dharma’s silky cotton voile for period undies.
Loving your website. Thinking of having a go at a period dress but I’m a beginner. Could you please advise me on what dress to start with.
Hi Caroline! Welcome. For beginners I always refer to this post on what to make first. After that, pick a time period/era you find interesting and go from there. Also, we have a new online class coming up in February that covers Victorian undergarments. Keep that in mind if that interests you.
H-hand sewing? *whimper*
Hand sewing can be tedious and at times it feels like you’re not getting anywhere. But the results are so worth it.
D’oh, I saw the reference to lawn when I reread the article. Thanks for the warning about the length of the drawers. I’m 5’6″ but have short legs in proportion to the rest of me and have learned to plan on shortening everything. BTW, the photos of you in the finished undergarments is lovely.
The fabric is lovely, so delicate and sheer. Is it handkerchief linen or cotton lawn or something else? Enquiring minds want to know 🙂
It’s a 100% cotton sheer that I’d call a lawn. It’s like a heavy voile too but opaque.
I’m glad to see someone has made these up and checked them out. 🙂 Yours came out really pretty, and I can’t wait to make mine. Still need to get the fabric for them tho.
Nice comments – – detailed some sticky issue resolutions. Thank you