
Finally finished!! My, but this took me longer than I anticipated. I’d made Regency corsets before but not a fully corded one. I love all the details and can actually say this one is 100% done. (Yes, I even flossed all 8 gussets. Ha!)
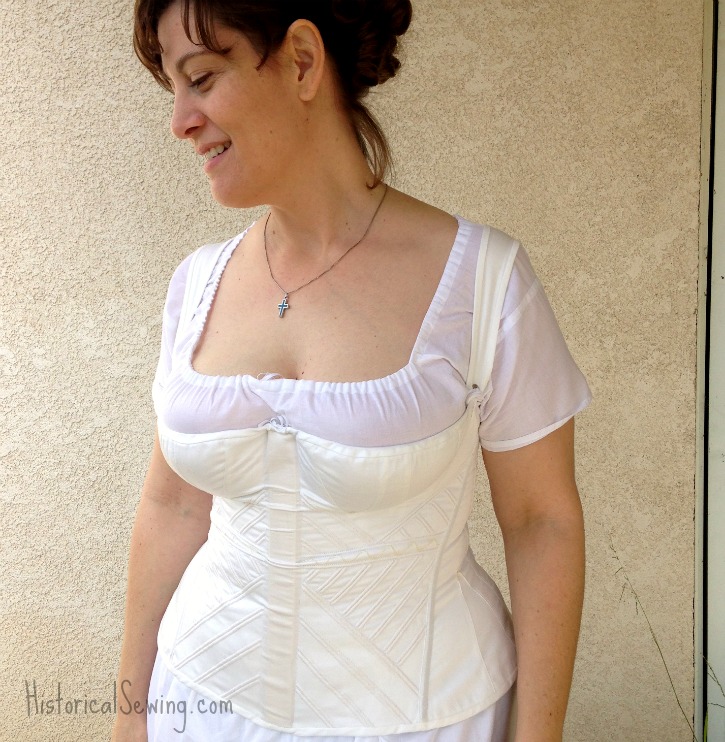
It’s very comfy, has six metal bones, wood busk and I love it!
Here’s more details and photos of my new undergarments.

This corset (along with the chemise) began in late November 2014 and was finally finished in very early February 2015. I used the Laughing Moon #115 pattern complete from the package with only personal fitting tweaks.
In early 2014 I was trying to get together a new online class for a Regency corset. I can’t even begin to tell you the fear that held me back from such a project when I’d already successfully made other Regency corsets as well as many Victorian corsets and one Edwardian. But this one was different. It kinda scared me.
Well, perseverance took over (as the deadline for class registration approached) and I kicked fear in the face.
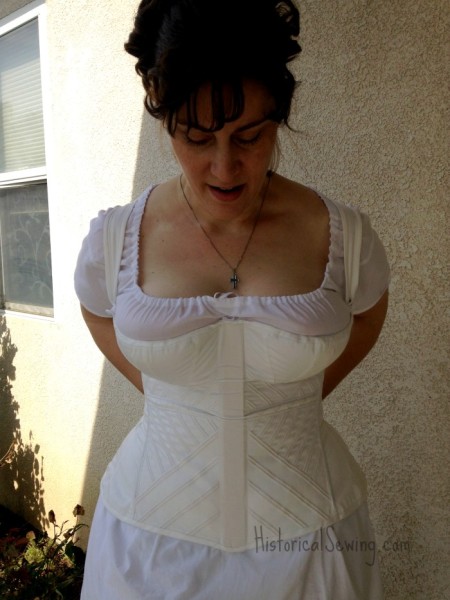
The chemise was fairly basic but made entirely with flat felled seams. I made it from a cotton lawn from Renaissance Fabrics. So comfy! My only only gripe is the back is really high near my neck. I cut the low front but I think if I make it again I’ll cut the back down and use longer shoulder straps so I can cut low back necklines on my dresses.
For the corset I used white cotton sateen (also from Renaissance Fabrics – fantastic quality!) for the face and plain cotton broadcloth (a high quality muslin from the local store) for the lining. I followed the pattern for selecting my sizes and only needed a few minor tweaks to fit. (Even after fitting my mockup the lower edge still came out too large but you can’t really tell.)

I’m a 36DDD with a narrow back and have always been hesitant on corsets that are only supported by cording. (Part of that “scary” part I had to deal with as I ventured into this project.) I will say, this pattern does excellent work on sizing, and if you spend time working out what size(s) you need to cut it does work out very well.

It doesn’t lift my bust as far as the flesh will actually go, but I naturally sit low. This style corset (and the fashions that are worn on top) fits right at that underbust level. I’ve found this corset to support me very well with no “falling out” issues. It’s merely accepting that my figure is SO not like those we see in the early 1800 fashion plates. (But none of us look like a fashion plate so we just need to concentrate on emphasizing the assets we do have.)

You can see here just how high that chemise sits on my back. Gah… This one’s only for day wear!
As for the corset, I used metal grommets because I didn’t want to take the time to make hand eyelets. There is a flat metal bone at the very center back edges to support the cinching. I’m gently cinched in but not like a tight Victorian firmness.
Those little divots you see near the waist… yeah, those are flesh rolls (probably about 20 pounds worth). The corset isn’t too long. Because there’s no metal boning there, the corset fabric simply follows my figure. I also have a high right hip (due to a longer leg) so that’s the reason for the larger folds on the right. And yes, I was too lazy to make separate corset halves.

Probably my favorite part of this style of corset are the straps. (I’m a dork.) The straps are a secret key to fitting this corset and shaping the figure into the fashionable silhouette. They are very comfortable and don’t fall off my (sloping) shoulders due to the starting placement near my center back and the firm tension as they are tied to the front corner of the corset.
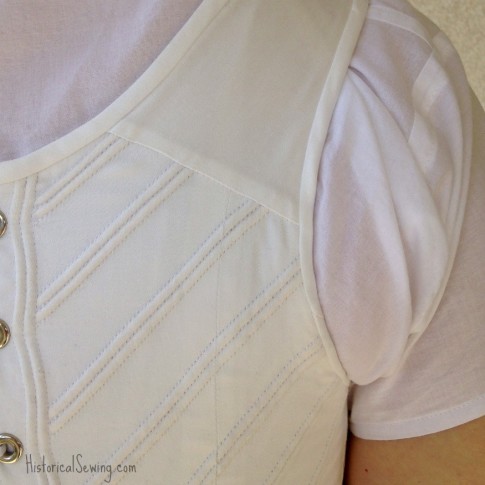
The top & bottom edges are bound with bias cut from the sateen material. Ahhh… all those rows of stitching and fine cords… that took me a bloody 13 hours to mark, sew and insert. ugh… But they look terrific! I can’t imagine doing this all by hand!!

You’ll notice I have a spiral bone running a bit diagonal along the side front seam. The pattern suggested it and I wouldn’t want to miss it. (Again, metal in a corset does wonders!) The cording design is straight from the pattern that JoAnn (designer at Laughing Moon) took from an antique corset in her personal collection. Period correct!
You can see the two hip gussets and the wide bust gussets here in their placement and a bit of flossing in pale yellow. I also tied the straps on because they were a tiny bit short to sew to the corset and still be comfortable.

I cheated with my busk. I *did* follow the pattern recommendations, but I still cheated.
It’s a paint stick. From the hardware store. And it’s a tad too long (because my corset shrank 1/2″ in length from all the cording). My other Regency corsets have real hardwood busks that are beautiful. I used a paint stick. But it works! Cheap (aka free) and easy to replace in case I ever double over laughing so hard it snaps in half (which I hope never happens as that would HURT).

I love the above photo with all the details of where those bust gussets start at my figure and the radiating cording channels and my amateur embroidery and gusset flossing.
You’ll also notice, I’m sure, the folding of the busk pocket. – I can hear you now: But you said the busk (aka paint stick) was too long! How can the busk pocket be buckling like that??
Well… it’s because the fabric “shrank” from sewing all the channels and then inserting the cording. The busk pocket doesn’t have channels to keep it in place or to “shrink” it to match the sides. I’m sure this is period correct. And it doesn’t affect the fit only the imperfect appearance (to which I say, bah! because nothing is perfect).


This is me singing praises that I finally finished this project!!
Have you made a corded corset? Did it turn out the way you expected? If you want to try your hand at it again (or for the first time) and punch fear in the face, my Regency Corset & Chemise online class is hosted by me personally once or twice a year. Amazing creativity happens in our classes.

Very late to the party on this, but I’m about to embark on this corset! Yours is beautiful – thanks for such great detailed photos.
I’ve made several Victorian corsets (using the Truly Victorian pattern) for my role as an Experience Maker volunteer at a National Trust Victorian mansion. We’re doing something a little different for Hallowe’en this year and it involves a Regency costume, which is great as I am keen to challenge myself with new techniques. So glad that this pattern works for the well-endowed – the correct underpinnings make such a difference to the overall look and my girls are a good 38FF!
Enjoy your new journey of Regency sewing!
Oh my, a woman my size with a bust size similar to mine, and you made gorgeous stays. Maybe I will be able to make some after all! These are lovely.
Why, thank you! I like to remind everyone – including myself – that there have been women of ALL sizes throughout history.
Best of luck on your own corset! 🙂
It’s beautiful! Nice work. Thank you for taking the time to share. I just got this pattern and now I know I’ll make a few adjustments (lower back, for instance) based on your experience. Very much appreciated!
You are welcome, Chris. Good luck with your own corset project!
Yes, I made this corset and it turned out to be so large I opened the diagonal side seams and took in at least an inch. I went wrong on trying to fit it on my dress form who has n o squish. I on the other hand have quite a bit of squish. My bad, but I made it workfor with the minor adjustment. If I make another I will use stiffer cord for better support (38 DDD). 🙂
I am finishing my first regency long stays and was planning on doing machine sewn eyelets but now worried they won’t withstand the cinching. Thoughts?
I have a friend who does all her eyelets by machine and they hold up well. Hand eyelets were all that were used in the Regency period and earlier. Metal grommets didn’t come into use until the 1820s. Your machine ones should be fine.
im about to start my second set of regency stays (my first was with mantua maker) and am currently doing research into different patterns and am wondering what made you decide on the laughing moon pattern?
Because I had made several other Regency patterns before and this one was the newest in the offerings. It’s based on historical designs, and Laughing Moon patterns are generally regarded as excellent. I also wanted to use it for my online class as the sizing was good as were the initial instructions. 🙂
Jennifer, how appropriate a project do you think this is for a first-time corset maker? Also, how appropriate would it be for an 1840s day dress?
Thanks!
It is appropriate for early 1840s silhouettes.
For a beginner…. not sure. The fit is specific, so if you have fitting experience it would be ok for a challenge project. The cording can be challenging and is definitely time consuming. But if one is naturally crafty then they could proceed ok. So it would depend on prior sewing experience.
Thank you for showing your work, and for your thought process and comments! I am similarly endowed and have been hesitant to make (or wear) stays like this, but now seeing yours, I can see how one might look on me. As for a busk, I was thinking about experimenting with “faux bone” and trying a little scrimshaw on it. Otherwise, I’ll just have my husband polish up a piece of hardwood for me.
Great work!!
Hi! I’m working on a regency corset right now, very similar to yours, and I was wondering what type of boning you used? Spring steel, spiral steel, or a mix? Would it be possible to do it with all spiral steel? (excluding the busk, obviously) Thanks!
All corded except the center backs which are flat steel and the sides which are spiral. Yes, you could use all spiral but always keep the bones around the grommets flat steel to keep them straight and in-line.
Great! Thank you so much!
This corset id beautiful! Well all of your stuff is beautiful!
Thank you for such a great site.
Thank you Christine!
This corset actually looks more comfortable than a modern bra!! Makes me want to make one myself. I do wonder if it would be supportive enough for my needs.
What modifications would you suggest to accommodate my (40L) bosom?
Take good measurements and follow the pattern sizing. Its put together very well for most any size bust cup!
If I add a few extra bones to side back, would it stop the corset from forming “flesh divots” in the back?
I was thinking one extra bone on each side, maybe in between the cording?
Would that work to control the back flesh a bit better?
Yes. It would hold the fabric much more taut, rather like a Victorian boned corset. I have made other Regency corsets and the cording just didn’t seem to hold as well on my fleshy figure so I went back in and added a few metal bones at the back and sides.
I sewed the Mantua Maker Regency corset pattern by hand (would not do that again), but mine is boned not corded! As a 32A my problem(s-there are two of them) are the exact opposite. And I’ve had difficulty keeping my straps from falling down, I might have to try what you did there.
I noticed your laces are cross instead of single, I also chose to cross-lace mine for convenience sake (and because my figure requires tighter lacing on top than on bottom). Was that your line of thinking as well?
Excellent work, as always!
The cross-lacing is simply more familiar to me (and those that help cinch me in). Also, at this period you start to see cross-lacing become much more common, although the single spiral lace was still being used.
Your corded corset came out beautiful. I am glad I am not the only one who uses paint stir stick for the wooden busk. I have made two 1700s stays and used them. Thanks for showing all the details. I loved taking your Victorian corset class.
It’s really beautiful! I’m envious of it!
I made this pattern myself, and I’m a 36 G. I used the largest bust gussets in the pattern set and I must say it fits me very well. It provides sufficient support and the period-correct breast separation.
My only objections to this patterns are this – the back sits high, so the back of the corset shows above most of my gowns. I will be remaking it and I will lower the back.
I will probably use a slightly stiffer cotton in my newer version, so that I have a little more smoothing and strength, especially of the back, where the tensile strength of the lacing is important.
I won’t use a paint-stirrer as my center busk for the newer version, but a piece of smooth oak or maple, as I think the stirrer is too soft.
I will add some extra boning to the back to provide more postural support.
Wow. Just wow! I am always speechless with awe by anyone who makes and wears corsets regardless of the time period.
Wow! So great! The corset really looks comfy! Yes, the back neckline of the chemise really should be scooped more. If your shoulders sloped less, would that puff of fabric disappear, I wonder. Conversely, it’s a good pattern adjustment to keep in mind, if you were making something for someone with a bit of a hunch in their back. Great job, all in all and congrats for facing your reticence and persevering!! Big woop for you!
The chemise is made as-is from the pattern. I didn’t alter it at all. Even though I’ve got it pulled down pretty far in the front, it still surprised me at how high it really goes. The “puffing” is due to the drawstring that goes around the entire neckline. I have other chemises that are better cut for under my Regency dresses. I’ll only wear this one for higher neckline day dresses.
Beautiful…you did wonderfully!