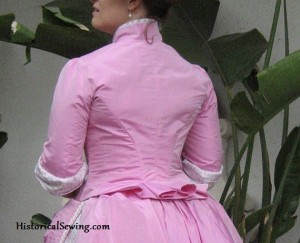
Lately I’ve had fellow costumers ask me about those deep pleats you see on the back of 1870s and 1880s bodices. Those gorgeous fluffy pleats tucked into crisp folds floating above the puffed up bustle.
The pattern pieces don’t seem too crazy – a little jaunt out about 90 degrees from the seam then straight down to the hem. But it’s when you get down to sewing those seams together that are the tricky part. The turning of the flat 2-D into 3-D yumminess.
I’ll admit – I love this little part of a bustle dress. It’s a very nice way to put a bit of excitement into an otherwise plain bodice back.
My first experience with these back pleats came when I was using a Truly Victorian pattern. Heather’s instructions say to sew up the bodice seams and match the pleat ends together then fold the pleats. You finish the outer hem edge by applying a separate bag lining.
(I really don’t like separate linings in my Victorian bodices. So I ended up finishing the hem with a separate facing.)
Those instructions sound easy, right? But what exactly does it mean to fold up the pleats. Are the folds on the outside? Do they lie on top of each other? Am I making an inverted box pleat here? Well… depends on the cut of your pattern.
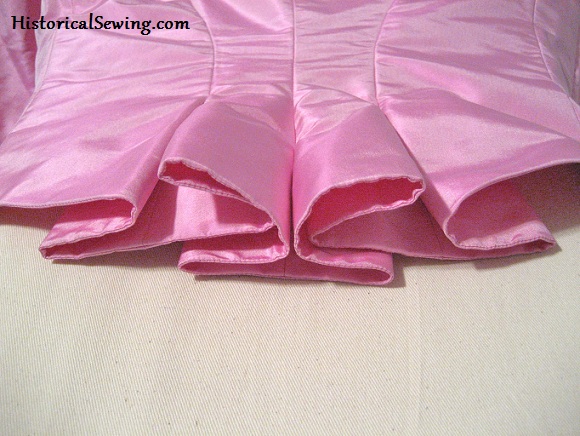
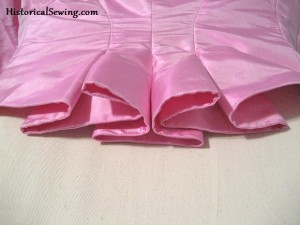
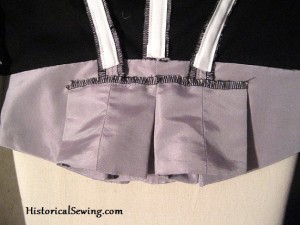
Look at all those lovely folds!
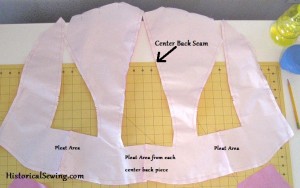
Where you have a seam (like at the center back and side back) are the places you can choose to put in a pleat. The pleat is cut in one with the bodice – half on each side of the seam. Generally, when you don’t have a center back seam (rare in the bustle period) or you don’t want a pleated part on that seam, you’ll have a wide box pleat.
How to Make the Pleats
- Sew the seams from top to ½” below the top of the pleat. (Pretend the seam continues to the hem but only go ½” in the body. It’s helpful to mark a dot at this point before sewing.)
- Sew the short pleat seam between center back pieces and the center back/side backs.
Now for the folding up of the pleats – which is dealing with that pleat area sticking out from the bodice.
- Clip into the bodice at a 45 degree angle to the dot you marked before sewing the bodice seam, where the pleat area juts out from the bodice. Don’t overclip!
- Press the bodice and pleat seams open.
- On the inside, open the pleat and align the pleat seam with the bodice seam, as if the pleat seam was just a continuation of the bodice seam. This will give you those folds on either side of the seam and it will look like a box pleat on the inside. Press the folds.
- Pin the upper edges of the pleat together and stitch together. (You’ll need to do this in two steps by folding the bodice out of the way and only stitching the pleat.
If you look at the right side of the bodice you’ll see an inverted pleat coming out of the bodice seam with the pleat folds underneath. The other pleat folds come from the other pleats in the side back seams making for a ruffle-y tail.
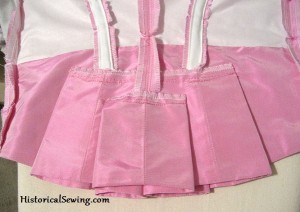
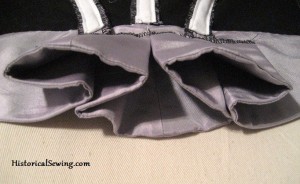
Here’s the inside of the pleats stitched down. Then a closer look at how the folds lay.
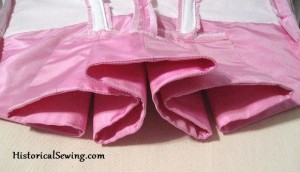
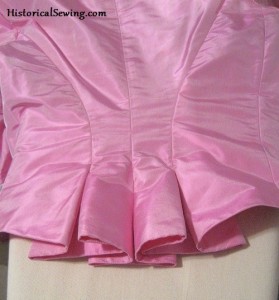
If you don’t want a pleat at the center back, simply sew the center back seam in full from neckline to hem edge. Below you can see what the outside looks like with pleats only in the side back seams.
And here’s the inside of those pleats. Notice it’s just the two box pleat folds.
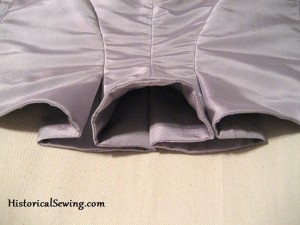
Here’s how the pleat folds lay. Use these angles to get yours to fall evenly.
These wonderful pleats are not only for bustle bodices. They can easily be made on a Regency spencer jacket at that short tail in the back. Although your pleat folds will not be as deep.
Have you made bodices with these seam pleats? What do you think of them? Leave a comment below.
I am not a huge fan of pink, but I do enjoy your Pink Bubble Gum Diamond dress. (Bubble gum, bubble gum, on a plate – how many ball gowns can you make?) The page about that dress’ construction gave me the link I followed to this page. I don’t create anything historically accurate myself, but your site gives me good ideas and techniques to apply to other sewing work. These butterfly pleats, for example, found their way onto the centre-back waistline of a skirt I was making, causing it to flare out and giving an almost bustle-like look to a modern silhouette.
Nice creative work Maryssa! So glad you found this tutorial helpful. 🙂
The folds are TRULY delicious and that color sends me to the moon! ♥
I’m so excited that you posted this! I’d been trying to achieve this on the muslin for my bustle bodice, and it just wasn’t working… now it makes total sense, though! As soon as finals are done, I will be all over this 😀
Thanks for the great post!
You are welcome Emily!
I recently used this method on my daughters school uniforms. It works really well and gives a garment some wow factor.
How was the interior fodder sewn on?
Thanx for picture,
Silvia
Do you mean the pleats on the inside? If so, I simply hand tacked them to each other to get them to stay in place. They moved around quite a bit so I had to stabilize them.
Very interesting! How does this compare to the robe anglaise? I have not made one of those, but the back and pleating is similar. Would be interested in your take on this. So many borrowings from past in the 1870s and 80s.
In my limited experience in 18th C. costuming, the upper back pleats on the robe a la anglaise are simply large folds of fabric that are taken up to fit the lining. I took Kendra Van Cleave’s marvelous class on this a few years ago at Costume College and the whole dress is best done by draping. Those back pleats included. The full width of fabric is pinned to the center back and folded into large box pleats out to the sides. Also, those pleats are at the neckline and secured in place, whereas the bustle bodice ones are left in loose folds.
And yes, fashion is FULL of repeated design elements from periods gone by. Nothing new under the sun!
I love putting those postilion pleats on my bustle bodices! They add that extra bit of sass atop my bustled bum that otherwise would be missing. I like your method of sewing the pleats first and then the bodice seams; especially useful for novice sewists, and your photo pretty much explains the process without any further words. Clever you!