I hate cartridge pleats! Box pleats, fine! Knife pleats, piece of cake, but gauging? Looks like I gathered it & slapped it on. What am I doing wrong? ~ Sylvia Shope Byers
Sylvia’s frustration was pouring through her Facebook message.
“I’m trying to make them small and lovely, but I might be making them too big?… Maybe I’m tacking the pleats wrong?”
I knew exactly what she was talking about… and the apparent thwarting of a perfectly pleated skirt by costume gremlins. So what to do for this issue? Here are five tips to follow for beautiful gauging.
1. The closer your pleat markings/dots, the smaller the pleats and the more they resemble gathering. Put more fabric between the vertical dot marks.
How close together your dots are depends on the look you want and how big your pleats turn out visually. Cartridge pleating is a technique for even pleats to draw a large amount of fabric (skirt panels) down to a small measurement (waistband).
If you want a pleated look but with the cartridge method, place your dots further apart, like 3/8″ or ½” or even more. This will take up more skirt width. Here the pleat folds inside will stack on themselves creating a knife pleated look on the outside.
But in the other direction, dots closer than ¼” will produce a very small pleat fold that “crushes” easily against the others and resembles gathering.
Play with a few dot widths on your fabric to get it right. Which leads to #2…
2. Take your fabric into consideration for pleat width.
A sheer dress looks lovely when finely cartridge pleated to the bodice waistband. If you peer closer, those pleats nearly look like they are gathered.
Some fabrics, like lightweight cottons & linens, despite smaller pleats simply gather up closer together. One solution is to add another skirt panel so you can widen your pleats a bit for a less gathered look and one more of pleating, which is what you want, right?
On the same hand, you’ll want to allow for wider dot placement with thicker fabrics such as wool. Too narrow markings will leave wools looking gathered.
3. Start your top row of dot markings about ¼” from the top edge of the skirt.
The closer that top row is to where you sew it to the waistband, they more it will likely start looking like gathering. Keep the rows down from the top enough. You want the pleats to be precisely formed.

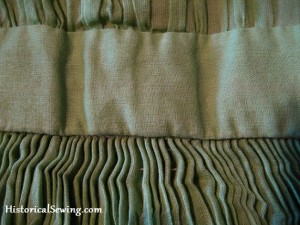
4. Have two or three rows of stitching.
This may seem like a “duh” but seriously. If you only put in one row – even if it’s perfectly set at ¼” from the top and each dot ½” apart – it’s going to come out looking like gathers.
Because that’s what gathering is: the in-and-out motion of thread that the fabric is then slid upon to scrunch the fabric together. Cartridge pleats are formed BECAUSE of the two or more rows the fabric is sliding on.
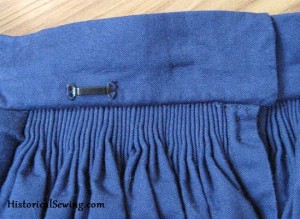
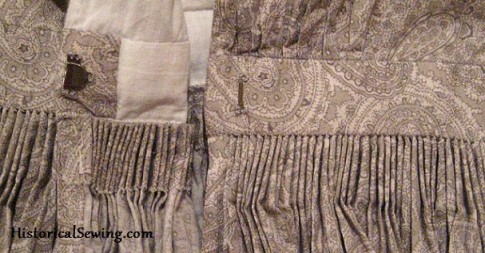
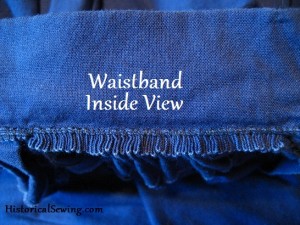
5. Tack the pleat folds on the INSIDE of the waistband (19th Century skirts).
Put right side of skirt to right side of waistband and sew the outer pleat fold to the waistband edge. To further escape the gathered look, pin first at quarter marks and spread the pleat folds away so they are all even along the line.
Pleats on the inside allow them to “pop out” away from the hips giving you a nice, even fullness to your skirt at that level. Gathering, even when very full, still has a sort of “flatness” to it when on the top of a skirt. Cartridge pleats give you that wonderful visual depth.
How has your success been with cartridge pleating? What are other issues you’ve experienced?
This was helpful even for making cartridge pleats for my Laughing moon Georgian cape. The hand stitching to the neckband was very helpful and now I know what I have to do. I am using velvet, so turning it under will definitely make it thick. Any suggestions?
Many years ago I made a kinsale cloak in velvet with cartridge pleats around the neck. I can’t remember what I did, but if possible, cut a wider seam allowance at the neck so you still have the raw edge turned under but not as much bulk.
Another option is to flat stitch the velvet edge to 3/4″ or 1″ wide twill tape, kind of like using hem tape where you overlap the tape over the cut velvet edge but a narrow amount and stitch. This could be turned to the inside as above then the pleats stitched. Or… place the twill edge even with the velvet edge and stitch along the raw edge. Stitch pleats through both layers. This eliminates the turn-under portion but gives support to the velvet edge and provides an edge to mount to the neckband.
I hope these help! Best of luck!
On every cartridge pleated skirt I have made I loosely smocked the inside folds of the pleats. They never shift or slide on the gathering threads and move together gracefully while walking. On firmer or thicker fabrics it even lets me get away with a smaller bum roll. On one wedding gown my designer planned a cartridge pleated removable overskirt over a even-hemmed cartridge pleated underskirt. The pleats were of smaller depth on the underskirt and deeper on the overskirt which was removed for the reception. The volume, drape and movement as the dress descended the carriage and walked down the aisle were amazing.
What kind of thread do you use for the pleating? Do you have to use strong upholstery thread? The fabric store didn’t seem to have it in yellow.
I use strong polished cotton thread or heavy duty in a color that is neutral for the fabric. It’s hard to find exact matching thread in that weight. I’d go with cream or white for yellows.
A problem I often see in cartridge pleating is that the maker will remove the gathering threads. This is fatal! The threads should stay in forever! As soon as they are taken out, it will look just like gathering.
Something I do, especially on a skirt where the rows of gathering threads are widely spaced because it’s a heavy material, is lay the skirt out in a circle on the floor or table after I’ve sewn on the waistband. The waistband should be standing up in the middle. I then loosen the outer row/s of gathering thread a little. You want the cartridge pleats to be arranged in a sun ray pattern. If you do not do this, since all the rows are the same length, the pleated area will try to remain a cylinder. This often leads to threads breaking.
Thanks for your post! Some very good advice!
Jennifer, do you sew the _front fold_ of the pleat to the waistband , or do you sew the _top_ of the pleat to the waistband?
The front part of the pleat. Watch for a full tutorial on cartridge pleats coming soon.
I’m so looking forward to this tutorial. Thank you!
When I was at theatre school studying costume construction we had to cartridge pleat all the time as we did a lot of Shakespeare and 19th century shows. My tutor taught us to sew a band of 1″ grosgrain/petersham ribbon to the outside of the skirt using a 1/8″ seam allowance then turn it to the inside, press and stitch the bottom edge down 1/8″ from the edge. This neatens and encases the top edge, gives you something sturdy to draw your dots on (we used white or smoke grey for darker materials) It really strengthens the top edge especially when using 4-5 widths of fabric for a skirt. Each pleat was then sewn with 3 stitches of waxed button hole thread per pleat to the finished waistband. This makes it nice and secure as there is nothing more frustrating than the hem of your skirt getting stepped on and the pleats all tearing off the waistband.
Thank you for these lovey hints.
If you do 2-3 rows of blind hem stitch, catching a thread in the stitches that go up, you can gather you cartridge pleats that way. You have to make sure yur blind hem stitches match. Use button thread to gather.
Oh, so the entire waistband is only attached to ONE side of the pleated skirt? You don’t fold over the rest of the waistband to the other side and encase the pleats between the two sides of the waistband? If this is true, now know where I’ve gone horribly, horribly wrong.
In my experience, you finish your waistband then sew the pleats to the long edge – you sew every other fold (or rather the front folds). When you wear the skirt, the flat top part of the pleat folds kick out and sit flat (perpendicular) to your waist. This is how you have a waistband fit the smallest part with the large skirt portion attached but jutting out and without adding bulk to the waist.
I finally understand how it is all supposed to come together. Thanks!
Finally! That last photograph was VERY helpful!
Thanks so much Jen! And the other thing I’ve learned since then, practice, practice, practice!
Sylvia Shope Byers
I use large checked grosgrain ribbon to cartridge pleat. It helps give me a guide for the width of my pleats, and also helps bulk up lightweight fabrics such as silks.
While making my first Wrapper this past weekend, I was happy to have assistance w/ a great idea for spacing the Certridge pleats.
Instead of turning over the top of the skirt waistband area to begin pleating, my friend had me sew a strip of gingham fabric (small checked) as long as the waistband and about three inches wide. After turning the gingham fabric to the inside of the skirt and pressing it down, I was then able to take a gathering stitch in every “white” square of the gingham fabric, making certain that I also stitched into the fashion fabric too; thus creating perfectly spaced cartridge pleats.
When I got to the end, I left about a 6″ tail of quilting thread and tied it off. Then began a second row the same way…and a third row, until I had three rows of gathers along the skirt waistband. Worked wonderfully!!
Maybe you all know about this already, but it was a very pleasant help to me!! :o)
Kathlene Bradford-Marks
I like to pad my cartridge pleats with a layer of something with more body, particularly when pleating linen or silk (usually one strip of felt does nicely). Velvet tends to do pretty well without a pad. This gives a nice rounded body to the pleat instead of squishing them down into tiny gathers.
Another tip would be, if you don’t want to make dots on your fabric, using Tiger Tape works great! It’s a narrow tape, with just black and white lines. They come in various different widths and sizes. I used the 1/4″ size or the 1/8″ size and just count out the lines for the size I want. When the tape is laid down on the fabric, it helps you with where you’ll put your first row and your second row of stitches. I do tend to do more then a 1/4″ from the top of the fabric, more like a 1/2″, especially on delicate sheers. It’s an extremely pretty look to skirts! Love it!
Finally! Somebody address this! I have some friends in the historical costuming circles who will go unnamed who think that you can machine sew cartridge pleats and still call them cartridge pleats or gauging, not gathering. I try to be super polite and not bash my own head out on their sewing machine, buuuut still. The biggest tip in gauging?
Do it by hand!
You can’t really do cartridge pleats by anything other than hand! A machine makes them into knife pleats. Then what would be the purpose of spending the time setting out your dot marks all perfectly?
These are great tips! I’ve kind of figured it out by trial and error, but this is wonderfully illustrative.
Another tip from the 1860s is to place a strip of white material inside the fold when pressing down the top of the skirt. This will bulk up lightweight material so that the gauging “sets” better and doesn’t collapse or look too much like ordinary gathering. Another benefit is that the white hides the folded down material when the fabric is a sheer. That way you can still gauge a sheer skirt, without the extra material shadowing through below the waist.