
But of course I needed a new hat for my new Bubble Gum Dress! Headwear including hats, bonnets, caps, floral wreaths and such can make such a difference to the overall finished look to a costume.
People in the 19th Century wouldn’t go out in public without *something* on their head. So here’s what I came up with in a few short days before “being in the public eye” at the Gaslight Gathering in San Diego.
I’d eyed the hat pattern for a while and decided it was finally the time to try it. It’s the Truly Victorian 1880s French Bonnet. I used the tall crown and wide brim.

First, I have to say that after receiving the pattern and reading over the instructions that I was SO glad I’d made buckram hats before. They were a bit on the confusing side.
Unfortunately I did not have time to mock up the pattern so just went to work with it straight out of the package.
Pattern adjustments I made and other observations:
- Drew in a grainline on the tip/top piece and set it on with the bias running between the centers
- Re-drew the grainline on the crown. I pulled out a couple other bonnet patterns I have to verify the grain placement. The grainline on the pattern runs straight through the centers. I skewed this so the bias was at the center front/top portion of the crown.
- The way the fabric crown (with the new grainline) fit over the buckram frame was disappointing. After pressing under the top edge allowance of ½” there was barely a ¼” in some spots to fold to the inside around the brim edge. Next time I would add at least another ¼” around the brim edge of the fabric crown before cutting.
- The buckram tip fit the sewn buckram crown quite well.
- The brim seamline did NOT fit the crown edge. I ended up clipping further into the brim so the crown would sit nicely on the brim.
- It was SO very frustrating trying to sew the brim and crown together.
Since I only had a couple days to get this done I made use of my sewing machine and the wonderful Fabri-Tac glue. (Yes, I cheat a little on hats, but you can’t see the glue as all outside & seen stitches are done by hand.)
The millinery wire was sewn to the tip and around the top edge of the crown and also around the outer edge of the brim. This was all done by machine with a zig-zag stitch. (I only broke one needle which happened when I wasn’t paying attention. duh!)

The 3 pieces (tip, crown and brim) were then covered with muslin to hide the buckram weave and wires. (Glue works well here.) The fabric was then hand sewn or glued to the frame pieces.


The pink brim lining was whipped into place around the outer edge while my husband drove to the event. Now I had a crown and brim to attach together. Which is where my frustrations really started.
As I mentioned that the crown didn’t fit the brim seamline as I put it together, I started by tacking the centers first. I then hand sewed (with a curved needle) from the center back forward on each side. The basting at the center front had to be ripped out when I discovered that the crown wasn’t sitting on the brim as it should. Argh…

Re-setting the crown, I did some quick pencil marks on the top of the brim so I’d have a new guideline for attaching the crown.
I clipped into the brim further to make it fit. I was really concerned that with the new clips the head size would become quite a bit larger (and I have a small head to begin with). But it really didn’t affect it much.
I then whipped the muslin lining to the inside. (The lining is necessary to hide the buckram but also to create a smooth edge on the inside so the hat/bonnet doesn’t snag on your hair.)
You can see here the machine stitching on the lining. I sewed a staystitch at the ½” seam line but had to back off of it to accommodate the wider clips in the brim and stitching at the center front peak.


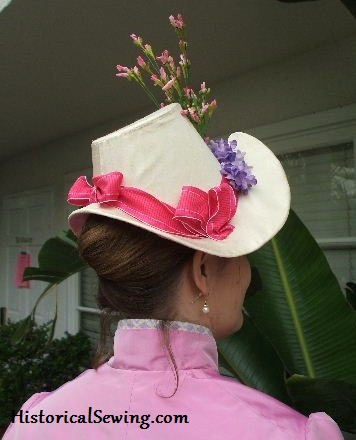
After a couple frustrating hours the hat was together and ready for trim. Thanks to my good friend Lana/Lily for decorating suggestions, I found some darker pink ribbon with a tiny check design. The pink & green flowers are made of paper – so no rainy picnics in this hat! The purple flowers are fabric that I’ve had in my stash for years.
I used this 1885 plate from the book Victorian & Edwardian Fashions from La Mode Illustree using the one on the far right for trim placement.


At the end of the day, the best compliment came from a fellow milliner, Morgyn Owens-Celli from Strawbenders Ltd. in Long Beach. He said it was the best hat he’d seen at the Gaslight event that day. Why, thank you!

Thanks for your insights. I use spray adhesive with my buckram hats to make a lining or fabric stick to the form. It makes it nice and smooth and then doesn’t scoot around and pucker. Also, coming from an electricians background, I use tie wire or hank wire rather than millinars wire. It’s just as good so try the home stores or electrical shops for alternatives if needed. Very pretty! I’ll try one of these too.
Love this hat! I have one “upside down flower pot hat” that was made for me to go with my bustle costume, made by the same person. (HollyGene Leffert, q.v.) But, even though I am selling most of my costumes, I won’t sell this one. I made a white asymetrical overskirt, from a pattern from Truly Victorian. Now, I will get this pattern and have the courage to make a hat to got with the black and white of the bustle costume. If only I could find somewhere to wear it…
If you don’t have time for a buckram & flat fabric hat, using a couple of very finely woven, large circular placemats to cut out the pieces is an excellent expedient, and you don’t even have to put a fabric lining in: just sew in a sweat band along the join between the brim and the crown, (which also keeps the hat lightweight) and keeps the raw edges from snagging on your hair! (you also don’t have to line the brim). There are some fabulous straw placemats nowadays that even look like the antique straw lace hats. PS: Before sewing, soften the straw by rolling it in a wet towel, and microwave it for 30 seconds: it will come out soft & pliable, and the straw won’t split in sewing. You can use a steam iron on the brim when it’s done to get a nice flat brim).
After seeing your photos for making this hat, I am not going to be intimidated when I make a hat. You made it make sense (I have always read hat patterns and had no idea what they were talking about in adding brim to hat).
I love like to know that too, Lauren. I just used the last bit that I had that I bought in a class a few years ago.
I bought this pattern at the Gaslight Gathering to go with the bustle dress I’m making, and I want to try the version you made first, so I’m so thankful for your review and suggestions!
Yours came out just brilliantly! I absolutely love it 🙂
Out of curiosity, where do you get your millinery wire?
I’ve had my roll of millinery wire for years and am now down to only a couple feet. Not sure where I initially got it from but try Hats by Leko (www.hatsupply.com) and tell her I sent you. (Look under Hat Making Tools then Wire. Note she does have a minimum but take a look at her velvet leaves to add to your order. The leaves on my 1876 Wedding Cake Dress came from her.)
You can also look at http://www.RichardTheThread.com and http://www.JudithM.com (her catalog of products is a bit unwieldy to sort thru).
As I told you, I have this pattern, and after seeing your bonnet, now I want to make it. So I’ve printed out your notes and observations for when I do. It was beautiful in person.