
It so often seems that after you spend hours on a project that you’re very proud of, you come down to that bodice opening that you dread finishing. You know, ALL those hooks & eye to hand sew on.
How many to sew on?
How far apart do I place the hooks?
Do they need to be right on the edge, or are they placed further back from it?
True, you do have to put in the time and hand sew them on, but it doesn’t have to be a stressful process. You may already use many of the techniques below and that’s great! These are what I use in nearly all my projects for a smooth, historical-look finish.
For straightforwardness, we’ll look at simple bodice closures on a center front or back opening. Although these tips can be applied to late Victorian & Edwardian bodices, we’ll leave them out because of their complex, layered & non-uniform openings.
Inspecting original bodices – what did THEY do?
In my online research and, closer to home, studying the antique bodices in my collection, I’ve noticed a few consistencies in how seamstresses finished their bodices with hooks & eyes.
For one, they used A LOT of hooks. So completely throw out your training from your junior high home ec class on applying only four or five hooks to close a shirt. This is not good advice when making historical clothing. Stock up on packages of hooks, buy them in bulk. Take advantage of JoAnn Fabrics’ notions wall sales.
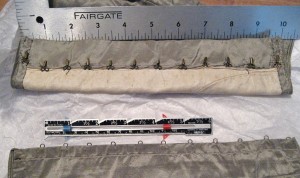
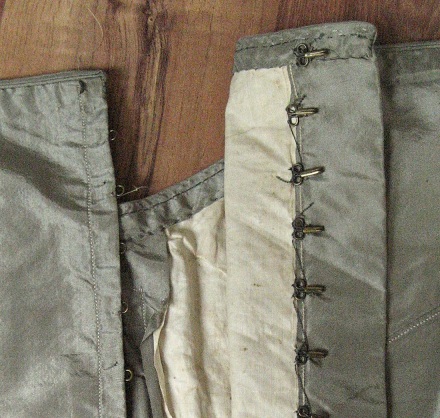
This evening bodice, circa 1860 and in my personal collection, is 10 inches long but has 12 hooks & eyes to close it. The left side seam allowances have been turned to the inside and topstitched to the underlining. The eyes, sticking out from the finished edge, have been hand sewn straight to the bodice inside.
The right side hooks follow the center back line, however the back panel was extended for a self-placket to hide the hook opening. The facing was folded to the inside, the raw edge turned under and whipstitched to the underlining just past the center line.
The hooks were tacked with a continuous thread – What do you think of this? – Great for speed but the thread between the hooks is loose and messy on the inside.
Also take notice of the very top and bottom hooks. They are set closer to the placket edge to keep it in place. They also help keep the bodice from un-hooking for when the young lady danced too vigorously. J
Now let’s move forward 40 years or so to the early 1900s.
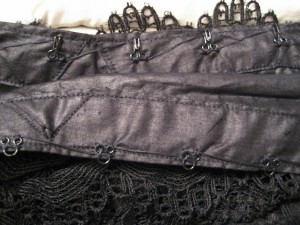
This is the center front opening of the fitted lining under an Edwardian bodice, also from my collection. The fabric is a polished cotton and the raw edges have been finished with a facing strip.
What I find really interesting here is that the hooks & eyes are sewn on EXACTLY the same way as the ones on the 1860s bodice! Both use a very long strand of thread to sew on several hooks. However, the 1860s thread is one strand of a heavy twist thread whereas the 1900s bodice uses two strands of regular thread.
On both bodices the rings are covered all around with thread. The top of all hooks is stabilized as well as are each side of the eyes.
These hooks are set on about 1″ apart.
*It’s good to know that after at least 40 years hooks & eye sets were still being sewn on the same way. (Some things never change!) So if you sew your hooks on with one really long strand of thread that shows on top you’ll be completely historical.*
Guidelines for Sewing Hooks & Eyes on Your Projects
- The rounded end of the hook should be placed 1/8″ in from the edge.
- The round eye is extended just slightly beyond the edge so the hook can go through it easily.
- Sew across the head end of the hook head to hold it in place.
- Sew across the edges of the eye where it meets the garment edge.
- Evenly sew around the lower rings of both hooks and eyes; don’t group your stitches in one place.
- Cover the rings of both hooks and eyes with a strip of bias from your fashion fabric or underlining to keep things looking neat on the inside.
- This next tip I recently found in a 1917 dressmaking book and had never discovered it before. I will definitely be trying this next time. Historical Tip: “The rings of each hook should be spread, as this distributes any strain which may come on it and prevents its pulling forward.”
Of course if you’ve ever tried to actually *bend* a modern hook or eye – it’s hard! The metal is definitely a stronger alloy than what was used on garments a hundred years ago. You might have to use two pliers to stretch the rings apart.
Bars/Thread Loops
- Sew metal bars or thread loops to the top side of the bodice matching to the hooks.
- Sew the metal rings of the bars as you do for the hook rings.
- Use thread loops for flat and invisible openings. (See the tutorial here.) These are used most often in Regency through early Victorian then again in the complicated closures of the 1890s through Edwardian periods.
Openings finished with hooks & eyes can gape open if you don’t pay attention to how the closure is completed. One reason for this is that the hooks are set too far apart. As with the originals, keep the spacing between hooks between ¾” and 1 ¼”. Closer together is better!
Hook & eye sets are the most used bodice closures in the 19th Century (probably closely followed by buttons & holes!). Since they’re pretty standard, practice making your technique quickly so it doesn’t take forever to finish the garment.
And if you want to “cheat” with a modern method, look at my tutorial on applying hook & eye tape.
Do you love or hate hook & eye closures? Do you find the hand sewing time pleasant or never ending? Share your thoughts below.
How difficult are these to put on yourself, I struggle with modern zippers and a ball gown I want to make has options for hooks in the back or a lace up back and I want to make whichever will be easier to put on
Zippers can be tricky even for advanced sewers. Hook and eyes can be “easier” but do take longer when done by hand, as is appropriate and a good method. If you haven’t, be sure to look at my tutorial on sewing on hook & eye tape, which can be faster than sewing single hook/eye sets.
As for bars, there is a ‘strong’ direction and a ‘weak’ direction to attach them. You must think about how the garment will pull (apart) and place the bar so its ring is compressed during wear and not pulled open. I sew for ballet dancers and they can really stress a hook!
Good tips! Another reason for gaping hooks is because you neglected to anchor the hooks to your interlining. If they’re only sewn to the lining, the fabric will shift toward the edge of the bodice, causing rippling and gaping along the entire closure. I had this issue with my first Victorian dress and I HATE all the front-view photos that were taken of me wearing it, because the front closure looks just awful! The trick is to sew the hooks on before you assemble the entire bodice, so you can attach them to the interlining and lining, but not the outer layer of fabric. Also, I’ve found that it’s best to use hooks and eyes for abutting edges, and hooks and bars for overlapping edges. If you try to use hooks and eyes on an overlapping closure, the eyes will often peek out at the edges.
I confess that ever so often I’ve used discreetly and carefully disguised hook & eye tape which has remained closed during the lifting and physical movement of open hearth cooking. On my Gibson girl blouse in addition to button closures I sewed regular hooks with thread eyes.
I just made a Gibson Girl blouse for my grand daughter. Should I use hooks and eyes on it for hand stitched button holes? Any help will be greatly appreciated.
Depending on her age, the button holes will work fine. If she’s an older teen (15+) then I’d go with the hook & eyes.
One thing I hate about modern blouses is the gaposis. Now, I know what to do about it.
Jennifer, I love your blog & incredible attitude.
I’m mostly homebound due to ill health. So… I dream of beautiful dresses.18 th C has stolen my heart & I found a tablecloth, an old length of green linen & some linen for pockets. I have an outfit planned!
Yay Jennifer! Best of luck on your upcoming projects. …and remember that dreaming keeps us alive because it presents hope. 🙂
Cheers!
Jennifer
I noticed the hook and eye tape is often set too far apart leaving you with “gaposis”,espically if you’re fuller busted (like my daughter).We put a snap tape in here Victorian day bodice/jacket ,as she has trouble with buttons(developmentaly diabled) , she has to wear a blouse under it cause we get the dreaded “Gaposis” going. I turned 60 and my eyesight and hands won’t stand up to sewing tiny eyes on in great numbers. If anyone has any better ideas on closures for our situation (we do Steampunk,Victorian and Renaissance faires) all requiring “period cosures, please pass it on.
melody and rachel…blessings on you Jen for this great blog.
You could always add extra hooks in between the ones on the tape. Just two or three right at the full bust point to prevent the gaping.
Well, one thing I learned from modern pattern books is actually not to start your fasteners at the top and then go down, but to figure the apex of the bust and distribute your fasteners from there. Ever since then, I’ve had a LOT less issues with gaposis. And trust me, at DDD, I’m DEFINITELY “fuller busted.” My research says that this tip would have been period as early as 1910, from a dressmaking manual I have from that time that talks about it, and as my mother phrases it, “if anybody wants to get that close to my chest in order to nitpick what I’m wearing, they deserve what they get from my right hand.”
You can still do this using hook-and-eye tape or snap tape, by the way, by just lining up a snap or a hook and eye on the tape where the apex of the bust is and then stitching on only one or two fasteners at the top or bottom if needed.
Finally, I also HIGHLY advise a magnifying lens with a light for doing up-close work. I do a couple types of counted-thread embroidery, and my eyesight is horrible to start with, and having one of those lamps you can swing over your work with the magnifier and the light is a godsend to that, though it takes some getting used to. Toss on a pair of fingerless compression gloves–they’re sold in the knitting section, usually–and that will help with pain in the hands, too. If I’m going to be sewing by hand for any length of time, I tend to swipe Mom’s pair if I can, because it helps SO MUCH.
I don’t mind the hooks & eyes, but how can you keep a smooth fit if your weight fluctuates? Would I be better off to stick with discreet lacing to make sure the bodice always fits closely?
For eveningwear you can definitely apply eyelets & lacing with a modesty panel behind. It won’t be accurate for daywear though. Day bodices can have extra fitting darts put in for when you are smaller. You see this a lot on extant bodices.
On many of the bodices in our museum, the hooks and eyes alternate down the front/side/lining. I assume that was so if one of the pairs came undone, the whole thing wouldn’t open.
Yes! That is a very period method of sewing them on.
My small bodice collection has them all the same direction with an opposite one at the very top and bottom. This is why sewing hooks on individually is better than hook & eye tape.
How about adapting the patterns to use hook and eye tape? The actual tape could be concealed fairly easily with a scrap of bias fabric or under the fold of the facing, I think.
Pati
I do my retail dresses this way to save on cost. I bury the tape between the interfacing and linings and pull the ends only through the fabric with an awl.
Sylvia (I realize this is two years later) do you have a photo of how your method turns out? That sounds like exactly what I need to do!
I have seen rings on hooks and eyes sewing with buttonhole stitch for a cleaner look.