Everyone who loves creating historically-inspired garments, at some point or another, will want to improve their skills in the accuracy department. As we are all on various creative journeys, this urge falls upon us at different times and with diverse intensity.
For some, the “accuracy thing” hits as soon as we sign up with a civilian Civil War group. For others, it’s been years since their first costume steps, but now time allows for the progression of “doing it like they did.”
It doesn’t matter where you are in your costuming time-travel excursion. You may be completely new to historical techniques or perhaps gone to that realm, traveled back to Shortcut City and now want to do it again.
So how do you know you’re on the right path to making that dress more historically accurate?

First off, you must remember NO ONE can be 100% accurate in their reproductions. We simply cannot be. And Fooey! to anyone who thinks they can be.
Sure, you can maneuver your needle & thread into the exact stitches they used, but you are still working with modern textiles and, most likely, contemporary tools and equipment. (And for those who are insane and use actual needles and scissors from 200 years ago cleaned up with a little CLR, cutting into antique textiles and hand sewing by the light of mere candles… well, you probably don’t need to be reading my articles anyway.)
If you are confused about where to head in the “Accuracy” direction, let’s take a look at areas you can immediately work on for becoming more historically correct with your projects.
Use Natural Materials
This is a simple one. Don’t make this more complicated than it is. Only work with natural fiber fabrics: cotton, wool, silk and linen. Sure, the weaves may have been a little different than what is available to us now, but the fibers themselves are spot-on perfect for that period look.
Avoid at all times anything with polyester, nylon, acetate, etc. – all those man-made, chemical fabrics. Yuck! Even run like the wind away from blended fabrics like the ever-in-stock broadcloths made from poly & cotton. No. Do not go there if it can be avoided.
Even stray away from most rayon; although, it was in use by the 1880s and many, many wonderful trims can be had nowadays made from rayon. Just keep in mind that it’s close to accurate but still man-made.
Hand Finish All Outer Edges
Unless that hem will be covered completely by a ruffle or other trim, hand sewing is the way to go. Sleeve hems, skirt hems, and bodice necklines and lower edges should all be finished with hand stitches.
Even if you decide to put in a full lining in your 1890s bodice, turn under the outer edge seam allowances and whipstitch to the bodice proper. Top stitching and understitching techniques came about in the 20th Century.

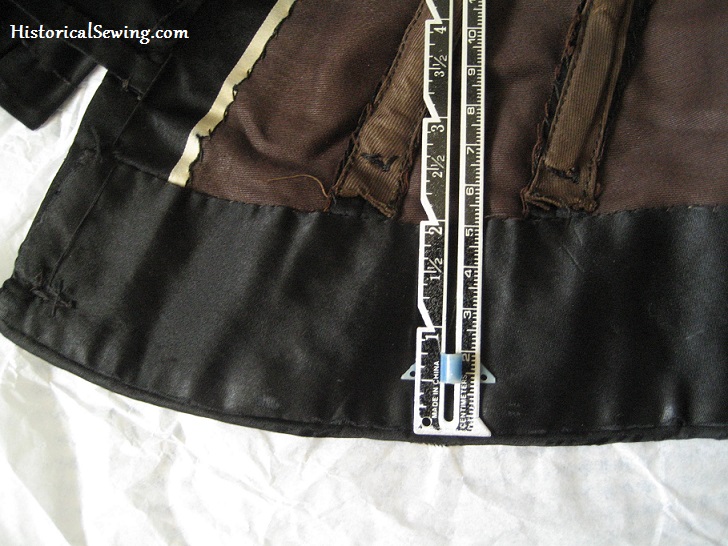
A widely used method of finishing bodice outer edges was to use a strip of bias cut from a lining fabric. They could be cut from any of the natural fiber fabrics (silk was common in late Victorian years). Sew the bias right sides together with your bodice edge then flip to the inside, tuck under the opposite edge and hand whip to the underlining fabric.
Flatline Your Fashion Fabrics
Speaking of underlining – did you know that nearly ALL 19th C. antique bodices (and many skirts too) were supported by layers of fabric under the fashion fabric? Really, the only bodices NOT flatlined are sheers… and even then you’ll find loads of half-cut linings under the sheer fabric.
Underlining fabrics are generally cotton or linen, although silk organza makes for beautiful support too. To flatline a bodice cut your pattern pieces from the fashion fabric and the support fabric then baste together.
I see many costumers skip this step of adding the extra layer of fabric. Yes, it adds weight, but most important is that it supports the trims, boning, and silhouette of the garment. Even flatlining sleeves will carry off a tailored look more than simply sewing up the single fashion fabric layer.
Flatlining is crucial for a well put together historical look. Use it early and often and your accuracy level will bump up a significant notch.
Use Metal or Reed Boning in Bodices
If you have any aspiration of making a costume “as close as historically accurate as possible” then please do yourself a favor and throw away any plastic boning you currently have. (You could burn it too because it really is THAT awful for period pieces but that would make a huge mess.)
Reed was used throughout the 18th Century and into the early 1800s. However, whalebone was most popular. Being that whalebone is illegal nowadays it’s best to go with the other historically accurate boning material – spring steel.
You will find no substitute for spring steel bones. Yes, I know they make “plastic whalebone” today, and yes, it supports corsets and bodices well… but seriously!
Do you want to encase your body in plastic pieces?!? Uh… no.
[Editor’s Note: I’m sure you don’t want to encase your body in metal either as it also doesn’t breathe as with plastic. BUT… metal is more accurate than plastic anyway you slice it (or cut & tip it).]
Plastic does not equal historical accuracy unless you are making vintage go-go boots.
1/4″ steel bones come in a couple of thicknesses. Choose the thinner ones for light boning in your bodices. The thicker ones work great around corset grommet areas and in bodice backs where you have eyelet closures.
And if you’ve heard the “but I’m wearing a boned corset, I don’t need to bone my bodice” or even vice-versa – No. One will not substitute the other.
Good to Know: A corset holds YOU in the fashionable silhouette. The bones in a bodice support the garment keeping it in place for a tight fit and minimal bunching around the torso.
Use Hem Facings
The simple “press up 1.25 inches” for a hem, then press under the raw edge and sew” instructions stem from a modern viewpoint. Hem treatments speak volumes about the dressmaker. And clothes made in the past were, for the most part, not slapped together quickly (even if one COULD sew fast). Thought was put into why certain things were done.
Hem facings support the skirt – the hang of the garment and the silhouette as it lies over the petticoats. Sure, they take a bit more time and fabric but are well worth every minute put into the making.
Even if you decide to flatline your entire skirt or add in a full lining (hemmed separately), a hem facing will kick your accuracy look right up the costuming ladder.
Use a sturdy fabric for structured skirts. I like muslin, polished cotton, and even lightweight twill. For sheer gowns, use a self-fabric hem facing – meaning, cut additional length on your skirt panels or cut separate pieces from your fashion fabric.
Bias cut hem facings work best; but if you have straight-cut skirt panels then you can cut straight strips for facings. Read my article on hem facings for more info on how to apply one to your skirt.
Of course, there are dozens of ways to give your historical clothing an accuracy boost. But that’s the beauty of moving forward in our costuming journey.
Every challenging technique increases your sewing skills. And every new project is better than the one before. Apply these steps in your next garment when you want to “make like they would.”
A final word: remember, not everyone wants to move along the Path to Accuracy. And that’s ok. We shouldn’t knock those who really only do costuming for fun or simply don’t have the means or desire to pursue historical methods. But same for that person trying to be accurate but is just not there yet – be kind, for you were there once too.
Do you pursue historical accuracy with your costuming projects?

I would totally love to do it all historically correctly, and I’m mostly quite aware of what is and what isn’t accurate, but oh dear THE COST! I am currently unemployed, having just submitted my thesis, and hope to get a decent job soon, but am filling in some of the time happily sewing, mainly using old bed sheets and fabric remnants. Any ideas about low-cost historical accuracy??
It’s not much different than the area here. Keep using the sheets. Use cotton for as much as you can as it’s cheap(ist) and readily available. If you want a bit more go to wool blends.
Practice on your fitting skills. When you are ready to jump to fancier fabrics (the main cost in historical costuming) you’ll have strong basics in place so you don’t feel like you’re “wasting” the fabric. The hem facings – cotton. Use purchased (inexpensive) or buy a yard of cotton poplin or twill to make your own. Hand finishing – no need for a higher budget here.
Don’t feel that you can’t sew if you have a meager budget. You CAN! Because even with a cheaper fabric, if it’s fitted well and has correct seam placements with hand finishing of edges and hems, it will look ten times greater than a silk dress without these things. Keep moving forward!
I would like to add: thrift shops! If you’ve got the patience to sift through a lot of junk, sometimes there are amazing treasures. This can especially be a good source of fabric for trim — one of those oversized silk shirts that were really popular in the mid-90s will make an amazing amount of extremely lovely piping, or several yards of gorgeous pleated frill, or some fabric rosettes, or a few bows, and so on, to give just one example. And pulling a previous generation’s clothes out of storage and taking them apart to remake is quite historically sound, as is using well-made trim in more expensive materials to fancy up a less costly garment.
I am dieing to know the accurate way to use boning in everthing from a camp dress to more formal attire. This process has me shaking in my boots. I would love to see a class soon on this
Thanks
Hi Donna, You can get started right away with learning boning applications in these two posts: Boning in Bustle Bodices and How to Apply Boning to Darts.
I love to make historical clothing and as accurately as possible. One example was a pair a leggings for a French fur trade voyaguer reenactor…he was not worried about accuracy but I was and told him so. He gave me a deer hide and when I was done I told him they look like they were made by, worn by and repaired (a hide patch where the arrow hole was)by a real fur trader himself. He was more than thrilled.
Hi Jennifer –
I hope you can help me out. I use natural fabrics with one exception: I am allergic to silk. Silk/cotton blends are fine, but just don’t quite hang the same. Is there a reasonable alternative I can use as a substitute to get close to the proper drape and amount of sheen? I want to make a Regency and a Victorian ball gown, but every pure silk sample I order gets me itching…not very ladylike behavior.
Thanks!
Oh, now that’s not fun at all! I’m so sorry silk makes you itchy. What about cotton sateen? It’s cotton but woven with a satin weave. I love the stuff and would use it for a ball gown. Just know that it is a bit heavier than silk so keep your design more tailored if possible. Good luck!
I work at a historic site that is fortunate to have authentic buildings ranging from the 1840’s – 1890. No man-made fibers for us because they have an unpleasant tendency to melt around the wood-burning stoves. We don’t even think of our clothing as a “costume”, preferring to use the term “kit” instead. Nothing, but nothing, will allow you to slip back 150 years in time than dressing from your skin outward in the most accurate clothing you can create. It makes you look different, move different and think different.
Great tips! Most of my historical sewing in 18th century but these tips still apply. It is so important to use as close to period correct materials as you can get. And depending on the project, in some cases that’s easier said then done!
-Emily
Emily’s Vintage Visions
I wish a had a job where I could sit and read your website all day! There are too many interesting articles here! You get me pumped every day to sew and create and then I go back to my JOB! 🙁 Someday again! IN the meantime thanks for ALL the knowledge and expertise!
You are welcome Lisa Marie! Don’t feel alone… I have a full-time office job too, so my sewing time is limited as well. 🙂
Well said Jennifer! Lovely article at a good time of year, Fall always sees me more introspective about everything and the why I costume and how I costume are much pondered.
I adore a well boned bodice, can you believe I completely forgot this step in my recent sailor dress? I kept looking at photos and trying to put my finger on what was wrong with the bodice fit…face-palm. Happily boning can be added easily even after a wearing.