
Ever find a beautiful fabric and it’s a wide 60″ but your pattern only lists yardage amounts for using 45″ fabric? Yeah, me too. It happens often.
And what about if it’s reversed – a pattern requiring 60″ fabric but you have THE material for the project in 40″? Well… that gets more complicated.
You’d much rather get what you need without running short or dealing with an excess of that beautiful textile. Taking a look at a general fabric conversion chart (it’s all based on math) we’ll look at both scenarios so you won’t ever be up a creek again when you’re too short of fabric.
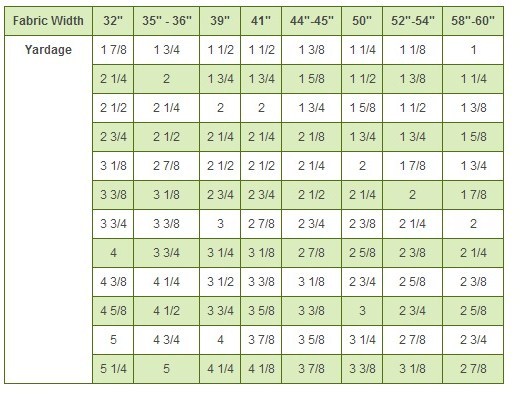
(The chart above is from the Butterick website.)
First, you must be able to do basic math here – addition and multiplication. This particular chart starts with 1 yard at 60″ wide and breaks down the yardage needed for all other popular fabric widths.
If your fabric requirement is not listed (and we all know this chart doesn’t cover the additional yardage needed to make a historical dress!), you need to pick a number that will be easy to multiply for your design.
If you need 10 yards of a particular size, follow that column down to a figure that is easily divided into 10 (2 is a good choice). So if your pattern calls for 39″ fabric, you’re going to focus on the row that has “2” listed because you can take that 2, multiply by 5 and get your 10 yards. If the pattern calls for 60″ fabric, that’s easy – go with “1” and the corresponding figures across that row.
Example #1 – your fabric is 60″ wide and the pattern lists 6 ½ yards of 45″ wide
Here you need to know how much fabric at 60″ wide you need to purchase. Start with what the pattern calls for. Look down the column of 44″-45″ fabric until you find a number that comes close to easily being divided into the 6 ½ yards required. I’m going with 3 3/8″ here as I can multiply it by 2 and get 6 ¾ yards which is close (or over) what I need.
From the 3 3/8 box under that 44″-45″ column, travel horizontally until you reach the column representing your 60″ fabric. It says 2 5/8. Now I take my multiplier of 2 with this and get: 2 5/8 x 2 = 5 ¼ yards. So you need to purchase 5 ¼ yards of 60″ wide fabric for your pattern.
Example #2 – your fabric is 40″ wide and the pattern lists 8 yards of 54″ wide
In this example you need to know how much of your gorgeous 40″ wide fabric you need to buy (without having a heart attack). First find a figure under the 54″ column that will divide easily into 8 – let’s choose “2” and know that to get to 8 yards we will multiply by 4.
Follow that 2 figure back across the row until you get to the 39″ width column. (I’m selecting this column instead of 41″ as you want to err on the side that’ll give you the most fabric so you don’t risk being short). Our number here is 2 ¾ which multiplied by our 4 number gives us 11.
So we need to buy 11 yards of our 40″ fabric to make up our pattern.
However… The Disclaimer:
When your fabric is narrower than what the pattern calls for, you’re going to have to pull out your pattern pieces to check their size. Some patterns are so large they require cutting across the full width of that larger fabric. Edwardian skirts are well known for taking up the full 60″ width.
Measure your largest pattern pieces to see if they can actually be cut on your narrow fabric (40″ in Example #2). If not, you’ll need to either piece the fabric to get the width you need (a period appropriate solution) or select a new fabric.
Remember to always err on the higher/more fabric side when converting your fabric widths. Even if you end up with extra, depending on the type of fabric, you can use it for future projects like a reticule, underlining for a bodice, skirt hem facing, laundry or shoe bags, trims or donations to charity quilting groups.
Have you ever needed to re-calculate yardage based on a smaller or larger width the pattern called for? Did you do it successfully and have enough fabric for your project?
The chart doesn’t go high enough for what I need. How would I figure out how much 60″ wide if the pattern calls for 45″ wide and I need 10 yards at the 45″ wide?
Look at the column for 45″ – the 2 1/8 comes closest. 10 divided by 2.125 is about 5. Now, that same horizontal line is 1.625 (1 5/8) for 60″ fabric. Multiply 1.625 by 5 and you get 8.125 (8 1/4) yards you’ll need of the 60″ wide fabric.
how do you use this chart
The two links no longer work. Do you have a current link to get the PDF? Thank you.
Found the new link and changed on the Butterick site. The PDF link has been removed. Thanks for the contact!
I haven’t seen on of those tables for a long time. I usually takes ages to work it out by getting all the pattern pieces out and fiddling with them till i work it out. I have just done that bustle dress in you class from 32″ wide which involved some piecing but i didnt have to work it out as i had 24yds of the stuff.
I’m am so excited to find you! I too have always adored the wonderful fashions of the 19th Century; the clothing and manners that made life so romantic! I am not a professional seamstress, but I have gone as far as to make my own three piece suit (slacks, vest and jacket) and now I want to learn more about how to produce a truly remarkable and well fitted garment from the 19th century
Welcome, Heather, to our joyful community! 🙂