
Do you make the grade? It’s super important to get into the habit of grading your seams, and I highly recommend it!
The process of grading your seam allowances (aka trimming to various widths) is fairly easy to understand. However, this sewing technique can be time consuming. But don’t let that stop you!
Making the effort of this step in your sewing will create a tremendous difference in how your seams lay and contribute to an overall professional appearance.
The grading term comes from industrial construction and landscaping and is used to describe the horizontal levels of a hill or building – the slope. In sewing, this translates to trimming your seam to various levels making each layer of fabric a different width. Doing this reduces bulk within the seam area – thereby creating a flatter appearance.
How to Grade Seam Allowances
S.A. = seam allowance
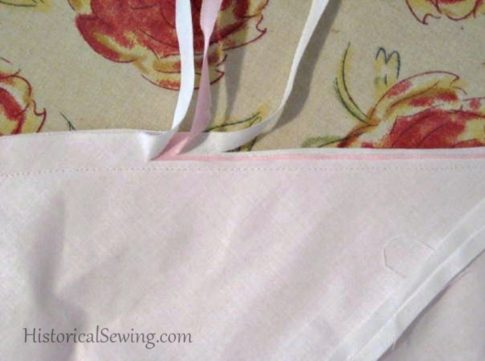
Above photo is a skirt facing (top layer) sewn to a skirt (bottom white layer) that has been flatlined with pink silk. The facing is trimmed the closest to the stitching and they other layers trimmed a bit wider than the one before it.
- Sew the seam first and press flat.
- Starting with the S.A. of the lining or innermost layer, trim close to stitching.
- Trim the next layer close to the first trimmed layer but leave the allowance a bit wider.
- Repeat with the remaining layers until seam is completely graded.
- If you have several layers (e.g. 5 or more), grade S.A. down to about 3 main levels. The last layer of S.A. may not be trimmed at all because the original S.A. width is perfectly in line with the other graded layers.
- If your seam is curved, you can grade either before or after you clip the S.A. (I do both ways depending on the project.) It is a personal preference and one you should do that comes easiest to you as you sew.
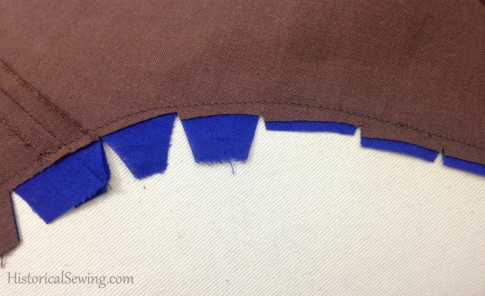
Above is a center back bodice panel sewn to the facing. The seam finishes the back edge. It has been clipped at the curve and graded. The facing will be folded toward the back panel and the seam pressed flat.
Nearly all seams should be trimmed, even a little, to smooth up the cut edges. If you are trimming down to 1/4″ or narrower, don’t grade. Any trimming, grading and clipping into a seam allowance will weaken it.
For future adjustments on costumes that will be shared or if there are weight issues you want to allow for, you can leave the seam allowances on the major bodice seams untrimmed.
Grading seams should, and can, be done on most seams. Any seams that will be enclosed, such as those on cuffs, collars, facings, underlinings and linings require grading to lay smooth and flat.
However, not all seams need to be graded. Skirt seams, for instance, do not need to be graded if the skirt is unlined.
What other tutorials on sewing would you like to see? Please contact us with what you need to be successful in your costume sewing.