One of my favorite things to do in historical costuming is to break down an existing garment, fashion plate, or painting and figure out how to make it. It’s like candy to me – must have!
So when April D. on our popular Facebook page asked me to do a deconstruction of this gown, well… I just had to! 🙂
So now to the good stuff: patterns, fabrics, and a few sewing tips.
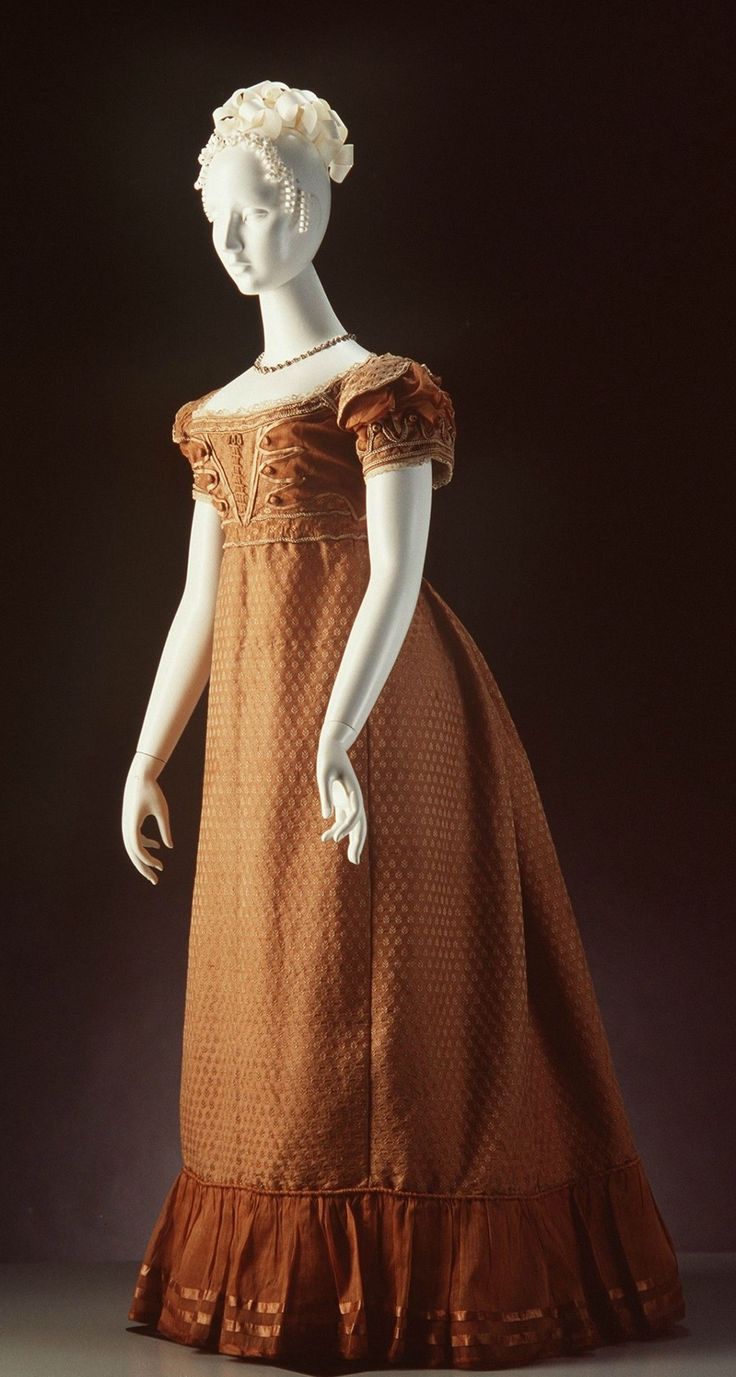
The Powerhouse Museum dates this dress as being made from 1815 to 1825. With the slightly lower waistline I’d say early 1820s is spot on. It’s made of figured silk muslin which means it’s a plain weave, lightweight, with a design woven in. Cream and brown silks complete the trims.
The skirt is made from gored panels still with the fullness in the back. The hem ruffle is reflective on the contemporary trend of emphasizing the expanding hem width.
For a pattern I’d recommend looking at a Regency pattern and simply lowering the bodice a couple inches until it sits around the very bottom of your rib cage. The belt looks wide – about 1.5″ so keep that in mind when you lower the bodice.
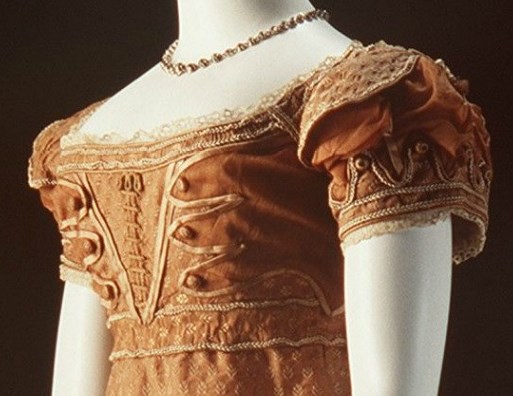
The underlining would be nearly as long as the entire bodice WITH the waistband width. As with period construction the fashion fabric would be applied on top of the underlining then the waistband tacked over it to sit where you wanted the fashionable waistline to be.
You can sort of see that the skirt was then tacked to the lower part of the waistband – it’s not as smooth and tight as the seam on the top of the waistband.

The sleeves could be cut with a straight sleeve stay with the puff mounted on top then topped with the semi-circle epaulettes and bound with a wide band with scalloping at the top. Based on the full description on the Powerhouse Museum web page there is a sleeve lining with the brown silk taffeta mounted on top.
The elaborate bodice is fairly simple in foundation with all that trim hand tacked on top. My thought: the brown taffeta sides were cut and tabs & lower edge bound with bias. Then the panel was applied to the underlining.
The figured silk at front probably only goes a bit under the piped solid brown tabs. I would mount the main silk to the underlining first. Then make the hand eyelets at center front and lace up so the cord ends are tacked & enclosed. The waistband would then be set on followed by the solid silk panel and the V piping. Notice the cream piping goes OVER the waistband seam.
I’ll also point out that there seems to be a tiny horizontal cream piping from the neckline towards the armpit. This could be a seam with a separate shoulder strap completing the bodice. This was a common dressmaking method in the late 18th Century and Regency periods. Could also just be more trim – cause TRIM!

The skirt seams are obvious. It looks to be a center front panel, side panel and center back panel. (Remember, fabric widths were about 18″ to 22″ so lots of seams were necessary.)
Because of the angle of the obvious seam – straight vertical – and the diamond pattern, the front panel could be cut straight. Even the side panel looks straight. Heck, the back panel, too, could be straight and everything hemmed where needed and covered with the ruffle to hide the unevenness.
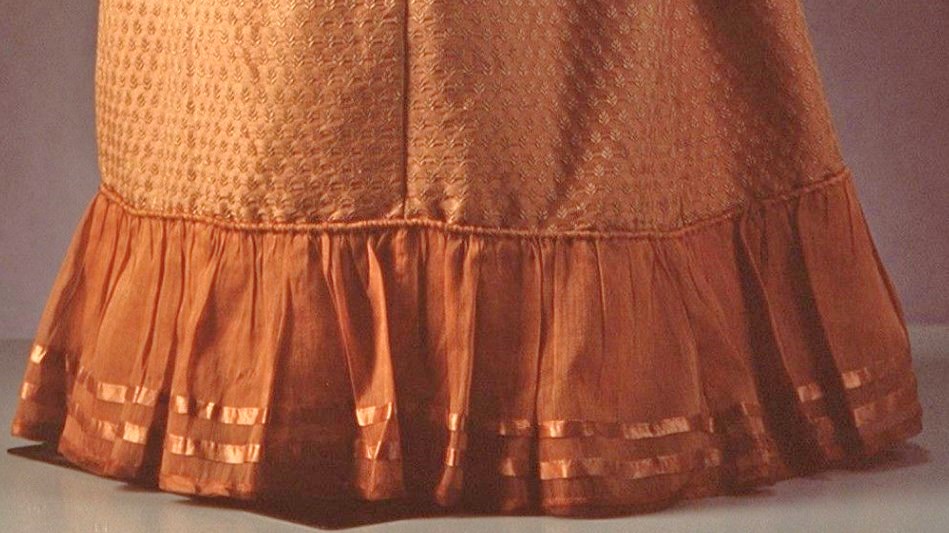
I do actually find the ruffle a bit odd as it looks like a sheer cotton muslin mounted to this silk dress, but is actually silk gauze (delicious & expensive). It’s one of the easiest parts of the whole gown. I’d guess about 1.5 and, no more than 2, times the width of the skirt.
The description says the ruffle is 19cm which is about 7.5″, probably with a small 1/2″ to 3/4″ double hem. The ribbons can be mounted on by hand or machine in the straight rows. Measure from the finished hem up so the ribbon placement is consistent all around.
Fold over the top around a 1/4″ fat cotton cord and run a long basting stitch to hold. Push the ruffle down the cord to gather. Stitch to the skirt along the basting stitches.
The center back opening is finished with lacing, but you can do hooks & eyes if you care to not sew more hand eyelets.
Possible pattern option:
Laughing Moon #126 – view B lengthened slightly with C sleeves; draw your own scalloped band from the sleeve pattern
For silhouette you’ll need:
Shift – I love the pattern from Kannik’s Korner
Corset – I recommend the Laughing Moon or Past Patterns
Bodiced Petticoat – can be made from dress pattern with a lower cut neckline and no sleeves
Bustle Pad – small half-moon shape to fit right in the hollow of the lower back
Take a moment to read the full dress description over at the Powerhouse Museum.
Do you study originals like this – breaking them down into workable parts? Do you find these deconstruction posts helpful? Let us know in the comments and we’ll continue to do them for you. Any particular dress you want to see deconstructed?

Hi there, I am very interested in clothing from this era (specifically the early 1820s. Did the website you found this dress on have any detailed images of the back. I’m interested to know how women got in and out of these dresses. Obviously they had lady’s maids to help them, but where are the fastenings?
The opening is in the center back and, for this period, hook & eye closure. Drawstrings at the neck and waist might have still been in use as they were in the prior couple of decades. Click on the first photo of the gown and it will take you to the museum website. It doesn’t look like they have any more photos online. Contact them to possibly see more.
I don’t know where to ask this, so I figured your last deconstruction post would suffice…I hope… I was wondering if you could do a deconstruction post on the black and red dress in this lovely fashion plate….
Pin here
Bartos Collection
This is my favourite dress ever, but I don’t even know where to begin….
Thank you, and sorry if this is the wrong place to ask this.
I thought your deconstruction of the dress was well-written and spot on. I’ve been eying the Regency period as a new course of study if I ever wade all the way through all the late Victorian projects ahead.
Do you have a guide for costuming a MAN in Regency wear if you only have intermediate sewing/tailoring skills?
Not specifically as of July 2014. BUT… we are in the planning stages of a complete Regency menswear ensemble set of classes. Classes will be intermediate and will cover a shirt, waistcoat, breeches and cutaway or tailcoat (depending on what our final pattern selection will be for that class).
That amazed me, Jennifer. Thank you! I asked because I have fabric purchased for a gown and haven’t quite figured out what to do with it yet. This one spoke to me, and your post pointed out things I would never have noticed! You made my day. 🙂
~april