
OMG – piping! Some costumers cringe even just thinking about piping, others squeal with delight. Or some are simply: “What’s the big deal about piping?”
What’s the big deal?!?
Well… everything! Piping is THE historical definition of design lines AND the support of seams that receive so much wear & tear. (Remember, our ancestors made their clothes to last a good long while.)
And in reinforcing those seams it keeps the fabric firmly fitted to the figure. This makes pressing those seams easier. (Yeah… we all want easier sewing steps.)
So let’s look at where you apply piping, how it’s made, and also dealing with the cut ends.

Piping – The Basics
Think of piping on a cake. You know, those fancy, fluted edges. Makes them stand out, right? Piping in clothing does the same thing. It consists of cording (usually narrow) covered by a bias strip of fabric.
It is best to use true 45° bias whenever possible; however, you can cheat a little and use a less-true bias if fabric is short. I don’t recommend cutting straight-grain or cross-grain strips to make piping. It just won’t work when you have curved areas of a garment to fit a curved human body.
Piping bias can be cut from the same garment fabric or be a similar or contrasting fabric. Generally though, the fiber (silk, cotton, wool) is the same although can be nicer than the garment fabric (cotton fabric with silk piping but never silk fabric with cotton piping).
For the inside cord keep it small. A 1/4″ width is usually too much for a bodice but could be used effectively on a skirt as trim. For piped seams, keep it small – from a tiny 1/16″ to about 3/16″.

Where to find piping on 19th Century garments
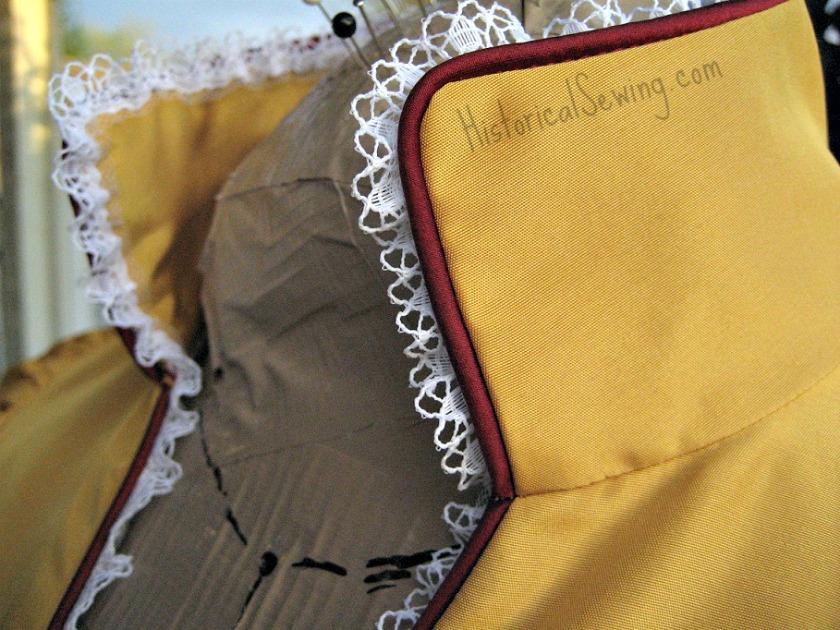
Piping is mainly used on bodices and upper body clothing. It is rarely used in skirts, but don’t assume it didn’t exist there. For a truly historical and finished look, piping is needed in seams on the bodice: shoulder, armhole, side back, and sometimes on center openings, but historically not usually on side seams. Depending on what time period you are making, the amount of piping and where it is used will vary. See the era descriptions below.
Regency: They were just getting into piping in the very late 1790s and early 1800s. But in a few years piping was everywhere! They used it in shoulder seams and on back princess seams. You’ll see it around armholes and also collars, cuffs and wrist hems. Skirt seams, however, were not piped. Generally it stayed on the bodice and sleeves of dresses, coats, pelisses and spencers.
1830s into 1840s: Piping stayed quite popular in these decades and into early Victorian years. Same as with Regency, piping existed on bodice seams – adding in the side seam too sometimes– and on the sleeves at the armhole, wrist and down the inner sleeve seam.
Piping was also used to support the edges of pleated bertha collars and around all sides of cuffs. It was huge in the late 1830s to band down the upper sleeve portion and highlight all the details of the sleeve design.
Piping was added to the neckline and bodice lower edge too. And double piping was an often used detail on the center back and/or center front seam of the bodice.

1850s & 1860s: Piping stayed similar to that of the 1840s but was more subdued and functional, although still emphasizing design lines like the dropped armhole placement. Not all shoulder seams were piped, same for necklines in their finishing. Fitted lower edges of evening bodices (those not in basque style) were much piped.
Bustle Era 1870s: Piping was still used in the 1870s but reserved to armholes, occasional side back seams, cuffs and bodice lower edges. Double, and even triple, piping was HUGE along bodice hems, many times in contrasting fabric. Sometimes the bias was left flat with no cord along the inside.
Piping also appeared on skirts when the Trim Explosion Era started in the late 1860s. Although here it was for decoration and not strictly within seams to reinforce them. Generally the skirt piping was all applied on the surface with edges covered by more trimming.
Cuffs, collars, and false or vest fronts were especially highlighted with contrast piping.

1880s & 1890s: Piping was fading from use in the 1880s but can still be seen on originals on collars, cuffs and armholes. Although still seen on some 1890s bodices, it was not as widely used.

How to Make Basic Piping:
Again, do not cut straight strips of fabric for your piping; they just do not work and make your work look shoddy.
Draw a line parallel to the selvedge of your fabric. Then using a ruler with a 45 degree line marked or other clear ruler where you can pick out true bias, draw in lines to the width of bias needed to cover your cording. You can cut with scissors or rotary cutter. Be careful to keep the fabric straight as it can easily stretch on the bias edges that you’re cutting.
Depending on the amount of fabric I have and bias needed for the piping I’ll vary how long to make each marked strip before cutting. Sometimes I’ll mark clear across the fabric width to avoid a seam in the piping. But most often I’ll keep the strips to about half the fabric width or between 20″ and 30″ long.

Next, piece the strips together (e.g. seam them into one long strip). You can also make the piping the approximate length of the edges to pipe rather than make one long strip then cut as needed.
Use 1/4″ seams on the diagonal ends to piece. The ends of each bias piece will stick out where the two strips match at 1/4″ (or other seam allowance).

[You can, of course, make continuous bias where you avoid piecing strips individually. You simply draw in the cut lines, sew the selvedge & ends together in one seam then cut along the lines. You can find loads of examples on how to do this usually on quilting tutorial sites. Google or search Pinterest.]
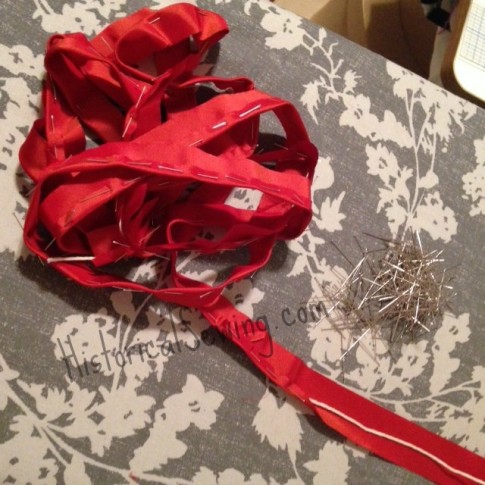
To make the corded piping, fold the strips of bias lengthwise, wrong sides together, and insert cording into the fold. Pin tight along the cording placing pins parallel to the cord.
[There are some dressmakers who make piping without pinning and more snaps to them! However, for me personally, I find that the bias slips too easily on me creating skewed bias around the cord if I don’t pin it all first. As with all sewing, do what comes easiest for you and produces the best look.]
Using a zipper or piping foot, baste the cord tightly into the bias. (If you don’t have a piping foot for your machine you must go get one now! Amazing tool.)

A handy trick after making the piping is to use a 1/2″ metal bone and rotary cutter to trim the bias down to an exact 1/2″ seam allowance for easier sewing. I love using this trick – thank you to my friend Bridget for showing me years ago!
How to Sew Basic Piping:

Pin the piping to the garment edge with the cord just to the outside of the seamline – very important. (The basting line of the piping should be on top of the seamline of the garment.)
Use a machine piping foot or zipper foot to baste the piping to the garment. After your seam is sewn you can grade the piping bias along with the garment seam allowances.
When pinning around curves such as around armholes use steam from your iron (be careful!) to guide the bias into place. Keep the cord just to the outside of the seamline! On very curved armholes (like the front curve of a dropped shoulder bodice) you may need to clip the bias a little, up to the basting, to allow it to lie flat.
Anytime you sew piping it is good practice to trim the cord AT seamlines or where the piping overlaps itself or other piped areas. After pinning the piping to the garment, gently open the basting stitches at the cut ends and trim the cord. Try to trim right at the seam. It’s okay if you trim a little more but be sure to trim enough so it lies flat.
How to Sew Piping Enclosed within Seams:
Enclosed seams include areas where the piping ends meet each other like armholes or cuffs.

The piping should start/end at a discreet location such as under the arm or towards the back. Trim the cord inside then overlap the edges, pulling them up away from the seamline. (The bias edges will go beyond the seam allowance and will be trimmed after sewing.)

You can also fold under one end of the bias (after trimming the cord) and inserting the other end into it to create a smooth finished edge. This manner creates more bulk as you are layering the bias together.
Adding appropriate piping to a garment will boost your dressmaking confidence as well as show you are attentive to the finer details. It adds such a nice historical touch to your clothing and speaks volumes about your skills. Be sure to add it to future 19th Century projects!
Do you pipe your Regency and Victorian costumes? Or are you new to piping? What’s your next project that calls for piping?
Any advice on actually attaching the sleeve once the piping is on? I’m stuck on figuring that out next.
You’d attach the sleeve as you would normally with the piping cord part on the garment side of the seam allowance. A piping or cording foot works fantastically here! But a zipper foot works just as well. Put the zip foot on so it sits on the “right” of the seam line, on the seam allowance. Sew the sleeve in with stitches right next to the piping (which, again, is on the garment side, or to the left of the zip foot and seam line). If in doubt, pin in the sleeve then hand baste loosely around the seam line to get the idea of where all the layers (including piping) are laying in the seam before final stitching. Good luck!
Do you have an online workshop on how to add piping to garments? My technique especially with a machine is very messy x
I assume in some of your examples in the pictures above you then turn the piping inwards and layer the lining on top? X
Hi Cara, I don’t have a standalone online workshop for piping, however I do demo the full application and variances of sewing piping in my dirndl workshop class, and a bit also in the Regency Spencer class.
As to your picture question, yes, you baste on the piping to the right side of the garment, then layer the lining over and sew; turn lining to the inside and the piping will stick out between the two layers.
I’m doing a course in costume construction and it would be so helpful to me if you could tell me about some books that have this kind of information in them.
I’ve got two posts on my favorite books. You can find them HERE and HERE. 🙂
hI, YOU DID NOT FINISH THE PIPING INSTRUCTION OF NOW THE PIPING IS CONNECTED TO THE FABRIC, SO NOW HOW DO YOU FINISH OFF THE PIPING? DO YOU JUST FOLD OVER THE PIPING AND SEW IT DOWN ( WHICH LOOKS AWFUL ON THE UNDER SIDE) OR WHAT??? THE FINISHING AFTER THE PIPING IS PINNED AND SEWN CLOSE TO THE PIPING, EDGES TRIMMED AND CLIPPED SO NOW WHAT DO YOU DO WITH THE RAW EDGES?? THANKS SANDY
Your article mentions the use of contrasting piping. We are trying to determine how “typical” contrasting piping was for everyday wear in the late 1850s and early 1860s in Southern California. The day and afternoon dresses I have seen from the period seem to be done in the same fabric as the dress.
For anything regarding fashion I am careful in calling things “typical.” Sure, there are common ideas but research will be found that other options existed alongside. Contrast piping was seen more often in earlier decades based on what I’ve found. I cannot vouch for Southern California specifically as my research is fairly general of fashion eras. I do know that even with steam trains, fashion knowledge was slow to reach the West Coast by a few months after taking hold in the East. Fashion doesn’t change overnight either. It is a slow progression through society. Contrast piping, along with other elements, would be based on one’s personality and preference sometimes ignoring fashion changes until years later.
If you are finding more matching piping on bodices for the years of your study, then in your research that was the common thing. Contrast piping would then be another option seen but not mainstream… based on your current findings. I CAN tell you that piping was very common in the 1850s & 1860s. It strengthened seams and emphasized fashion lines. Whether it was a contrast fabric or not I’m not sure as to commonality. Also, with “everyday wear” we may not have as many existing garments to study as we do for upper class and special event garments as they were worn so often as to wear out and/or be repurposed. Photographs would be a great research medium for everyday wear but deciphering contrast piping will be harder. Best of luck in your continued research!
Here is one early 1860s dress with contrast piping. This is merely one example.
Hello, please can you give any advice on piping the bottom edge of a bodice where it goes to a V point at the centre front. I know how to make piping insert piping using a sewing line first along the bottom edge of the bodice, but how do you cut out all the bulk at the centre front when you come to turn in your bottom edges and catch stich to the lining on the inside. There is lack of information the internet of how to cut out the bulk or what to do when you reach that point. I’ve piped bodices before, though not totally successful when it comes to the V point, there must be a way of doing it.
If you can help please e-mail me above.
Thanks from Tracy
Piping has always terrified me, but I think these tips might just give me the courage to add some period appropriate piping to my next project, an early 1880’s vest bodice. Thank you again for sharing your wonderful experience and wisdom with those of us just muddling through!
I find piping knotched collars the hardest getting it round the pointy bit.
Stay tuned for another tutorial on piping corners! 🙂
Funny enough I just finished a piped bodice. I had some questions about which seams to pipe (I erred in piping the side seam, but it’s a mistake I can live with), and how to neatly pipe around the armhole. Makes me happy to find that I was correct in deciding to overlap and ease away from the seamline at the armpit. I did accidently do this on the back of the hand instead of the wrist when I did the cuff, but I think it made for a nice effect and it’s subtle.
I learned to do piping for my regular dressmaking ages ago, though it still sometimes gives me fits. Thanks so much for sharing your knowledge about the different sizes and the proper placements for different styles and time periods. Fashions do change, and it’s hard to keep up when you’re looking back….
Fabulous tutorial! Piping was one of those things that intimidated me a great deal when I started doing historic costuming (about 8 years ago), and so many of my earlier garments have no piping in them. Once I learned how to do piping (and why it was so important) I had a lightbulb moment, and now pipe everything!
Pipe.All.The.Things!
This article is wonderful! I’m piping two jackets today and the reminders were perfectly timed for me. I’m doing a brown jacket for my Steampunk character and I’ve already made piping (although rather larger than you describe because of the nature of the character). The blue TV 1872 Vested Bodice to go with my TV Parisian skirt has been a puzzle that you just solved.
I bought some blue “silk” which was going to be my lapel then abruptly changed my mind and decided to do the collar and cuffs to match the paisley print I’m using on the front swags of the skirt. Well that plan hasn’t changed, but it’s going to have SO much more pizazz with my polyester “silk” piping outlining the sleeves and the jacket. I can’t wait to show it to you.
Thanking the Great Power of Creativity who inspires you, Jennifer, for your kind nature, patience, abiding faith both in your god and in us!
Thank you for this very informative article. I have never seen anything that so clearly explained the piping areas for the different eras.