
Stripes are awesome! (if you don’t know). And they rule fantastic designs throughout the 19th Century.
What if you love stripes but the matching part terrifies you? You avoid sewing with beautiful linear patterns because you think the Stripe Matching Game is beyond your reach. I can assure you it’s not. It’s a matter of knowing what steps to take first and developing patience to get it right.
Let me walk you through the steps I use when matching stripes. This method can be used for stripes of all sizes and plaids too. 🙂
Before we begin, you must remember to work on only 1 layer of fabric at a time. None of that, “Oh, I can fold it exactly on one of the stripe edges and it will all be on grain and match” stuff. No.
You want your bodice to look good, right? Then spend the time and cut one piece at a time. Trust me. You will thank yourself later. 🙂
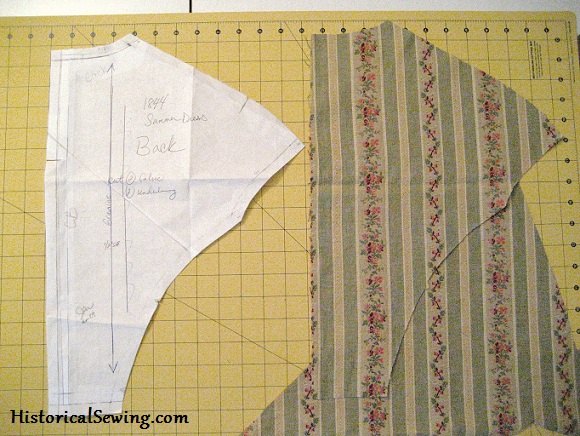
Step 1
Remember the key to accurate matching: your pattern seamlines must match perfectly before you even touch the fabric.
Walk or measure each seamline you want to pattern match. The photos in this tutorial are of a mid-1840s bodice back. Notches help here, but for this method you want to concentrate on even seamlines.

If your back piece along the princess seam is 9-3/8″ then make sure your matching side back piece seamline is also 9-3/8″ long. You may have to adjust the length of either piece in the middle or at the bottom (but not at the armhole usually).

Step 2
Determine if your stripe has a top & bottom direction or even a left & right. You’ll want to pay attention to this direction when cutting.
Step 3
Cut your main bodice piece first – usually center back. If you have a center back seam, cut one half first like the right hand side here.
Position the stripe to where you want it to run within the piece. It’s always best to have the main motif or largest stripe running along the fullest part of the piece. But position it where you feel it has the most emphasis.
Step 4
Lay your cut center back piece on top of the fabric, aligning the stripes, and with enough fabric to cut out your matching piece. This part is where it counts.
Step 5
Clip into the seam allowance of the two paper pattern pieces you want to align – here the center back and side back pieces. Clip at intervals and fold up along the seamline on both patterns
Step 6
Lay the center back paper pattern on top of the cut fabric piece. Keep the seam allowance folded up. Pin to hold if needed.

Step 7
Lay the side back paper pattern on the fabric aligning the seamlines of both paper pattern pieces. Here the seam allowances are folded out of the way so you concentrate on the seamline only.

Be attentive in matching up the seamline intersection at the armhole /princess seam.

Step 8
Pin the outer edges of the side back piece to hold in place. Be extra careful here not to move the cut center back fabric section or the paper pieces.

Step 9
Gently remove the center back pattern and cut fabric piece.

Step 10
Finish pinning the side back piece. Remember to unfold the seam allowance! Cut out the side back.


Step 11
Pin the seam matching the seamlines of both pieces. Stitch. Sometimes you have to tweak the fabric a little as it goes through your machine so the stripes stay aligned. You can also hand baste the seamline for a super matched stripe!

Repeat for the other half of the bodice. Follow the same steps if matching a center back seam – cut out one side, fold up the seam allowances, and match the pattern for the other side.
Not too hard, huh? It can be done by beginners and professionals alike. Of course, the toughest part is finding the patience to go slow.

Have you tried this method to match stripes? Do you pattern match another way? Share with us!
Oh my goodness! This post has absolutely saved my project! I’ve never been able to successfully match vertical stripes on curved seams so I almost always avoid them. Well, I found absolutely stunning vertical striped fabric for a bodice I am making and struggled HARD to attempt to match the pattern. Failed miserably and can’t look at the garment any more. I will be seam ripping it apart tonight and trying again with your info here. Thank you, thank you, thank you! I’ll let you know how it goes (hopefully well)
So happy to hear this post has been helpful! Best of luck in finishing your bodice. 🙂
So… I’ve been looking everywhere to figure out how to make that sleeve style work. For some reason I just can’t fathom how to create the sloping shoulder like that. It looks like the sleeve attaches under and before the edge of the shoulder. Can anyone help out a confused soul?
Are you talking about the sleeve or the bodice armhole? The bodice shoulder seam is extended over the top of the arm. The sleeve pattern is trimmed down around the top of the cap to compensate for the longer bodice.
The particular bodice in this post was created from Truly Victorian TV454 that has lapels that are laid on separately so they cover the top of the shoulder.
I’m not clear – do you fold up the paper seam line on the back bodice piece too? The picture looks like it is still down. Do you fold up and butt it up against the side piece folded up along the seam?
Yes, you clip and fold up the seam allowance on the back too (see Step 5). So both pieces have the seam allowance folded out of the way as described in Step 7. You are on the right track with your thought!
I work on a single layer of fabric. Make sure you Preshrink it First!!! When working with a pattern or stripe, I Carefully mark the fitted pattern piece at the seam lines. I draw the lines or pattern to be matched. I do this with every piece. Make sure you have extra fabric, because there will be a lot of moving of the pattern pieces around , to line it up correctly. I then pin. Then BASTE the seam at the matching points, then sew it. The basting keeps the seam from shifting while sewing the seam. Depending on the fabric, you can flat line it or not. I have seen dresses made by just using the fabric the most economical way they could and didn’t care about matching anything. If you feel you MUST Match up the seams TAKE THE TIME and DON’T RUSH! Do Each piece ,than the next. When you finish, it will have been worth all the time and effort!
Stripes were so popular during the 18th century (my favorite time period!) but I’ve always been scared to death of tackling a striped jacket or gown – until I read your tutorial! So simple, but clearly described, with great photos. Many thanks!
Great advice.
Great how-to! Much needed advice on technique.
thanks for the tip!! may have to try a strip some day.
I have a plaid circle skirt on my list of projects….i’m guessing I would cut out the “on the fold” piece first and then match each side to that…correct? and what do you do about the waistband?
Is it difficult to do this with a skirt pattern? Is it different? How much extra material do you need to do this with a skirt?
You simply need a large space to lay out each skirt panel separately. Fabric – always add an extra yard or two (or even more!) when matching stripes.
Will this method also work for making the Chevron stripes?
Hmm…would this work for other patterns, too? Probably…I hope, at least. I don’t favor stripes, but I do favor brocades with ornate patterns, particularly for a bodice. Layering pattern/plain/pattern/plain is the way I love to do it. I feel like my pieces could be better if I did figure out matching the pattern! Thank you!
I’ve seen many methods during my sewing career, some with mediocre results and other just too time consuming to attempt. Your method is straight forward and simple, really. Another great tip, Jennifer! Thanks!!
Thank you for the tutorial. It has been decades since I really matched stripes. I really want to make a stripe or plaid Steampunk skirt one of these days.
This will be so very helpful when I begin working on the wonderful silk fabric I found on sale. I was worried about matching up the stripes but now, with your hints I can actually start sewing.
Thank you so much for this! I tried making a plaid bustle and really failed at the matching part. But, now I see where I went wrong was trying to use two layers of fabric instead of one. I also did not fold up the seam lines as you mentioned. I will give the plaid bustle a try again. Thank you for your helpful advice!
Great tutorial! When I made an 1870s striped bustle dress, I actually used tracing paper for my altered-to-fit pattern pieces. This made it easy to trace the stripes and line them up. Of course, it was my very first costume and I didn’t yet understand the difference between lining up the *edges* and lining up the *seam allowances*! It turned out surprisingly well in spite of my ignorance, but I wouldn’t mind the chance to redo certain parts of the bodice.
This is very helpful, thank you! Do you not worry about grain lines then, or do you cut your flatlining to grain so your top fabrics matters less?
That is EXACTLY what you do – cut your underlining fabric on grain to flatline to your bias cut/off-grain fabric for support. Although, some bodices like the tight 1840s will still need the side front pieces cut on the original bias so it fits smooth around the torso. But if you’re tweaking your striped fashion fabric, you need that underlining on grain so the final bodice doesn’t twist.
WONDERFUL! And just in time as I start my sewing for this years events!! Thank you!!
Oh dear, crying on the inside a little at the moment. Tried to make a striped corset top with chevron front. Terribly bad. I wish I had this article earlier, but I forge ahead, perhaps not on the current project due to a rapidly dwindling fabric supply, but on a new project!
Thank you for this one, Jennifer. I have used a similar method before–to match wallpaper! I seldom wear stripes or patterns because I mainly favor solids–but that doesn’t mean I never will. After all, I love Steampunk and I’m not the only person I’m sewing for.
I’ve begun a ring binder for the corset class. I think I’ll expand my horizons and start filing these wonderful tips so that they’re at hand when I sew.
You’re the best!