
Perhaps you’re putting together a new summer dress.
Or maybe it’s a new work dress for camp.
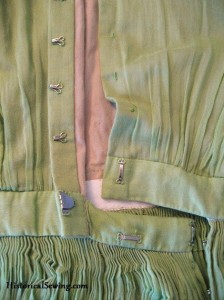
All you know is that one piece dresses in the 1850s and 1860s had the bodice and skirt attached together. Then there is something about that closure that looks funny and seems daunting….
I mean, you could easily sew up a bodice and skirt. But connecting them when the center fronts don’t even match – holy cow! How does one do that??
I don’t know about you, but I find this skewed opening hard to figure. The bodice is fine, opens as usual. And the skirt is finished with the usual pleating at the top. But connecting them – that’s where it gets confusing.
What is this finishing technique anyway? Why did they swing the skirt opening over to the left?
I think it’s to avoid the break that would naturally attract attention in the skirt panels. By shifting it over, it keeps the center front panel smooth and unbroken. Plus it makes it easy to get dressed by yourself. 🙂
So to break this method down, I put together some basic steps to follow for an easy-to-do skewed closure (that sounds like an oxymoron, oy!).
18 Simple Steps for an Off-Center (Dog Leg) Closure
1. Sew up your bodice as usual, finishing the center front opening with your choice of buttons, hooks & eyes/thread loops or hook & eye tape.
2. Mount bottom edge of bodice to waistband cut to your waist measurement plus ease and finish. (Your bodice should be complete on its own.
3. Pin mark the center front, center back and sides by quartering your finished waistband.
4. Sew together the 3 to 4 panels of your skirt leaving one seam open 9″ to 12″ at the top. Narrow hem the opening. Finish the hem.
5. Cut 1″ twill tape the same length as your finished bodice waistband plus extra on both ends for a small hem. Turn those ends under twice and hand hem.
(Below is probably what you want to really know so pay attention here.)
6. The tape waistband ends will meet on the left side of the body. Find the end that will start there and move to the center front and then onto the right side of the body. Make or pin a mark 3″ to 4″ in from the hemmed end of the twill waistband. This will be your center front mark.
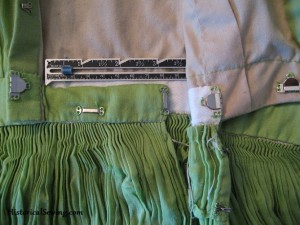
7. Apply a strip of your dress fabric over the twill waistband from about an inch from the center front mark all the way to the end. Tuck in all the raw edges and hand whip down.
8. Quarter mark your twill tape. Overlap the ends the same as your bodice and pin to hold. Fold tape in half at the center front mark so you can mark center back. Match up centers and mark sides.
9. Find the center front of your skirt panels. This is probably the most confusing part of a dog leg closure.
a. The amount you allow to pleat up to fit that left tag of the waist band varies but generally 12″ to 18″ is a good amount depending on your waist size. Measure from the hemmed opening over the width and mark as center front.
b. Or you can be a nerd and do math in proportions to figure the exact amount. The calculation would be that 3″ (the length of your waistband tag) is to Y (the total length of your waistband, as X (the width of fabric you need for the waistband tag is to your full skirt width.
3″ X
=
30″ 170″
This would, in fact, give you a measure of 17″, which is the width of your skirt from the opening over to the center front mark.
10. Quarter your skirt. Following the idea in Step 8, at the top fold skirt in half and mark center back. Fold again and mark sides.
11. Turn under the top edge of the skirt. Balance your length from the hem at the quarter marks.
12. Pleat top of skirt panel with your choice of pleats. Cartridge and knife were the most popular.
13. Match skirt up the waistband and pin together at centers and sides. Adjust pleats to fit.
14. Hand sew top of skirt to twill waistband.
15. Match waistband (with skirt attached) to the inside of the bodice waistband at centers and sides. The right-side end of the twill waistband should extend 3″ left past the bodice waistband center front mark. (Remember the fashion fabric cover you did in Step 7 extends about an inch from center front so that’ll help with the placement.)
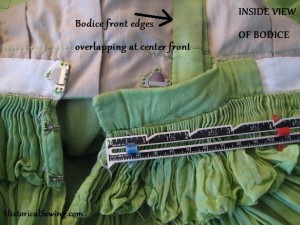
16. Hand sew the twill tape to the inside bodice waistband AND on the outside of the skirt at the bottom of the bodice waistband for a secure attachment.
17. Add finishing hook & eye closures.

18. Wear with pride knowing you skewed everything correctly and can get dressed by yourself!
Off-center openings can really throw people for a loop. They can be really daunting the first time you attempt one (it was for me!). Everyone will have an issue with this until you’ve done it. But once you know the basic steps to figuring it out, you can apply them to all your Civil War and Mid-19th Century dresses.
Tell us below how you’ve tackled this unusual dress closure.
Is it possible to get a video of this being sewn?
I have an entire online class for making a cartridge pleated skirt; however, I do not have a specific video available on attaching the skirt in this off-set manner as described here. Sorry for the inconvenience.
Thank you for taking so much time to explain how to join the bodice while creating that daunting opening. Please make a video or sew a long. Thanks
All I can say is Wow! I love your work!! Beautifully explained even to a newbie historical sewer like me. Would you consider making a video on YouTube in the future… Thanks
Thank you. And you’re welcome Nancy!
(Video on what specific part of this?)
I’m trying to figure out how to do this on a stacked box pleat; how do I fit the closure to make it invisible, versus smack in the middle of the box pleat?
I’d put the stacked box pleats so the outer folds touch over the opening in the skirt. So, on the left hand side of the opening the pleat fold would end just back from the opening to allow the right hand side to come over to close and the pleat folds would be right next to each other. Perhaps only one set of pleats to the left of center front on the right hand side that closes over.
Do you make a plackard style closure for the skirt So it doesn’t split open?
No, as it’s too heavy and bulky for this opening. I simply narrow hem the edges of the skirt whether in a seam or a slash in the panel. The bottom of the cut or seam does need to be reinforced, however. A bar tack by hand or machine is a perfect solution.
Miss Tracy! Thanks for sharing. This is my preferred method too. It works really well on dresses with no waistband.
Janet
How helpful and just in time too! 🙂 I have problems with the horizontal section of my closure staying shut, especially when doing anything strenuous (read dancing!). Right now I just have hooks and eyes on it. Any idea what else I could put that would make it stay shut?
I would try an interior (hidden) button, Veronica, or else some ribbon ties (also hidden) in addition to your hooks and eyes. I don’t know anything about how period either fastening would be, but either would be more secure.
Thank you very much! I will try that.
Thank you. I hope this will help me next time I do a front closure.
Oh, I’d go insane trying to make this look right.
Thank you ever so much for this article. Very helpful! Generally, I make the bodice without a waist band because I am SO short waisted. But I add a ‘tail’ (for lack of better words) to the right (hook) side of the bodice that acts like a waistband to accommadate the dog leg closure. This is inside the bodice and naked to the public eye.–Miss Tracy
Oh, what a great idea Miss Tracy!
I just love these detailed explanations. Thanks a million!