Your corset order has arrived. You rip open that box or cardboard priority mail envelope and out you pull beautiful white bones. And there’s the busk too. How pretty it looks!
You examine it’s little bumps attached firmly to the steel bone. The knobs that easily fit through the rounded loops. You figure out how to get the two pieces apart – amazed how the loops are woven over & under the opposite bone. Now they are apart and you set the busk pieces down on the table. You’re not quite ready to put it in your corset yet….
Later you notice the cat (or your toddler) has found a play stick. Uh-oh…. Now how do the two bones with their silver loops and studs go back together?? You know you have to get them matched back up correctly or your corset is going to turn out horrible.
If you’ve ever taken apart your busk bones and jumbled them up before you were able to set them in, here are 3 simple tips to keep you from ever mixing up your loops and studs again (even when they become play toys).
#1 – THE LOOPS ALWAYS GO ON THE RIGHT HAND SIDE

Well… they are always on the right hand side for women. If you are a man who wears a waist slimming corset for Regency, Early Victorian or Late Victorian historical wear, then the loops could be on the left.
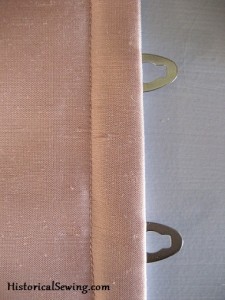
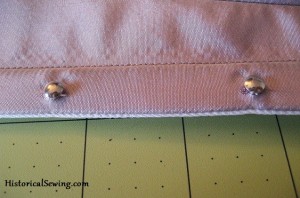
This follows the modern dressing method that women’s bodices close right over left. You can easily tell what are the right and wrong side to the loops – the single rivets are on the wrong side, loops on the right side. This allows for the loops to stick out past center front and connect to the studs.
To determine the top of the busk, hold the loop side up to you with the loops pointing toward your left side. Hopefully you know where the top is from here. 🙂
#2 – THE STUDS SIT CLOSER TO CENTER FRONT

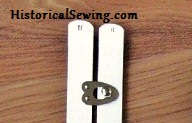
When you look at the stud side of a busk you’ll notice that they are not riveted in the center of the bone. They are off-set. How to tell which end is the top is to look at the studs and which edge of the bone they sit closer to. That closer edge is center front.
Now that you know which edge of the bone is center front, hold the stud side up to you and you’ll know what end is up.
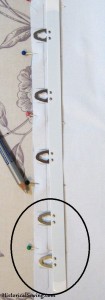
#3 – TWO LOOP SETS RIVETED CLOSER TOGETHER SIT AT THE BOTTOM

Not all busks are made like this, but some are and you’ll especially find this on longer busks. The lower two sets of loops & studs are set closer together than the other sets along the bones. These two friends are always on the bottom – making you aware which end is up. 🙂
My favorite trick to always know which end is up on each side of the busk is to mark it immediately after my order arrives. Busks nearly always come fitted together. Don’t take them apart until you mark them!
I determine which end is up by using the above tips. Then I use a felt-tip pen (I like Sharpies as ball-points and pencils don’t work) to mark the busk length at the top of each bone. Now if and when the two pieces ever come apart I don’t have to re-figure which end is up!

Have you ever mixed up busk pieces? Do you have your own trick of finding out which end is the top of each piece?

How do you know what size a busk to order? My center on my corset that I am rebuilding is 12 inches. So do I get 1 12 inch busk or 2 6 inch busks so I can bend forward?
Are you even suppose to bend forward in a corset? I use mine for back support & made it out of a very solid cotton, about 5 or 6 years ago. It’s a bit faded, but she will still work for a few hours before the old featherweight bones crinkle (before I learned or knew anything about the right bones to use. Thanks for that Jennifer. 😉 )
The corset is, I think, a modern attempt at a vintage corset. I say this because the corset covers the nipples quite high & the length is longer then I have seen in some of the photos recently.
I will be getting one of your correst patterns soon & a book on corsetry, in the mean time, I make due with what I have.
So, the question remains, what kind of busk do I get & how long should it be?
What about lacing? is there a special kind to use? I’ve been using ice-skate laces & they work very well, but I am also lacing in the front from top to bottom. Again, something I just learned not to do 2 months ago.
I have SO much to learn about the kind of clothes I love to wear. LOL
Hi Marianne,
You want one solid length of busk – so 12″. You’ll need to make sure you can sit down with a 12″ and the bottom of the corset doesn’t get pushed up. If the busk goes as far as your pubic bone it’s too far. You’ll want to go shorter here. Always err on the shorter side when selecting a busk length.
Cheers,
Jennifer
Just found a busk that I hadn’t marked in my notions box. As puer usual the pieces came out separately. This advice has been very useful. Incidentally there were to bones in there as well.
Having just played this game a few days ago, I realized that if you fit the two pieces together correctly, the two steels are flush with each other and will therefore sit on the corset evenly and smoothly. If you flip the loop side steel so the rivets are to the outside, then the two steels do not lie flush, one is pushed to the front, the other to the back.