
The slipstitch is a finishing stitch. Use it to hem garments with regular fold-up hems and for attaching the bias to the inside of necklines, waist edges, and sleeve/skirt/pant hems. You can also use a slipstitch to attach flat ribbons and trim to the top side of a garment.
However, the slipstitch is one of the most difficult to fine-tune. It takes a steady hand to make slipstitches truly invisible on the outside of your project. Strive for excellence!
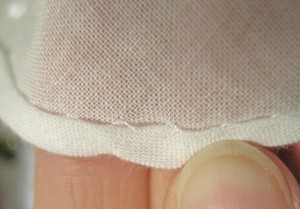
This is a slipstitched folded hem. The part folded up on the right shows the correct side of the fabric and the tiny points of thread. Note: the example was stitched with a reverse thread color (white) to show you where the stitch is. You want to use an appropriate thread color to hide your stitches. 🙂
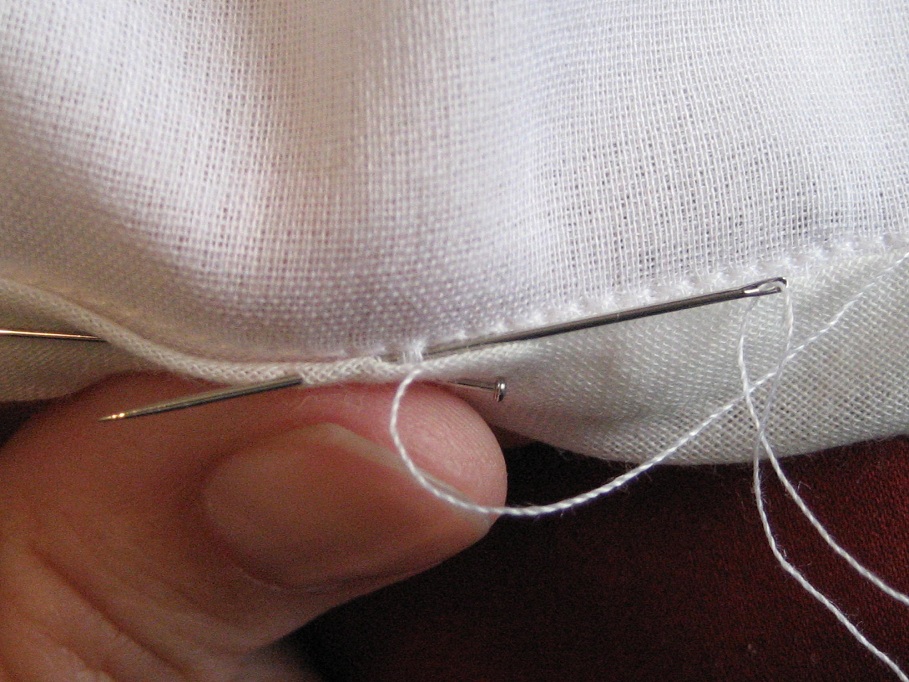
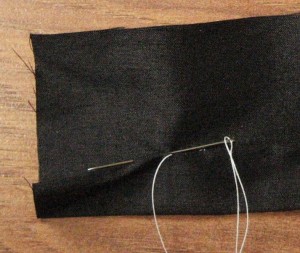
- Secure your thread to the back side of your folded-up bias/hem facing/hem. Take a stitch into the main garment, picking up only a thread or two of fabric.
Here you can see the needle picking up only a thread or two of the fabric. This is the part of the stitch that shows on the correct side of the garment. Keep the section small!
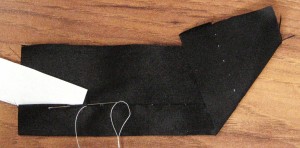
- Place your needle again to the back side of the folded hem/bias/facing near your last stitch and run it through the fold. (This can vary from 1/8” up to ¾” depending on the types of fabrics you are using, the strength of the stitch needed, and your particular sewing style.)
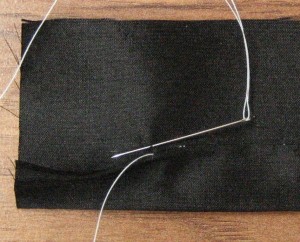
You can see the needle has picked up a thread or two of fabric and then was pushed through the fold of the hem to form the stitch. After you pull the thread through the fold, take up another thread of fabric across from where the needle came out of the fold.
- Again, take a thread or two of fabric from the main garment piece and run the needle through the fold a second time.
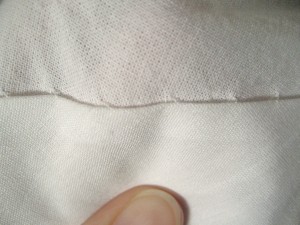
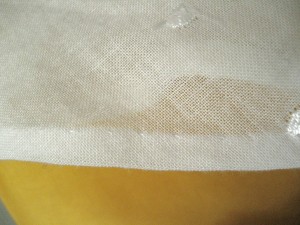
This stitch on the correct side of the garment only shows the few threads of fabric you picked up with your needle.
Below: Top shows the inside hem and the bottom is what you can see on the outside.
In some fabrics, you may need to take up more fabric threads for security. If you are hemming a skirt train, make your stitches close together. For very curved necklines, your closer stitches will help “bend” or ease your bias facing easier around the curve.
I use Slip Stitch frequently. From now on whenever I sit stitching using this stitch I will be telling myself I am using Jennifer’s Stitch. If I am interrupted by anyone I will say that they have stopped me from doing Jennifer’s Stitch…. Many thanks for all of your marvelous blog posts.
Well, thank you. But I didn’t invent it. 😉
comment peut on avoir les articles en francais lorsque l’on ne connait pas l’Anglais.
merci de votre réponse
j’aime beaucoup regarder Pinterest
il y a vraiment des choses très intéressante
continuez merci
Hi Suzanne,
If you use Google Chrome as your web browser it will ask if you want to translate any page into your language. I recommend using that so you can read any of our articles and pages in French. You can also copy text and put it into the Google Translate page to read in French.
So glad you are following! 🙂
Si vous utilisez Google Chrome comme navigateur Web, il vous demandera si vous voulez traduire n’importe quelle page dans votre langue. Je recommande l’utilisation de ce qui vous permet de lire n’importe lequel de nos articles et pages en français. Vous pouvez également copier du texte et le mettre dans la page Google Translate pour lire en français.
Si heureux que vous suivez!
Bjr, pourriez vous me traduire en français, tous les articles que je pourrais suivre. Mercii
If you use view my website on Google Chrome web browser you can automatically translate the pages into French. Visit this link.
Si vous utilisez voir mon site sur Google Chrome navigateur Web, vous pouvez faire traduire automatiquement les pages en français. Visite ce lien.
I’ve used this stitch on hems, to attach quilt binding, to close the open ‘turning point’ when making plush toys (where you sew most of it together then turn it inside-out so the seams are on the inside), and to anchor tags/labels so they don’t flip up and poke out of the collar.
My friend asked if I could sew her drape panels together so they are not separate panels. I told her I could and would – and the slip stitch that I used is invisible – the 2 hems together and I slipped the needle/thread into the folds from edge to edge.
None of the stitches can be seen – unless the hems are pulled apart. So, that will work, IF she ever wants to make single panels again (which I doubt she will ever do)
That sounds like ladder stitch?
It is different though as you only pick up a thread or two of the main garment part with the needle so it remains invisible on the right side of the garment. The ladder stitch is to bring together two folds of a seam. The stitch there is made evenly on both sides of the seam.
This is the only way I have ever hemmed anything. I have been doing it so long I forgot what it was called! Great tutorial!
This is a great stitch.I need to remember to use it when doing my binding. Thank you. Enjoy the day!
I do have one question, would anybody have patterns to make chemises or slips made from cotten… The silky ones become so hot during the summer….
Check the Patterns resource page for vendors. I highly recommend Truly Victorian chemise and the ones from Past Patterns.
My grandmother was a seamstres. She taught me how to sew ‘properly’.
My grandmother taught me this over 50 years ago. I thought
I was the only one who did a slip stitch this way. Thank you
For teaching a new generation how to do beautiful stitches.
Old school hemming…such practical sense!! Still use it today!
This is the first hand stitch I learned as a little girl. A few years later I began making clothes for my little sisters and also for their dolls. I am retired now and I quilt rather than sew. I bet my slip stitch looks just awful now days. Ha! Thanks for sharing. Maybe I should sew something for the grands just to stay in practice.
Yes you should Rose! Or better yet, teach your young family members how to sew. 🙂 Pass the craft along!
love the clear instructions.. very well explained thank you
My mom made little girls pinafore dresses for my cousin when she was little (and also sold them on eBay). When she passed away she left a dress that was almost finished. I have been wanting to finish the dress but did not know how she managed this “invisible” stitch. Now I do. Thanks so much.
I have always loved the slip stitch, it was the first stitch I mastered in home ec, now sadly many of my projects don’t require it…. I will have to make sure I do more hand sewing, thanks for the inspiration.
The slipstitch is one of my favorite hemming stitches. This is one of the best tutorials I’ve seen online for it. Very well done.
I was actually looking at some handmade curtains yesterday and was in awe of the awesome slipstitch my friend did. Now I know how to do it! This is a fabulous tutorial, thank you so much.
I remember agonizing over this stitch in HomeEc eons ago. We did it on gingham to help gauge our stitch length. I must have had to take mine efforts out a dozen times before I got it right but have I ever used this stitch through my life.