In this video tutorial you’ll learn how to create a bustle pouf from the skirt back panel. Although an 1870s skirt is shown here, the technique can be used for 1880s bustles as well.
Following the video check out the photos for a more detailed look at what you learned in the video.
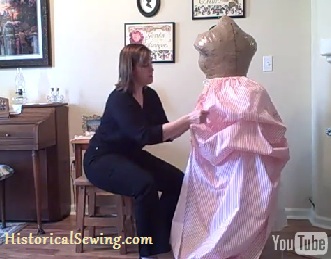
Showing the side seam pleats.

You can see here two safety pins marking where to pin the back panel to the tape inside.

The side view of the pinned bustle:

The back view of the pouf-y bustle:

Inside view of pin pleated bustle:

The twill tape holding the bustle poufs:

Cottons are the best fabrics for bustle skirts. Read about which cottons to use and how to work with them. And after you make your bustle dress learn how to sit in one.
I hope you enjoyed this tutorial. Easy method to make a bustle skirt Have you used this tutorial for any bustle projects?
After your done, would you hands sew the poufs to the tapes?
Love this video and your amazing blog!
Yes. You could hand tack or sew to the tapes by machine if you’re careful. Another option would be to safety pin the poufs to the tapes so you could easily release them for storage and/or cleaning. Although, with that you’d have to re-create the poufs next time you wore the skirt.
What pattern are you using for this bustle skirt? I would like to make the whole skirt.
Hi Stefanie,
I didn’t actually make a whole skirt from this striped fabric. But I’d highly recommend the 1870s or 1880s skirts from Truly Victorian to get the front and side panels that you can attach to the full-width back I’m showing here (which I didn’t have a pattern for).
Thank you:)
Also do you know how much fabric you ended up using on the bustle?
The whole skirt takes about 4 to 5 yards depending on how much puff you put into the back and your hip size. The back panel here could be done in about 2.5 to 3 yards or so.
I just found this site…. is so awesome and helpful. Thank you very much for the explanation
I am not a seamstress by any means….BUT I loved your tutorial and busted out a bustle panel for a historical society event…It looks great and \I feel beautiful in it…..thank you so much for the tutorial ( I watched the one on youtube as well!!!)
Oh, wonderful Mikelean! So glad you found it helpful. 🙂
Do you have any tutorials or instructions on how to make a draped apron overskirt? This tutorial is great and I would like to add a draped overskirt to the front of my dress that uses this tutorial for the back bustled section. Any suggestions ?
You can use this exact tutorial to make an overskirt. Simply shorten all the panels and wear over a basic underskirt. The underskirt back panel can be straight or bustled up like here.
Question when making a Bustle do you always have to have the tape or can you just sew it where you would like it placed ?
You can sew the tucks you pinch up but they may not stay in place or look as good as when using tapes.
I am curious about with which material you have filled your dress form? I am going to make myself one, but I am not sure which material is the best for this project.
Hi Rebecca – you can read about my dressform project (and re-do) in this post. Be sure to click on the other links in the post for more info on how I did the first version.
I’ve heard of finding treasures, but did I find one this evening !!!! – sewing is my joy, began as a child in UK – completed a 4 year apprenticeship in ladies tailoring /clothing . I now live in the states and miss the love of fine needle work . To find this web site, patterns, materials, tutorials , supplies, the list goes on, there others like myself – the love of fine quality needlework and supplies for all.
Thank you, for such a terrific web site . I am going to enjoy getting to know more – Oh, well another late night. Again “Thank you”
I’ve just watch the tutorial on the bustle skirt – that’s I’m off downstairs to my sewing I can play awhile to get the hang off it and make a skirt tomorrow
Suzanne
Thank you so much for the tutorial! I am an intermediate sewist, mostly historical clothing. This was my first attempt at a bustle skirt and I was quite pleased! I do need to make a proper bustled petticoat since my bustle pad just didn’t make as grand a bustle as I want.
This is wonderful! Am I to assume that you replace the safety pins with strings or ribbon? Or do you sew the areas?
The safety pins are holding the fabric panel to the twill tapes underneath. Once you position the fabric where you want it you need to either hand or machine stitch the fabric to the tapes to hole. Another option for less permanency is to sew a button at the marks on the fabric and sew in buttonholes on the tapes so the fabric can be let out for washing/pressing.
Oh my goodness, the buttons are a wonderful idea for cleaning! Thanks for the great directions and the great tip.
HELLO,
I JUST FOUND YOUR WEBSITE. GREAT!
I HAVE A QUESTION. THE UNDERSKIRT YOU HAVE IS THAT A BONED ONE, OR IS IT BONELESS WITH A BUSTLE UNDERNEATH.
CHEERS FROM IRELAND
Hi Marie-Jeanne,
It’s a boned one. I used the Truly Victorian TV101 Bustle Petticoat for this one.
Thank you so much for this video. I am making a costume for a play. As it is in jersey it is not the easiest or best fabric for a bustle, but I am using LOTS of it. (2 metres x 4 Metres).
This video is fantastic! I have a steampunk birthday party on Friday and I was at a complete loss for my costume – I’ve been working so hard on costumes for the local Ren Faire and an upcoming Princess Bride themed party that I had no Victorian appropriate fashions at all and I was stuck with less than a week to go.
I was so blown away with how much simpler it would be to make a bustle skirt than I thought, that it only took me one day to make a skirt like this out of two gold “silk” curtain panels I had in my fabric stash. It looks AMAZING and my friends are going to be blown away that I made it myself! Thank you!
Oh! and how would you make this type of bustle?
http://www.etsy.com/listing/126249652/tardis-blue-black-and-white-full-bustle?ref=shop_home_feat
Well I am only 16, and I’m definitely no historical costume designer, but I ADORE the way women from the mid-1800’s dressed. And I am aiming to create a dress, similar to those dresses (maybe toned down a bit for increased productivity, because I might not fit in the car, and what-have-you) just to wear around town, and basically wherever I wish, because I am not self-conscious. But I am now curious as to whether there are others like me who make these dresses just to wear and not for any special occasions……are there?
P.S: the tutorial was VERY helpful. Thank you 🙂
Absolutely, my sewing skills are somewhat limited so I haven’t tried to make my own yet but I too love wearing period clothing. I used to buy them but can’t do that now as I’m not as well off as I once was. I’m not giving up my personal taste so I’m finding ways around it.
I’m like 2 years younger than you, and yes, I like to wear historical costumes in town too! I also make them, and im just a bigger sewer too :p So dont be afraid to make a full on dress! it’s super fun, and the only realy “hard” part are sewing the sleeves on XD
I love this skirt! I am a total novice when it comes to sewing and I’m a little nervous anpbout trying my hand at costuming but this tutorial make it look easy. I was just wondering how far apart to mark the side pleats?
You want them relatively deep – marks 3″ to 5″ apart – to start. But that’s just a suggestion. Play with them and your fabric to see the depth that lays the best for you.
Thank you so much! I hit sewers block on my 1870’s costume and this just gave me an idea.
Wow, thank you so much! I’ve been watching this tutorial for a while now, and yesterday I made the most amazing bustle skirt on my very first try! It was so easy using your very wonderful tutorial. The only thing that gave me a little trouble was where to put the markings on the fabric and how far apart the safety pins on the inside strips should be placed. It was easy to adjust, though.
Since I’m a total beginner, I did not really knot how to make the rest of the skirt historically accurate. I made (and ironed) large, flat creases in front and pleated the side panels to fit my waistband. Hopefully it won’t make me look like a n00b when I use it. 🙂
I was also wondering what an appropriate bodice or blouse for this skirt might look like. Is there anything special I should keep in mind/avoid?
Again, thank you SO much for this! You are amazing!
Thanks V! So happy you were able to make a bustled skirt as a newbie. Congrats! For bodices and designs, read up on my Bustle Era article. Then start viewing my Pinterest board to get a feel for the bodice styling.
This is a very helpful tutorial as I am just getting into historical costuming and sewing. The tutorial doesn’t mention stitching where the pins are. Would this be the next step in finishing the bustle?
Yes. After you pin the fabric to the tapes underneath, tack them together either by hand or machine. This keeps your poufs in place.
In the tutorial you mentioned the panel had pins placed at specific points already to pin the skirt to. How did you arrive at these measurements? How do you transfer the temporary waist band and gathers onto a permenent band? are the other 5 skirt panels just straight pieces ? or are they tapered so the hem is wide and the waist is less? Thanks for the help
melody
The marks/pins on the skirt back panel are in 3 even columns (center back and one one each side half way to the side seam). The spacing between the pins varies as to how you want your poufs to look. I like mine between 8″ and 14″. Also, the center column pins are off set from the identical outside columns. They usually start lower and go further down OR just the opposite where the top pin is higher. The lovely thing about this method is that it’s so adjustable to the look you want and the fabric you have.
As for the other skirt panels, I recommend getting a basic bustle skirt pattern (Truly Victorian is my favorite) that’ll have the panels drafted for you. (No need to reinvent the wheel – use what’s already there). They are shaped with one straight edge that is seamed to an angled side of the joining pattern.
Waistband: unpin the temporary one if you have it and re-pleat or gather up to fit the back of your fashion fabric waistband which is cut to your waist measurement (over corset).
You’ll also find more info on bustle pleats here: https://historicalsewing.com/bustle-poufs-dont-lay-right
Do you have a tutorial on how to make a bustle pad for an 1880’s dress?
Not yet, Kathy. But a bustle pad is simply a small pillow. You can cut it into a half-moon shape with a straight edge on top and stuff it. But don’t stuff too much! A little can go a long ways. Bind the top edge and add tie strings or stitch into a petticoat waistband. My own pad I’ve added organza ruffles to the top side before stuffing for even more fluff and prettiness.
Thank you so much for this tutorial, all I could find on other websites were patterns for sale ! Very helpful!