This tutorial is dedicated to Corinne Pleger who taught me the beauty of cartridge pleating in July 2000.
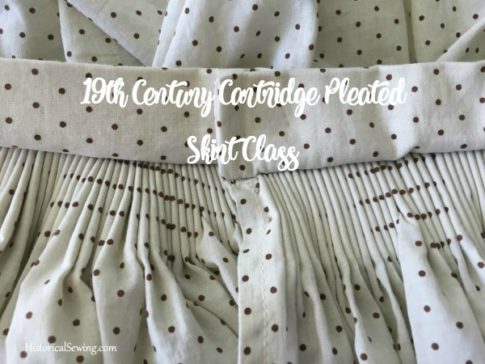
Cartridge pleats are eye-catching! Neat little pleats stacked in a row, stitched together and standing at attention. Those little pleats do a heck of job too with getting an enormous amount of skirt fabric into a tiny waistband!
If you’re ready to tackle this common method of pleating in the mid-19th Century, let’s get to work on how these pleats are actually made. Although cartridge pleats are found on sleeve caps in the 1830s, we’ll stick to gauging skirts in this tutorial.
Cartridge pleats (also known as gauging) are used when a large width of fabric needs to be fitted into a small space. As opposed to the other types of pleats, cartridge pleats are seen throughout historical fashion but practically disappear in the late 19th Century. Because they are completed by hand, they didn’t work in the new, mass-produced, assembly line garments.
Cartridge pleats are characteristic of historical sewing. Found on straight panel skirts of the late 1830s through 1860s and on full sleeve caps from the 1830s to 1860s, these pleats are very easy to create and can be adapted to all sorts of fabrics.
Supplies:
The skirt to apply cartridge pleats and finished waistband
Buttonhole or strong glazed thread that matches fabric
Long hand needles such as embroidery
Marking pencil/pen or Tiger Tape
Safety pins or long ball head pins
Overview:
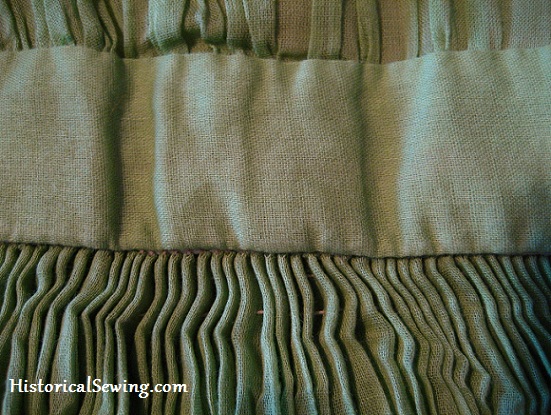
Cartridge pleats are made from 2 or more rows of uniform hand basting stitches run along the top edge of the skirt. The rows have to be exactly matched for perfect pleats. The stitch threads are pulled up to form the pleats that are then whipstitched to the waistband.
Cartridge pleating stitches are placed in evenly-spaced rows. The stitch marks vary and will change with different fabrics and for assorted projects. Make a sample using different markings on your specific fabric to find the best placement.
The spaces between the stitches can also vary for how full you want the pleats and the bulkiness of your fabric. Wool will have wider spaced stitches than cottons and silks.
Step 1: Determine Area for Cartridge Pleating and Prep
Piece your skirt panels, finish the hem, then mark the allowed skirt length from the hem up to the top at center front, center back and sides. Allow an additional 5 inches for the pleated top.
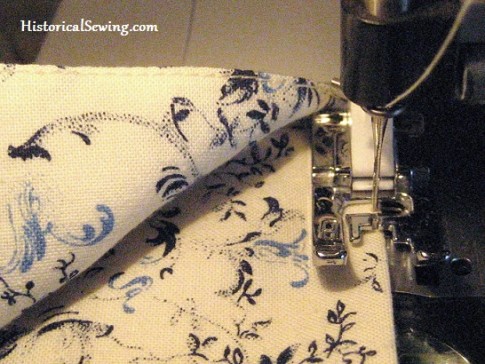
Finish the raw top edge of your skirt before folding to the inside for pleating (see below). You can trim with pinking shears, run a small machine stitch, sew a narrow hem, zigzag, or serge the edge.
Fold the skirt top to the inside a few inches allowing for the skirt length needed as mentioned above. Fold at least 1 inch to the inside and even more for additional support. Keep this turn under within 5 inches or so. This amount will taper around the top of your skirt in accordance to your marked lengths.
A machine edgestitch on the fold of the fabric is a modern tip that provides support and makes the whole pleating process easier.
Step 2: Mark
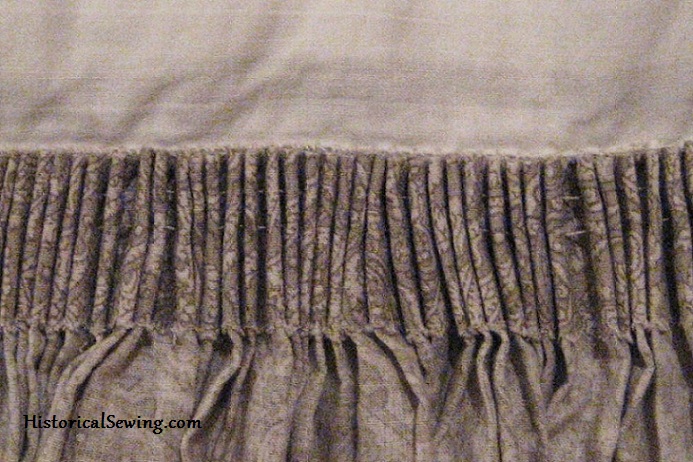
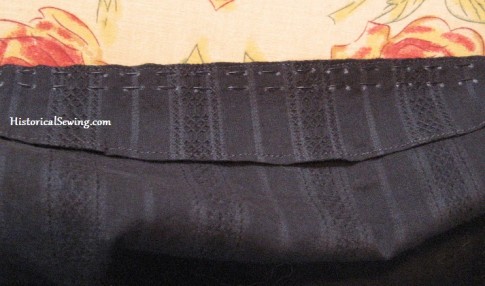
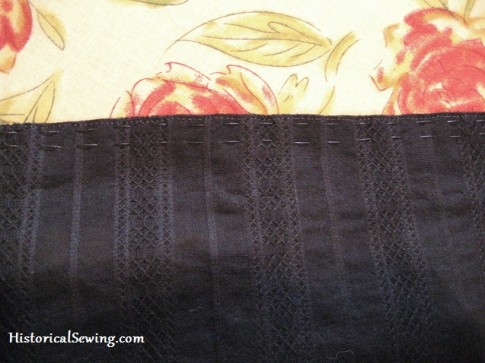
The first row of stitching works best at 1/8” to 1/4” down from the top fold. Additional rows should be between 1/4” and 3/4” down from the previous row, depending on fabric weight. The stitches themselves vary from 3/8” to 3/4” apart. Use these 5 tips, including how to mark your pleats, to keep them from looking like gathers.
Using a ruler, mark the entire length of fabric to be pleated with dots spaced according to your project. Mark all rows of stitching. Note: This will take some time – be patient!
A nifty sewing tool is Tiger Tape sold with quilting notions. The narrow tape is marked in 1/8″ lines. Place the tape along the skirt edge to make your dot marks. Remember to keep all dots in line with each other – along the horizontal rows as well as vertically (most important).
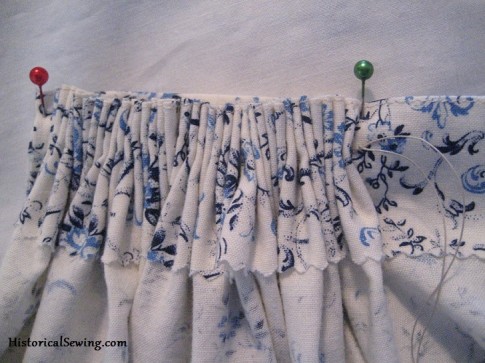
Step 3: Sew Pleating Threads
Cut a very long piece of thread. This should be nearly the length of the flat skirt width but could be shorter if you remember to pull up the pleats as you sew.
Use strong thread such as button thread or millinery thread. These pleating threads will remain in the fabric holding the pleats in place. If the thread breaks – the pleats come out.
Thread a long needle, such as an embroidery or millinery needle, and make a firm knot, leaving several inches of a tail.
Begin on the correct side of the skirt at the opening and make your stitches at each dot. Weave in and out of the fabric. Do not tie off the thread when you reach the end of your markings.
Repeat for additional rows. You can sew up to 5 rows depending on the fabric, but most 19th Century skirts have two to three rows. Some people find running all the rows at the same time faster than sewing each row separately.
Step 4: Finish Waistband and Pull Up Threads to Fit
Finish your waistband separately before attaching the pleats. The recommended width of your finished waistband should be 1” to 2”. You can also use a length of twill tape for the waistband.
Quarter mark your waistband and skirt. This will help space the pleats evenly.
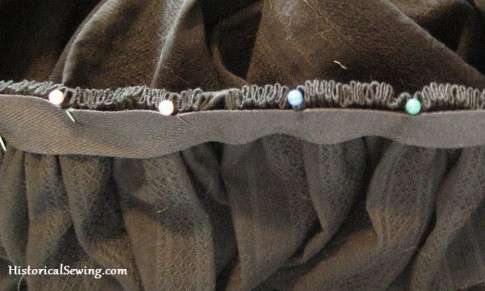
When all the rows are sewn, grab all the thread ends and pull up together. Align right sides together of the skirt to the waistband. You do not need to pin every pleat but only every few to keep the pleats in place. Spend some time working out the pleat spacing. I like to pin every one to two inches.
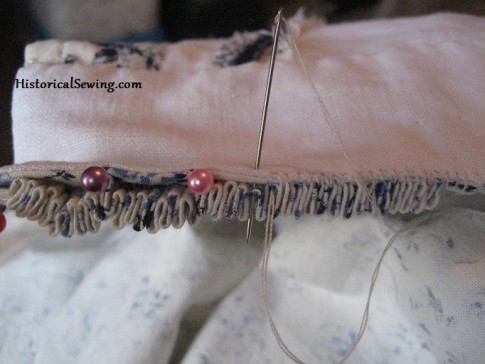
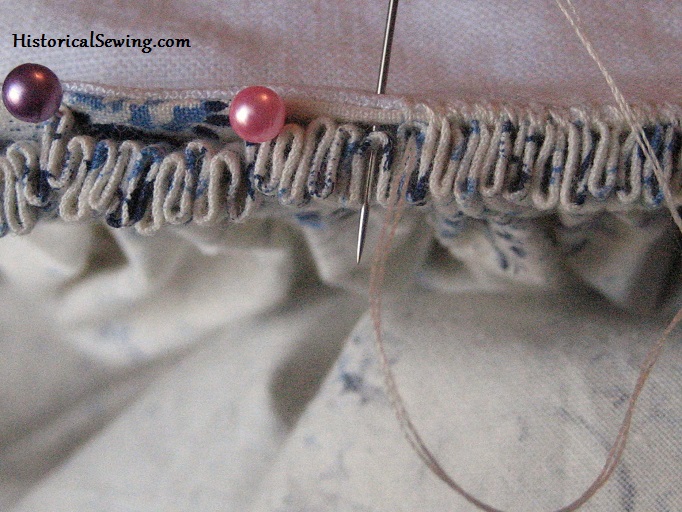
Step 5: Sew To Waistband
Start attaching pleats to the waistband or tape using an overhand whipstitch. Sew two stitches into every pleat for a secure hold.
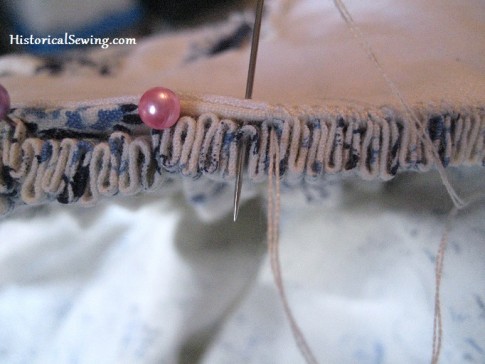
Finish by re-threading a needle onto the long tails left at the starting point and push them through to the wrong side. Tie the threads together.
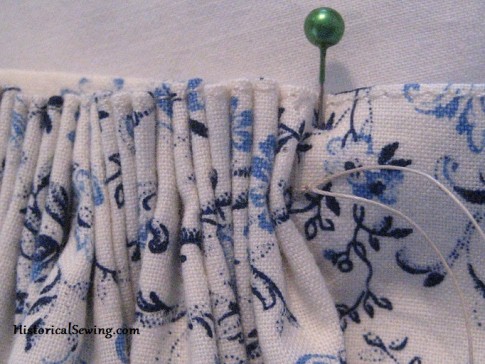
After sewing, fold the waistband up, kicking the bottom fold of each pleat out. The top of the pleats will sit flat against the body.
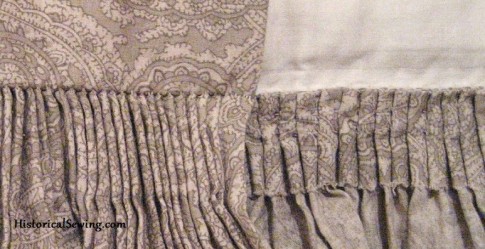
If your pleats are very wide on the inside, you can fold them to one side (check from the garment’s right side to see which way you want them to lie) and tack down on top of each other on the inside. This will make them look more like flat knife pleats.
And if you are overthinking how to do all these pleats, take a look at my article here to ease your head.
I now have a full online class about creating cartridge pleats in a 19th century skirt project.
Have you cartridge pleated before? What do you think about the technique? Feel free to share any other tips you might have from your own sewing experience.
This tutorial is amazing! I have made an 1840s 2-piece party dress from a vintage pattern, but chose to knife pleat the whole thing since cartridge pleating sounded incredibly daunting. Since then, I keep seeing that every 1840s museum piece has at least some amount of cartridge pleats, and many of them are pleated that way all the way around. I’ll be making another dress this year and have been considering trying my hand at the cartridges, and this tutorial has greatly eased my mind about it! Knowing that I can refer back to this is a great relief!
So happy to hear this! Have fun in your future projects. 🙂
I have been researching my family history. They imigrated from Trondheim, Norway. That city or region has it’s own folk costume called a Bunad. (Trondelag Bunad) Bunad fabrics and patterns are not available as only the Husflids are allowed to make them or sell the “kits” in Norway. So, by looking at photos and a few youtube ads, I think I have come up with a way to make a Festdrakt that is similar to the Bunad. THey are all made with a way for the tops and vests and skirts to be altered easily as they are passed down through the generations. There seems to be a space in the back that has cartridge pleats where the large pleats meet. The skirt is made with 4 widths of fabric, pleated to fit the wearer. Hem is finished first, all as you describe in this article. Do you have any idea how much fabric I should cartridge pleat in that space for alterations in the future? Also How much over lap should I have in the opening to put it on and not have it gap? My guess is that I would fit it at the waist with the larger pleats and the remaining fabric cartridge pleats? You are the expertfor 19th century construction, I hope you can give me some direction. I will be constructing all by hand as it would have been when first worn.
Hi Sheryl,
I have no experience or research of Norwegian folk wear, so forgive me on that account. I would probably still recommend the front of the skirt be a bit smaller than half the total skirt width with the rest being put into the back half of the skirt (side seams to center back). You could also divide the skirt into thirds and put the back third into cartridge pleats into a couple inches on either side of the bodice center back. For your 4-panel skirt I’d put at least one panel width into the cartridge pleats. The overlap could be 1″ to 2″. I hope this gets you further along with the project!
There is a page called finn.no. It’s a sell and buy place. There you can search for trøndelag bunad, maybe they have some for sale.
Thank you! I couldn’t figure out what I was doing wrong with the pleats on my daughters prom dress. After I read this I figured it out and redid the entire skirt. It looks so much better now! The dress is a Lolita style Marie Antoinette style. Lots of fluff!
Yay!
Hi Jennifer ,thank you for the tutorial. Cartridge pleats does give a garment a beautiful look. If you don’t mind I will like to share the link to this tutorial on my instagram page so that more people in the sewing community can see and appreciate your beautiful work. Please let me know if I have your permission to share the link. Thank you
Of course! I’m so glad you’ve found it helpful to yourself and others. Cheers!
Hi Jennifer, I am making a doll costume and I am at the point where I want to attach the bodice to the skirt. The directions says, fold under the short sides of the twill tape. Stitch the tape to the unfinished bottom of the bodice overlapping the bodice just 1/8″. turn the bottom edge of the bodice to the wrong side just 1/8″ and press to a sharp point.Then stitch the bodice to the cartridge pleating like i did the twill tape. I am confused about the directions and was wondering if you could explain this a little better so I understand.
Thanks,
Linda
Sounds like the twill tape is a binding for the bodice (finishing the raw edge) that’s then sewn to the cartridge pleats.
Thank you for this excellent tutorial. I’m curious how you would go about making the waistband opening for a gown where the bodice and petticoat are separate pieces. Do you recommend side openings or a back opening? And what was typically used to secure the band together and prevent the fabric from gaping? I can’t seem to find any good clues online. Thank you!
You are welcome, Amanda!
Depends on the time period, but mid-19th century skirts generally opened in the center back. For Bustle Era skirts you’ll find skirt openings at both center back and side back (not together, obviously). Waistbands were overlapped and closed with hook & eye sets; the opening down into the skirt may or may not have hooks to close it (sometimes the overlap was enough to conceal petticoats). My tutorial on skirt plackets might help you further.
When finishing the skirt to the waistband, and it’s all whip stitched on, are you threading the tail end of the running stitch(s) made earlier (for creating the pleats), to the inside of the skirt, and tying it together with the “whip stitched” thread. Am I understanding it correctly, that the pleating stitch thread(s) never get removed? Thank you –
Hi Nancy,
Usually the tail ends of the thread where I started and stopped the pleating are left hanging on the inside. Sometimes I’ll tie them together or even whip them to the skirt on the inside to control them. Yes, the long threads used to create the pleats remain in the garment permanently.
Jennifer, THANK YOU for this wonderful post. I followed your directions and my skirt came out perfectly, even the hem that scared me so. I also took your advice and flatlined the skirt. I wore it today and could immediately see around me the skirts and gowns that weren’t flatlined. You are so right that it can really make the garment, just as the right foundations make or break an outfit.
Yay!
I’m sure it’s just me being dense, but how does one finish the hem on a garment before setting the waistband? Yes, I’ve measure from my wait to where I want the hem to fall while wearing all the required underthings, but I’m never sure I’ll get an even hem by turning up the same distance all around. Do I just measure my skirt length wait to hem, add 5″, and trust it will be correct?
This is the “old” method of finishing a hem; the modern way is to hem last.
Skirts are generally cut on grain for an even hem. Finish with your preferred way. Then measure the skirt from finished hem up to waist at center front, center back and sides. Fold down the excess at the top then make your cartridge pleats. I like to allow a minimum of 1.5″ excess at center back (the longest length measure). You will naturally have more folded down at center front and sides.
I just finished my first set of cartridge pleats, and this post was very helpful! The pattern instructions were a little vague.
One other useful tip I discovered for marking the pleats–I ended up using my narrow tape measure and marked 1cm increments on either side of the tape to get consistently spaced and aligned dots. I suppose that’s the same as using Tiger Tape, but I already had the tape measure!
I do cartridge pleating all the time. My shortcut is to use iron on smocking dots on the inside of the skirt top. No guess work involved.
In one dot, out the other. Perfect scale for cotton dresses.
I have learned to make a shortcut by using a fabric with horizontal and diagonal stripes. I will try to post a photo on your fb page. (Don’t manage to do it here)
I am about ready to join a bodice to a skirt of a Henrican Tudor gown. The entire back of the gown is carriage pleats. I have read and reread this article and now feel confident I can accomplish this task. I do have one idea to pass on as to the pleating process itself. The pattern I am using said cut woven gingham fabric – not the printed kind. The woven gingham has perfect 1/4 inch blocks that if attached to the fabric to be pleated provides you a very exact way to make the running stitches.
I have sewn my dress up to this point and now need to do the cartridge pleats. This will be my first time trying this. I’ll let you know how it turns out. Thanks for the information.
Best of luck, Bev!
I have never tried this but the steps look very interesting and I think I might give it a whirl. The pleating process reminds me of the work done for smocking.
I’ve never done smocking but these pleats (gauging) is truly the foundation for smocking.