
You may have read a recent article I wrote on boning in bustle bodices. How you HAVE to have boning to keep the shape of bodice in place. Yes. You do.
Well, Frank asked the question about just how one applies boning to the front waist darts. “Do you encase the bone in the dart, or do you open up the dart and bone it like a regular seam?”
Yes. And they are both period correct…. Woo hoo!
Technically, you’ll find 3 ways bones were applied to darts in the 19th Century. Each has their basic purpose (holding the bodice in shape) but vary in their applications, which in turn vary the support. But it’s not that noticeable.
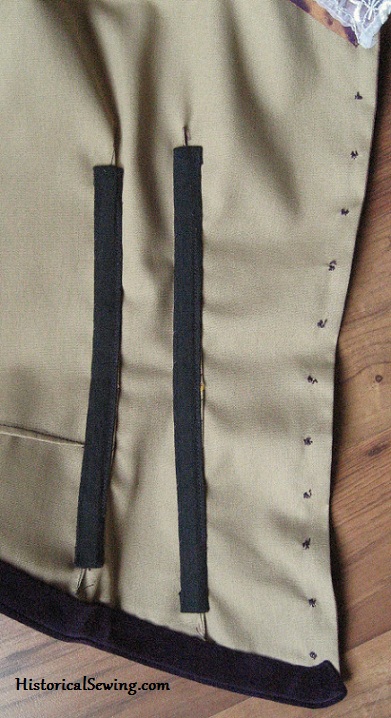
1 . Press the dart towards the front and apply bone casing on top.
I use this method most often as it works well. It also doesn’t take much thought.
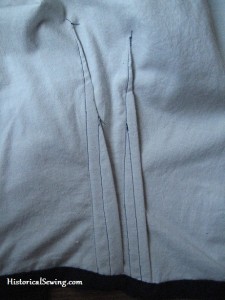
You’ll first want to press the waist darts toward the center front. If you have a long dart that goes several inches below the waist, the center of the dart take-up may need to be clipped for it to sit flat.

Put the bone in the casing and fold under the top & bottom raw ends. Lay the casing over the SEAM of the dart – center it as best you can. Whipstitch the edges down.
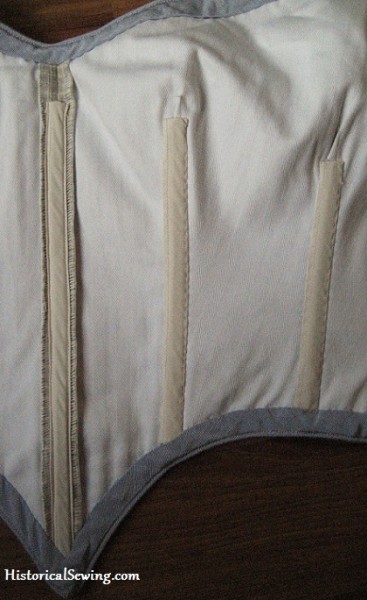
2 . Slice open the dart take-up and apply the casing the same way as in #1.
This generally works if you have a wide enough dart to press open. If your dart is only ¼” wide then it’s best to press to the side and lay the bone on top.
Slice the dart fold, stopping about ½” away from the point. Lay the top of the bone (in its casing) at the top of the slice. Whipstitch the long edges down. It also helps to whip the cut dart edges to the bodice underlining to keep everything in place.
The last method could seem like a lazy cheater trick. But you know, it’s actually a period technique!
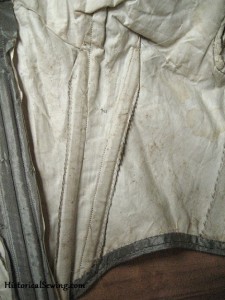
3 . Slide the bone INTO the dart take-up.
Slide the bone between the bodice layers of the dart up as far as you can. Don’t push up too hard or the bone may poke through the layers.
Stitch by hand or machine next to the bone (be careful!) to create a casing. Press dart toward the front.
Tips to Remember
- Dart bones should come within ½” to 1″ of the sewn dart points. Yes they go that high. (Your dart points should stop ½” to 1″ from the bust apex anyway, so this dart placement works okey-dokey.)
- You *can* machine sew the casing sides to the dart take-up edges if you want. Period garments are generally hand whipped however. (It’s ok to cheat here & use the machine as far as you can go for faster finishing. I do.)
- Add “spring” to your casing by pushing more length over the bone before tacking to the bodice. You’ll see this quite often in late Victorian antique garments and is a way to prevent the bone from poking through with the wearing of the bodice.
Was one of these techniques new to you? Which one do you like best or use most often?
I’am a beginner on boning could you recommend a tutorial or book for beginners. Thank you
What do you need/want to learn about boning? Are you boning a bodice or corset? I’ve found Linda Sparks book The Basics of Corset Building a great resource with boning information and techniques. Another book is Jill Salen’s Corsets book. Otherwise, good historical patterns such as Truly Victorian and Laughing Moon give great instructions on applying boning.
Quick question– if you don’t have tubular boning casing, what do you use instead? I’m told bias tape stretches too much, but can I just make my own casing out of fabric cut on the grain? Should I use twill tape? Does the type of fabric matter if this is just a bodice and not a corset?
Twill tape is a perfect notion to use. Strips of a tightly-woven cotton can be used as well. If you use spiral bones I would recommend bias either make your own or buy. Bias strips are ok as long as the (cotton) fabric is tightly woven and has a good hand.
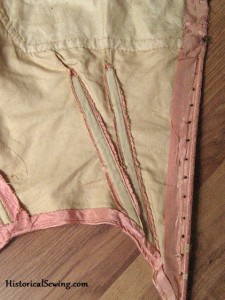
Question, regarding darts, while we are on the subject…I have been told that 1860’s era darts are made/placed differently than modern darts. Can you confirm this, and if so, how do they differ exactly? Thank you!
Dart placement through most of the Victorian decades had them at an angle which is different from today’s straight-up-and-down placement. The darts are angled from full bust angling down to center front. This varies, of course, to the specific figure and also to the particular fashion styles. The pink bodice in this post is from the 1860s. You can see more photos & read about it in this post.
ooh, this is perfect. I was wondering about applying boning. It seems to be a mysterious art.
Thanks again Jennifer. Loved the article and as always very helpful. I use the pressing to the side but I had no clue if I was being historical or not.
Owing to the big difference between my bust and waist measurements the darts in my bodice are enormous. It adds too much bulk to the bodice so I tried the slicing technique. Seems to work just fine but as always, the proof is in the wearing. I’ve printed out this article to put with the bustle class handouts for future reference. Thanks Jen for more extremely useful information!
Wonderful information, thank you so much. I always learn something here!
Thank you for sharing your methods with us! 🙂
I wonder about this pharagraph: Add “spring” to your casing by pushing more length over the bone before tacking to the bodice. You’ll see this quite often in late Victorian antique garments and is a way to prevent the bone from poking through with the wearing of the bodice.
I do not understand what you mean? Do you mean that the casing should be longer than the boning itself so the bone can float inside? But won’t it cause wrinkles? Or is it the opposite making it as tight as possible?
Or would it be something entirely else?
(I have made corsets but yet to make boned bodices. For my corsets I do the “as tight as possible” to make the fabric lay taut on the bones)
Anytime you apply boning you want to leave a little room for movement. This helps prevent the metal boning from working it’s way through the casing or fabric. For corsets, the channel should be just slightly more in width than the bone to prevent twisting but still have extra room in the length.
As for bodice bones, yes, the “spring” is extra casing length that’s pushed down over the bone. Then the casing with bone is securely tacked to the seams or darts, usually in a hand catch stitch in period garments. Think of a garter and how the fabric bunches over the elastic inside. Although for boning it’s not nearly that much extra. Just a little to help prevent the bone from working through the threads.
Oh ok, I understand. 🙂
It is interesting because I have read elsewhere on corsets that you should put bones without play room to make it look smoother.. It does. I hope my corset will survive for longer time. 🙂 I have used it three times on events and such.
Thank you Jennifer this information it is very good I have always slashed my darts for boning but the last costume made I put them inside the dart I thought I was being lazy and cheating great to know I wasn’t
THANK YOU JENNIFER!!!!!! This was very helpful!
I learned about boning the darts and side seams using the plastic boning. I cut the boning down to the right size, and then sewed the boning casing on top of the ironed flat dart. Even though I used plastic boning, it made a world of difference compared to other Civil War costumes I’d seen. Are you using plastic boning in the above pictures or metal?
I never use plastic boning in my historical costumes. It is all metal, mostly the flat white but I use spiral too. Boning makes such a difference in the appearance of a bodice!