
“My bodice necklines never ever come together correctly. Maybe I am too much of a perfectionist, but I really hate having to hide them under cameos when they are made to lay flat. One side of the collar always sticks up more than the other because of the thickness of fabrics.”
I had asked my Facebook friends what issues they had with sewing 19th C. garments and Martha G. stepped up to talk about her problem with necklines. If you sew garments at all, you know about the issues that occur with necklines. But there is a secret to getting it to look right.
First off, you have to be content that perfection doesn’t exist. It doesn’t. And those chasing perfection will always be disappointed. Even the most celebrated Chanel jacket or Worth gown will have flaws – whether you can see them or not. Sometimes it’s as insignificant as the thread breaking two inches from the end and you have to overlap the stitches. See? Not perfect.
I fight with myself on my perfectionist tendencies. But in the end, I accept that it’s good enough and move on.
In the whole scheme of the full costume, who’s going to point out that the necklines don’t match up? And why should I care. (I personally use those flaws to better my sewing and to teach others from my errors.)
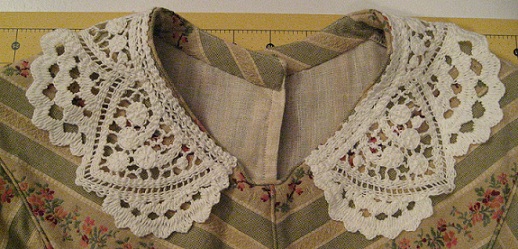
If you look at original bodices from the mid-1800s you will see quite the variety of mistakes – especially in uneven center front edges. Now I believe the collars still attached to antique bodices that we see lying flat is due to the passage of time with the bodice stored flat and compressed. Or perhaps they knew the secret to a nice round neck edge….
Martha’s problem is with the collar sticking up and believing that is due to the thickness of the fabrics. I don’t think that’s the main cause here. True, a stack of fabrics layered around a neckline might create a lump at the seam allowances. Perhaps it was not graded correctly or enough. Grading is essential to making seams lay flat and smooth.
But here’s what is really going on with that collar.
Did you know there’s a proper way to sew? That each cut of the fabric or seam through the machine should be a certain direction?
I’ll point out that these directions are not law – “they’re more what we call guidelines.” In fact, I didn’t know the “right” way to sew a seam until after I’d been sewing for well over 10 years. Now I know which direction to sew in and make the choice to follow that guideline or break it entirely and do my own thing. Sometimes my way is faster and the results the same as if I’d followed another path.

The Guideline for Sewing a Round Collar Neckline
You’ll want to sew with the grain. For a neckline that means sewing from the neck/shoulder point (usually at the shoulder seam but it can be forward of that with a severe dropped shoulder line) down to the centers.
The way your machine pulls the fabric through will give a tension to the seam. You want to sew in the right direction, working WITH your machine, to produce the best result.
When finishing a neckline with bias or a facing, this method can grate on the nerves because you have to sew the seam four times: left shoulder to center front, left shoulder to center back, right shoulder to center front and right shoulder to center back. Most likely, you’ll need to turn the bodice over to sew two of those sections (or you can simply rotate it and put the seam allowances to the left of the presser foot).
You’ll find it a bit challenging to turn the bodice over if you’ve basted in piping along the neck. In that instance, baste the entire seam first so you have a thread guide to follow with your machine needle.
This same technique should be applied to detachable collars to as well. After stitching right sides together, grade and notch the seam allowances and turn in.
Sewing with the grain and stitching toward the centers will give you a smooth edge and one that lays flat on the body. And the cool thing is that it works with most types of necklines. Try it in your next project!
What tips have you discovered with working with round necklines? Post them below.
IT works wonderfully. Although I sew the bodice leaving out the side seams. I attach the piping for the collar by working towards the front, snip the seam allowance at an angle / and then hand attach the piping seam allowance to the lining so no threads draw through to the silk front. When you hand attach the lining you lay it at the neck circle angle…this helps to achieve the proper lay with out bulk or pulling. The piped neckline is perfect for attaching collars. Thanks Jen. You are amazing!
Nice! I love how piping makes it so easy to finish edges and seams.