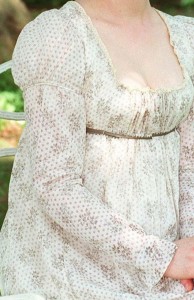
Fashionable dress in the Regency years (1795-1820) is full of uncomplicated styles. Although the bodices and skirts are relatively simple to begin with, dressmakers give their own take on basic forms like with a cross-over bodice or perhaps an overskirt.
But what’s truly an area of design here is in the sleeves. I mean, how else do you put your own personality into a garment if the skirt is plain straight and the top simply covers what it needs to?
If one is even only slightly acquainted with the Regency, you might think it’s bursting at the seams (no pun intended) with short puffed sleeves. But what I’ve found is a vast array of design options that can be applied to a current costume project.
Take a foundation shape, add your unique figure attributes and you’ll happily discover how to avoid the “mutton dressed as lamb” or “stuffed sausage” look.
Let’s take a brief look at the variety of simple sleeve options available for your early 1800s gown.
Demystifying The Regency Sleeve – Foundational Shapes
- Short Puff Sleeve – “Bishop” Style
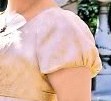
The short puffed sleeve (called a bishop in period publications) is a general Regency style. It can be set smooth into the armhole or have a bit of fullness – especially as you move into the 18-Teens. Generally, the fuller the sleeve head (top of sleeve) the later the style. Make sure to review the Regency years you are creating so as to not make your puffed sleeve too big.
To make it a bishop style, the hem edge is gathered up to fit a narrow band. It might also be taken up to match a fitted undersleeve (lining) sometimes called a stay. However, most short puffed sleeves were set onto a band. Regency puffed sleeves could be both lined and unlined.
For a simple decorative touch on a basic puff sleeve, pull up the center of the sleeve, tack and sew on a button or trim to cover the gathering stitches.
For later years you can sew vertical bands from the armhole down to the hem band with the sleeve puff “trapped” beneath. Use only three vertical bands for a proper look.
This decoration can be used on an oversleeve on top of a false or regular long sleeve and on fashionable evening gowns. The later in the Regency era, the more design that was constructed into the sleeves.
- Short Straight Sleeve
Basic straight, short sleeves are seen in the early Regency from the early 1790s through about 1810 or so. The short, straight sleeve style is cut with a straight underarm seam and no fullness at the hem. The hem is usually a rolled and/or baby hem tacked by hand. The hem can hit at the full bicep or fall down to the elbow (think 1780s jackets).
This is the perfect style sleeve (along with the long straight sleeve below) for those lovely narrow-back bodices of the early Regency. The sleeve head is extended towards the back and gently eased or gathered into the narrow bodice.
The best way to fit a straight sleeve into your bodice is to sew up the underarm section, leaving the top loose. Try on the dress then smooth the sleeve over the arm & shoulder. Pin then stitch in. Perfect!
- Long Straight Sleeve
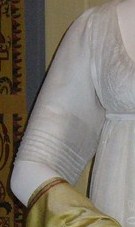
As with the short, straight sleeve, the long, straight sleeve is simply a longer version. It can be cut with or without fullness in the head (again, depending on the time period) and falls at least to the wrist.
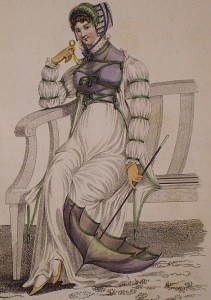
Many Regency long sleeves, especially early on, cover the hand up to the knuckles as seen in this fashion plate from 1802.
This can be done with a cuff, a bias cut sleeve or, when cut on the straight of grain, the long sleeve can be tightened at the wrist with a band closed with button or hook & eye/thread loop.
For a bias sleeve, look to the tight, straight sleeves of the late 18th Century. In fact, you can even use the same pattern shape as that’s what Regency women would have done.
This general style is seen throughout the period on day dresses, spencers, pelisses and coats. When in doubt, or lack creativity or time, sew in a straight sleeve either long or short and you’ll fit right in.
- Detachable or False Sleeve
A detachable sleeve was one that could be easily taken off the dress. Generally it was a complete long sleeve that was basted to the armhole under the permanent puffed dress sleeve, whereas a false sleeve is a separate undersleeve that is finished apart from the dress and tacked in and removed as desired.
For colder weather or more modest look, a detachable or false sleeve was added to the lower edge of a short, puffed or even straight sleeve. Most times the false sleeve was cut from the lower part of a long sleeve, finished with a narrow rolled hem at the top and tacked to the short sleeve binding. These sleeve styles could be cut on the straight of grain or on the bias for a closer fit.
The fabric of both the puff and lower false sleeve was generally the same. Although, in later Regency (c.1810 and beyond), a secondary fabric could also be used on the puff to separate it even further from the false sleeve part.
For a fabricated, false sleeve look, add a casing at bicep level to the inside of a long sleeve for a drawstring or elastic. Draw up the sleeve to make it appear like a puff and lower straight sleeve. Leave the casing area plain or cover with trim to further divide the two sections.
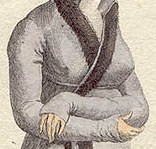
- Long Bound Sleeve, à la Renaissance
An unusual sleeve style that appeared quite often throughout the early 19th c. decades was a long sleeve bound by several horizontal bands from wrist to bicep. The style was reminiscent of the Renaissance (as was the tiny pleated collars on chemisettes and slashed sleeve heads).
Sections of the sleeve were gathered up and sewn to a stay tape on the inside. The tapes were covered with ribbon or trim on the outside.
Final Notes
Shoulder seam placement in the Regency was angled to the back or a separate shoulder strap was set onto the bodice front and back. The armhole was generally at the shoulder point or slightly inward. No sleeve was off-the-shoulder. If your sleeve slips down, add in a casing and drawstring to tighten it to the body.
Regency gowns were not sleeveless either. If you find a sleeveless Regency garment being touted as a gown, make sure to ask for the evidence and backup research. It could very well be an underdress to wear with sheer muslin gowns or a bodiced petticoat.
Use your imagination to transform these 5 basic shapes into wonderful sleeve designs with gathers & trim. You can stay simple or go for full-blown handwork. Have fun with the process!
Fascinating! in several film / tv adaptations of Jane Austen’s works they show ladies wearing what appear to be blouses underneath a short sleeved dress however the only information/ sewing patterns I can find online concerns chemisettes with no sleeves. Are these sleeve’s chemisettes? Or actually blouses? I want to make informed choices with my regency sewing and cannot find any fashion plates or sewing patterns for a regency era blouse or even a sleeved chemisettes, do you know what I mean? I’d be most grateful for some advice
Yes, sleeved chemisettes existed as well as blouses. (Look for riding habits, which used sleeved blouses under bodices and riding skirt.) But also, thin sheer dresses with sleeves were worn under open robes and overdresses. Here’s one plate showing a long sleeved chemisette under an evening dress. And feel free to browse my own main Regency Pinterest board for more examples.
I find myself coming back to this article for sleeve ideas. Thanks!
I do want to perhaps clarify sleeveless dresses. They do exist in various fashion plates and portraits. Princess Charlotte’s “Russian-style dress” is in the Royal Collection Trust and portraiture. They are earlier period, pre-1809 or so, though Charlotte’s dress style was mid-teens. Her dress was made in 1817. The earlier incarnations appear to be either morning “at home” dress or could be walking dress with a coat. The latter feels solely at home wear. They are not worn without an underdress or blouse with sleeves.
Thanks for adding to the conversation!
Can I just ask if long sleeves are OK for evening wear? From my admittedly little bit of research, I have gotten the impression longer sleeves were only worn during the day.
And thanks for the great article!
For balls definitely not no matter your age. For dinners, opera, theater, etc, shorter sleeves are better, but if you are older or “of age” then a longer sleeve on a silk gown that’s well-trimmed or embroidered is probably ok. I haven’t found much research yet on longer sleeves for evening events however. We’ll keep looking!
Hi – Great post. Will be needing a Regency dress for my historical dance troupe duties. We generally wear “evening/ball” outfits for our various performances, the bulk of which are mid-Victorian. Came looking for alternatives to the short “puff-only” sleeve, which is less-than-flattering on chubby upper arms like mine, especially combined with an ample bust in an empire waist. Not quite clear on your answer to the above question, which is similar to mine. Are you saying that ball/evening gowns really must have short sleeves (w/out any undersleeve) to be period-correct? It certainly wouldn’t be the first time in history that fashion dictated a style unflattering to the vast majority : ). But if there’s a way around it, I’ll take it. Please advise. Thanks, Jennifer! – Liza
I’ll still stick to my previous answer and say that I haven’t found much research for long sleeves at a ball. I suppose if you were an mature matron chaperoning a younger lady and definitely not dancing, then you might get away with it. Again, other evening events the undersleeve of embroidered muslin or silk will do fine. It’s balls that I’m not sure long sleeves were worn by any age – especially if you intended to dance.
The Regency period was my first try at historical clothes and it’s my favorite to sew so far. Thank you for posting this info.
Children’s Performing Arts of Miamisburg in a crunch with sleeves for Glenda the Good witch from Oz need to make sleeves an don’t know where to find a pattern! Show is Sat. have dress but it needs sleeves. Need a simple pattern !
I believe Simplicity has a Glenda dress pattern you can use the sleeves from.
Hi! I’m currently sewing a civil war day dress for the second time in about ten years. Can’t remember how I sewed the first one, but, on this one the sleeves seem to be a problem area. Anyway, my dilemma appears to be that the upper sleeve and lower sleeve don’t match at all. When I match dots, etc. I have gathers all up and down sleeves. Would this be accurate?
Dianna,
I’m a bit confused here with your project and this particular article which covers sleeves from the Regency period (early 1800s). You are welcome to offer more info to me and to repeat your question via email – please use the Contact page to do so and I can try to help you further.
Jennifer
Thanks for this. I have found that the elbow length fitted sleeve is a great choice for those of us ladies with fuller upper arms. The short puffed style can tend to broaden the frame a tad just where you dont want it. These cover up all the bits you want to hide, are very flattering on all ages and are great for day and evening gowns. Was only pondering the construction of the banded puffed sleeve this morning with regard to the dress worn by Queen Victoria to her first privy council meeting. Thanks for the tips. 😀
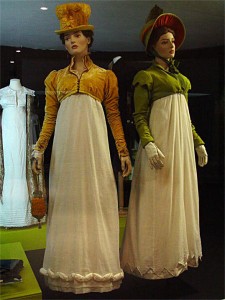
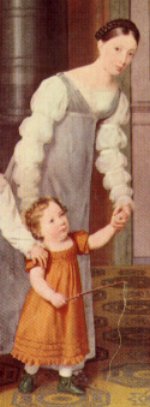
The sleeves look fabulous. What is the rest of the dress in the last picture? Is it a separate over garment or is it a cross over gown with inserts?
It could be a separate overdress with the white under it that creates the bodice fill-in and sleeves. Or it could be simply one dress unit with a chemisette fill-in and the sleeves set into the armholes. Both would work and are period solutions.
Jennifer–this is an excellent article. It’s good to know there were so many Regency sleeve variations, since not all of us want that short, puffy sleeve. The illustrations are so helpful. Thank you for doing the research and explaining the construction of the sleeves. Jody Regan, San Diego
I loved this article. Great info all the way through…thanks for sharing this.
My confusion comes from the Civil War era garments. We are new to “re-enacting” and sewing up these garments. I have sewn for over 50 years, do heirloom sewing and finish each seam. My dismay comes from the raw seams, unfinished undersides, etc. of the CW garments. Also…the corded slips, modesty slips, flounced slips, hoops…my goodness. No wonder my ancestor drown when she got off the boat and slipped into the harbor! Her clothing acted like an anchor!!! What is the necessity of all these “slips”??? Thanks in advance for your direction. :o)
Kathlene Bradford-Marks