
It wasn’t only the corsets in the late 19th Century that had boning in them. No, women’s bodices did too. You might be thinking: Why?
Well, corset boning helps hold the body in a fashionable silhouette, whereas boning in a bodice holds the bodice in place. The two garments each have their place for a stylish presentation.
If you have the Victorian Corset Workbook, you’ll know all about boning in corsets. But let’s take a look at what kind and where to apply boning in 1870s & 1880s bodices.
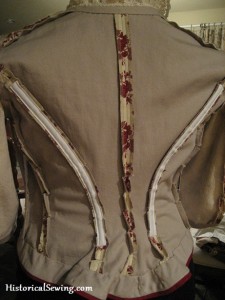
By the 1870s, boning in 19th C. bodices had been around for nearly 40 years (generally speaking). But as the Reconstruction Era took off, more boning was added to achieve that glorious fitted shape. You can barely find a 1880s bodice without boning!
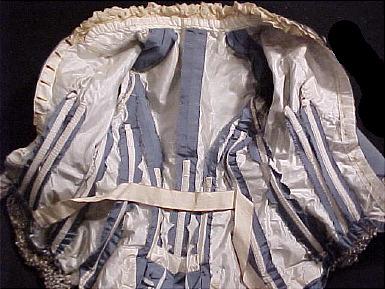
In my research, bustle era bodices took the sparse amount of bone placement from the 1860s and added additional bones to the other seams. (By the 1890s every seam was boned. Just look in Nineteenth Century Fashion in Detail!)
Bone Placement in Bustle Bodices:
- Darts
- Side Seam
- Side Back/Princess Seams and/or
- Center Back Seam
Nearly all bodices had two fitting darts in front. Even the tiny sizes. Both were boned.
Some bodices had a separate underarm side piece – one or both of these seems could be boned. And frequently, the bodice back piece had bones either on the center back seam or on the two closest side back/princess fitting seams.
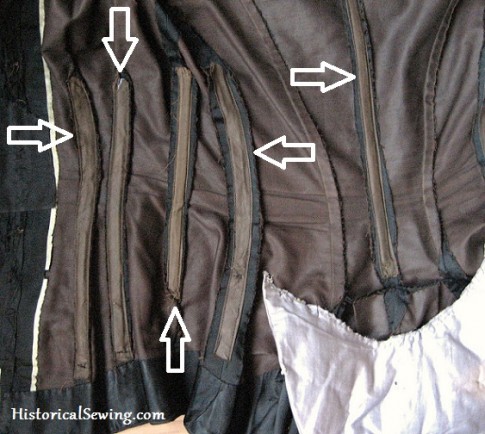
Types of Boning for Bustle Bodices:
Of course the Victorians choice was whalebone. But that is now illegal to sell (and also why you can’t be 100% historically accurate). If you happen to be given it, don’t use it as it’s probably fragile. They also used steel bones.
I’ve mainly only seen ¼” wide bones used in late Victorian bodices. You might come across a 3/8″ width but that’s rare. Stick to the ¼” wide and leave the others for earlier time periods such as the Renaissance.
Flat white spring steel is the preferred choice for us modern costumers and it’s perfect.
(whisper) Although…I’ll tell you my cheater method: I use spiral steel boning on my curved, side back, princess seams. Even though it wasn’t invented/used until after 1904.
Length
I don’t know about you but I don’t like having a piece of metal poking me in my armpit. Hence, you’ll want to keep you boning at least ¼” away from the seam allowance of the armhole.
On those curved side back seams I place mine no closer than 1-1/2″ from the armhole seam line. This will vary on how your seams actually curve, where they meet the armhole seam, and how the bodice fits around your back.
Sometimes you’ll need to lower the top bone edge more than expected as the bodice may poke away from the body while wearing. (It’s perfectly ok to do this.)
You’ll also want to continue your bones past the waistline… but only for an inch or two. (You want to sit down, right?) Depending on the cut of the hem, you can carry the boning all the way to the lower edge too.
Remember: Use ¼” bones and place them on most seams but at least on the darts, side seams and 1 to 2 on the back. Also be aware how high on those seams you place them – avoiding pokeys makes for more comfortable costume wearing. 🙂
Boning is essential in 1870s & 1880s bodices. Seriously. Don’t make a bodice without it!
Hello, I am doing a 18TH century stay, I am not trying to historically correct, so I wonder Are you sewing the boning channels just on the seam allowances? without going through with the seams the underlining and fashion fabric? Thanks
For bodices, yes. I merely sew the bone casing to the seam allowance, pushing back the bodice body to not catch it in the machine. You could also whip the bone casing by hand to the seam allowances (only). My boning seams/stitching does not show through to the outside. Although, 18th C stays DO have the bone channels sewn through all layers.
I’ll tell you my cheater for boning: extra long zip-ties! They are the right width, light weight and cheap, though definitely 100% historically inaccurate.
Hi! Your site has been incredibly helpful and interesting to read over. I don’t consider myself a historical costumer, but I am an avid [very serious] cosplayer, and I treat the “costumes” I make as though they are real life normal clothing— they are not simply Halloween costumes, they are handmade, fitted garments that take a lot of time and skill. I appreciate all the knowledge you have shared through your articles.
The newest outfits I’m trying to tackle seem to be inspired by 1860s-70s clothing/Victorian clothing in general. I plan on making all the necessary undergarments/hoopskirt/etc and using the underlining and boning methods to give myself the right shape in my dress, but I also have to make a men’s vest and coat. Do you happen to know if menswear also used boning along the seams the way you’re showing here? I’ve looked at reference pictures of men’s coats on museum websites, but they don’t look very structured, so I’m not sure. Any advice would be helpful. Thank you!
In all my research, no. Men might wear a short waist corset to smooth the body, but the coats were structured with tailoring methods of underlining layers and the waistcoats/vests were certainly not boned.
So glad you’ve found helpful articles here! 🙂
Help! I’ve been reading your marvellous site and getting lots of inspiration, but I had a question about boning. I’m sewing a quasi-historical dress with a full, gored skirt, short, structured sleeves, high, v-waist, and HOPEFULLY a fully boned bodice. I’ve never done a fully boned bodice before and was hoping for a couple tips. The lass I’m sewing for is very curvy and I’m worried if I use the steel boning that it will stick out oddly at the neck. (It’s a high, wide, embroidered neckline) Any thoughts would be greatly appreciated!
My first question would be why are you wanting to put boning around the neck? Guess I’m not picturing it. Perhaps look at heavy interlining instead such as organdy or even soft, plastic bones for support. There’s other methods than steel boning, which I wouldn’t use on a neckline except for just a tight collar as in the Edwardian bodices & guimpes.
The boning would be running up the front and sides of the bodice, along with princess seams, etc. The seams with boning on them would continue up to the neckline where they “dead-end” into an embroidered collar. The bodice needs the support of the boning, but I’m afraid that when it comes up over the bust it will not want to curve back down over the bosom and will instead continue upward in the manner of inert objects. I’ve not worked with boning a great deal, and never actually with steel boning, so I may be wrong in thinking of it this way. Does it tend to curve WITH the fabric/seam it is attached to, or will it fight to stay in a straight line?
On the bodice you show at the top of the page, you have a stay at the centre (I’m assuming that’s the front?) and side seams, and such, but all these pieces are short and do not extend over the bust. There is no boning on the princess seams…
Thank you for taking the time to answer, I’m sorry it’s such a convoluted question!
Generally boning ends a the full bust level in front and shoulder level in the back. It is VERY rare to have boning go above the bust. A high collar would be supported separately than with boning continuing from the bodice. I don’t advise bones placed above the apex line.
Different types of boning act differently. Metal bones follow the channels they are sewn into. Plastic boning can bend and will many times force the garment to bend with it. The other thing with plastic boning is that (body) heat can make it deform into the shape of whatever it’s around which then destroys the intention of support you need. It has its uses, but be aware that it can change shape on you.
Alright, that makes sense. Thank you so much for answering, you may have just saved my project!!
I’m working on a sleeveless bodice, I drafted and constructed by following the directions in a number of Dressmaking books from the 1880s. I’m to the point with the bodice that I need to decide how I want to finish out the front closing edge. The books give pretty good instructions on hook and eye, buttons, or lacing, and I’m considering lacing, but what I’ve noticed is that none of the books say anything about putting boning along the front edge, but when I look at images on the internet of antique front lacing corsets it looks like to me there is boning between the eyelets and the edge of the fronts. For the 1880s/1890s was boning common on the closing edges?
My apologies, when I said “front lacing corsets” above, I meant “bodice.”
Whenever you have eyelets/grommets and lacing you need a bone at the very edge to support the lacing and keep it straight. I haven’t come across too many front lacing bodices in this era unless they are a wide belt meant to go over a fitted bodice. In fact, a front laced bodice is foreign to me in the Late Victorian period. But again, you need to have a bone at the edge to support the eyelets.
Thanks so much! I have had a hard time finding images of late victorian front lacing bodices on the internet, which also made me think it must not have been commonly used, lacing I mean. I have found a couple, and like you said it looks like there was a bone at the edge. I may just go with hook and eye (sounds like it would be the easiest and represent what was most commonly used at the time, but the book I’ve been referring to the most to make the bodice, called “Hecklinger’s Ladies’ Garments” printed 1886 (viewable at archive.org) has a wonderful illustration of a low neck front laced bodice and I really like the way it looks. In fact, they have two illustrations of front lacing examples, One with a low, curved neckline and one with a square or rectangle cut. Although the book gives instructions for both boning and methods of closing the bodice, in either section it doesn’t say anything about placing a boning at the front edge. Thanks again for answering. 🙂
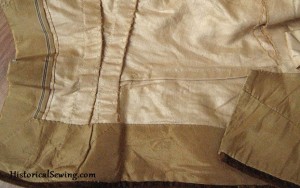
I’m a little confused how do you sew the boning into the seams without the stitching showing through to the front? Do you do it by hand or machine?
The casings are only sewn to the seam allowances. You flip the rest of the bodice out of the way to attach only to the seam allowance.
Thanks for the tips I’d like to know how to make a corset top using Gipure lace with Lemais as a lining? I intend inserting the bones in casings sewn on the lemais , but I am not sure how to attach the Lace . Also do I sew normal darts in the lace? The latter is very expensive!
I’d recommend hand basting and sewing the lace to the lame’ (is that the fabric you’re using?) so you can have precise placement.
Do you do custom orders? I would love to pay you to make me a Civil war era corset
🙂
Thanks for the confidence Charlsea. 🙂 For various reasons I don’t do full custom orders. However, if you have the finished (i.e. fitted) pattern & supplies, I’ll sew it. Use the Contact page if you want to proceed.
Can you explain how to bone a dart? Do you encase the bone in the dart, or do you open up the dart and bone it like a regular seam?
Both methods are period correct & documented. Thanks for the question – you’ll see a new article on this in August. 🙂
And just like that, you’re my new best friend!!
I got the truly victorian long tailed bustle jacket pattern and it had placements and tips for placing boning in it, and i wasn’t sure, so we put the casings in, tried it on over the corset, put the boning in, and damn- such a difference!
I was making four full bustle outfits for a wedding (one in silk for the bride and three in cotton for us bridesmaids), so budget and timing was an issue. (and the youngest bridesmaid was 11, so her jacket was quite small). We ended up using heavy duty duct ties in all the straight seams and for the princess seams some weird plastic cord stuff I found in the upholstry section. we wanted the buttons close to the edge, so the center front boning was regular zip ties (except the littlest bridesmaid, I used weedwacker string for her center front and dart bones!)